Diagnosis:
This guide aims to fix the common issue with the any vehicle that uses the Denso Display Control Unit Screen (Or DCU Screen) as it’s infotainment unit. This includes but is not limited to, the R52 Nissan Pathfinder, Y62 Nissan Armada, Infiniti Qx80 (Most of the Infiniti lineup from 2013-2022), and possibly some Toyota models– The common issue is when the infotainment system (DCU Screen) enters a failure mode that results in Dealerships charging in excess of $5600 + Labour. That failure mode typically presents itself with these symptoms, or variations of them:
- Center screen not working (black, but backlight on)
- Center screen showing only Nissan (Infiniti) logo
- Center screen going in a loop (shows logo/tries to start etc and then restarts)
- Any of these symptoms or more AND, backup camera still works.
The last one is fairly key, as it shows that it’s not an issue with the display, it’s an issue with the operating system. I have a full breakdown of how to diagnose the issue on the Display Issue Diagnosis page, linked below.
To break down why it fails, the TL;DR is, the operating system is stored on a MicroSD card inside the DCU (a very cheap one). After enough time, this MicroSD card fails (due to a design flaw, and it’s cheapness). This causes the symptoms that we see people post about on the forums countless times, and usually results in DCUs that get replaced; sadly, often by Dealerships for far too much money. I had this happen to me, and when I discovered how much it cost, I wanted to do it myself; and I did. After weeks of diagnosing and even being unable to find a used part that matches mine, I tore apart the DCU and discovered the SD card. After digging through the files and some research, trial and error, and an eventual aha moment I got it booting again on the original SD card.
There are two copies of the operating system (OS) on the SD card, and I was able to get it booting off the second. I was uncomfortable with that, though, as I knew it was only a matter of time before it happened again; and I wanted to create a backup of it for when that happened. This was over 2 years ago, and I’ve been running the cloned image on a faster Micro SD card since with no issues. It’s also been more responsive since I did the fix, as I used a class 10 Micro SD card instead of the terrible class 4 that it came with.
Preparation:
I’ve created this guide to detail the process of removing the DCU, opening it up, cloning & repairing your own SD card, and reassembling everything— as well as everything else I can think of that might be helpful for the process. I also intend on creating and sharing a repo of working and tested images that you can contribute to, as while I have been able to spread my image to other vehicles without issue many times now, I’d like to collect as many of them as possible incase there’s things like updates, different features from different regions, and to expand beyond Nissans/Infinitis.
To contribute an image you’ve created and tested, please join the discord and find the repository information there– and please make the file name make-model-year-trim-region-optionalvin:
I also now offer these Micro SD Cards for purchase for those that don’t want to undergo this process.
- If you wish to purchase a pre built SD card, check out the repair kit compatibility list below.
- If you already have a Micro SD Card, and want to know how to recover your own image, I provide the full instructions free of charge right here on this page.
- And lastly, if your vehicle is not compatibility list yet, check out the bounty program here!
Requirements:
The guide for the entire process, start to finish starts here. If you wish to jump to the other guides you can find them here:
Before jumping in, I’ll give a list of parts needed and useful tools for getting at the DCU. Parts needed:
- A 16-32GB Micro SD (Class 10, UHS 1, V10)
- (This will be provided by me if you purchase a Repair Kit)
- The card cannot be larger than 32GB, or the DCU may not recognize it.
- Class 10, UHS 1, V10 should give a speed rating of 10MB/sec. This is greatly improved over the 4MB/sec card that you’ll be removing from the DCU, and your touch screen should feel faster.
- A good quality name brand is highly recommended, it will be subject to high vibrations and heat.
Tools needed:
- Plastic trim removal tool (For DCU Removal)
- Philips Screw driver, preferably magnetic tipped (For DCU Removal)
- A computer capable of running Linux (This guide is written with Ubuntu in mind), with at least 10GB of free space on the drive.
- If you purchase this computer (or have one laying around), you’ll need to install Ubuntu on it. Click here to find the guide for this. (Coming soon)
- (If purchasing a Repair Kit, you won’t need this).
- A Micro SD card reader
- (If purchasing a Repair Kit, you won’t need this).
Time Needed:
- Estimated 30-60 Minutes
💡 Note: A Windows or MacOS computer is not capable of performing this repair. Windows cannot read EXT4 partitions properly (even with WSL), and MacOS puts index files on every file system it touches which breaks the SD card. A Linux machine is a requirement for the DIY method.
Finally, before beginning this process, it’s important to note that while the success rate of this process is very high, I have encountered a few cases where the SD Card in the DCU Screen was too far damaged– and this repair method either didn’t work, or partially worked. If this happens to you, join the discord server and reach out to me directly.
The Guide:
This section previously contained information specific to the R52 Nissan Pathfinder, but this has been pulled out and moved into it’s own article here. This article will be covering the DCU Screen repair method only, and assumes you have already removed your DCU Screen from the vehicle. The instructions for removing the DCU from an R52 Pathfinder can be found here; and the instructions for removing the DCU from a Y62 Armada can be found here.
If you have another vehicle, I may have a guide specifically for you as well; check out the guides section.
Done with the preamble, let’s begin with the guide!
Step 1: Remove the first set of screws from the DCU
-
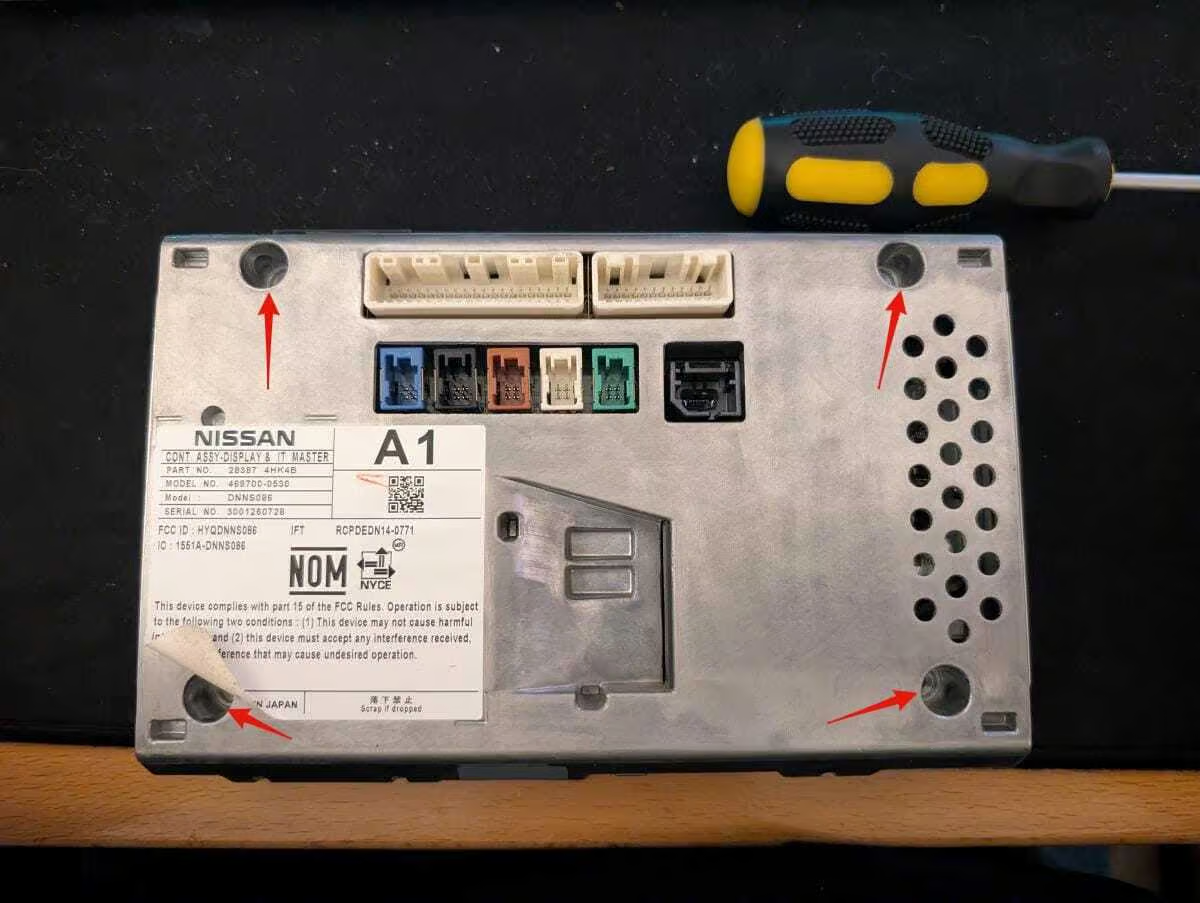
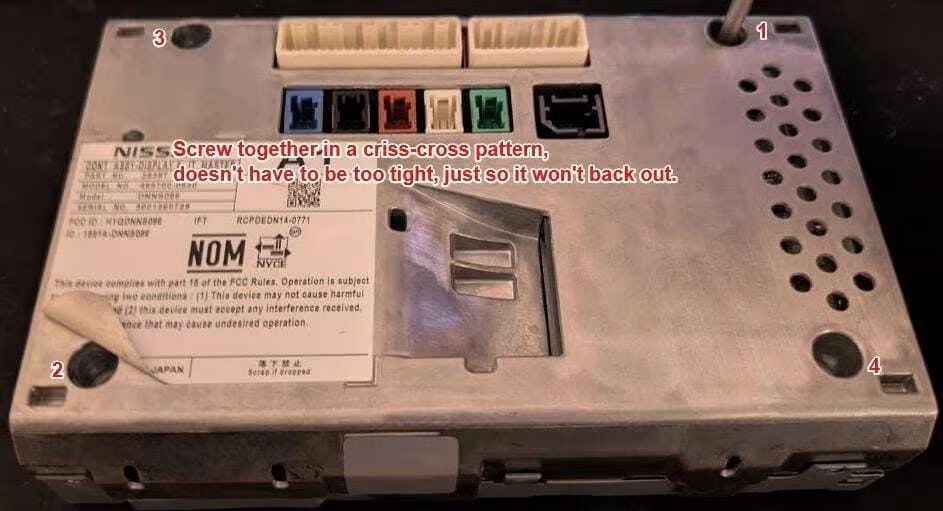
- Step 1a: Remove the first four screws on the back of the unit, one of them is under the Denso logo on the label.
-
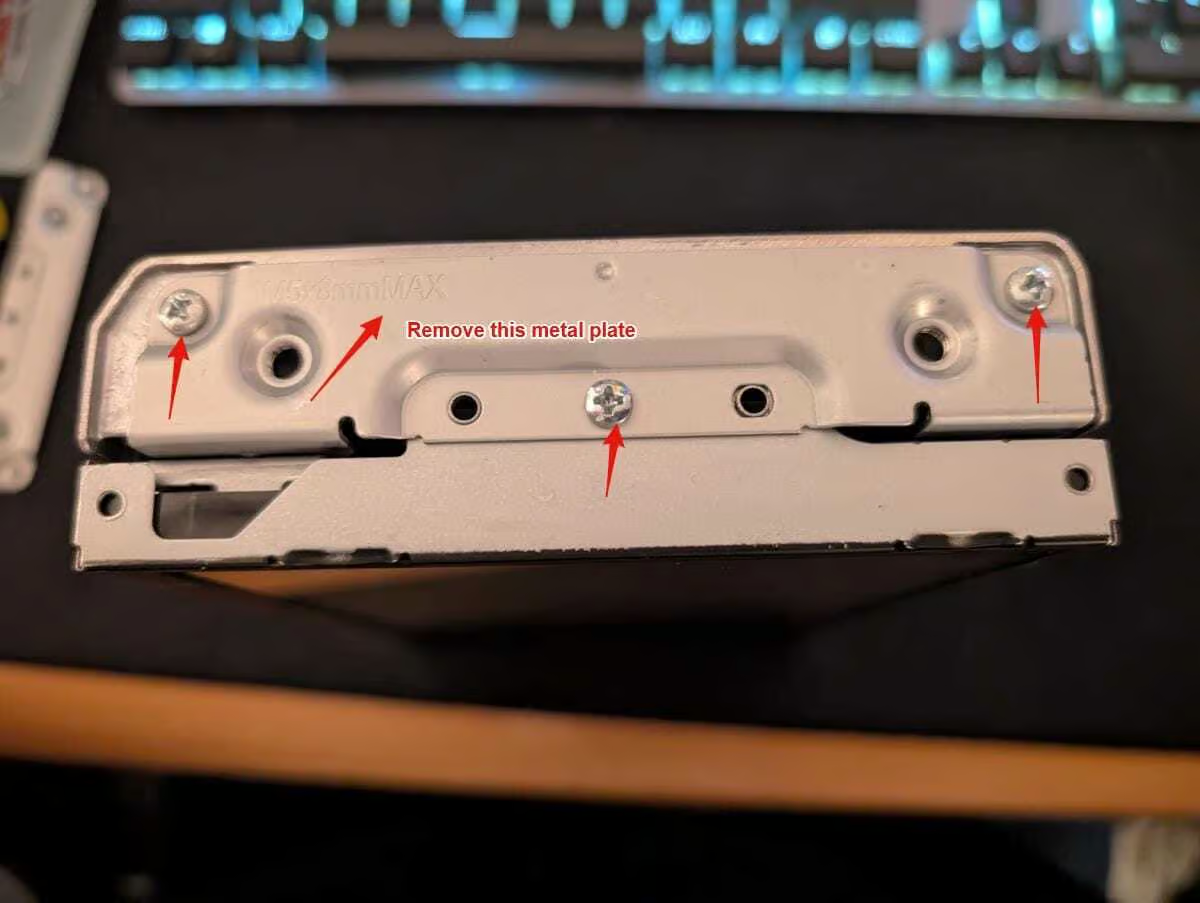
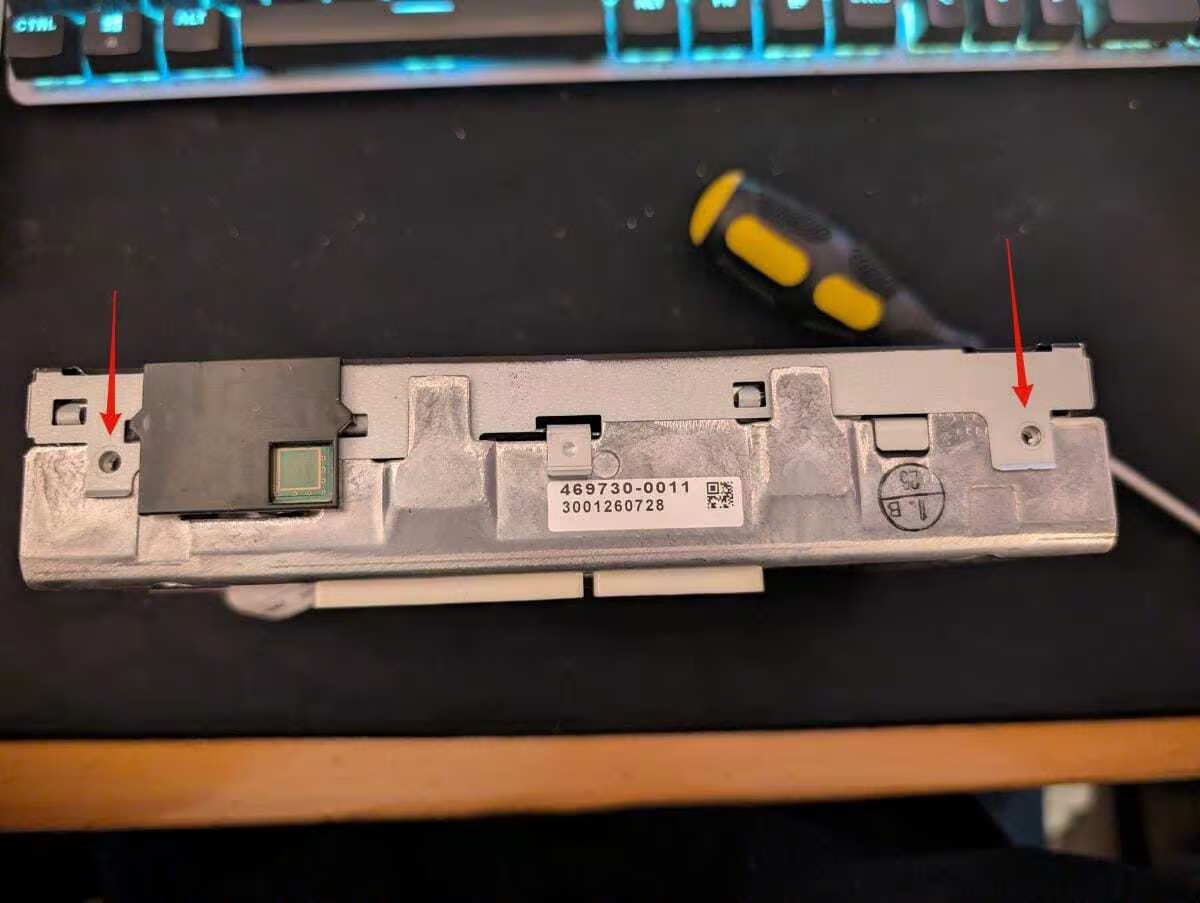
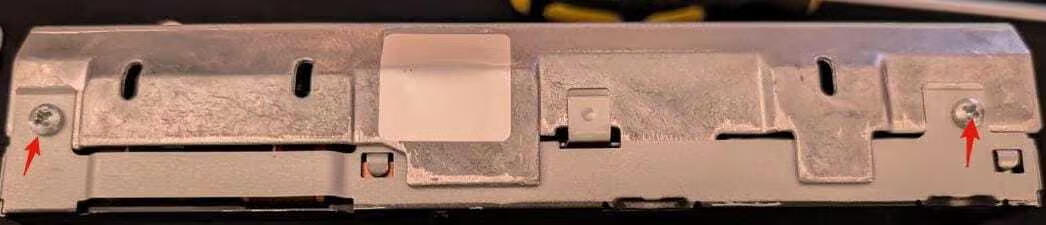
- Step 1b: Remove the screws, and metal bracket from the first side.
-
-
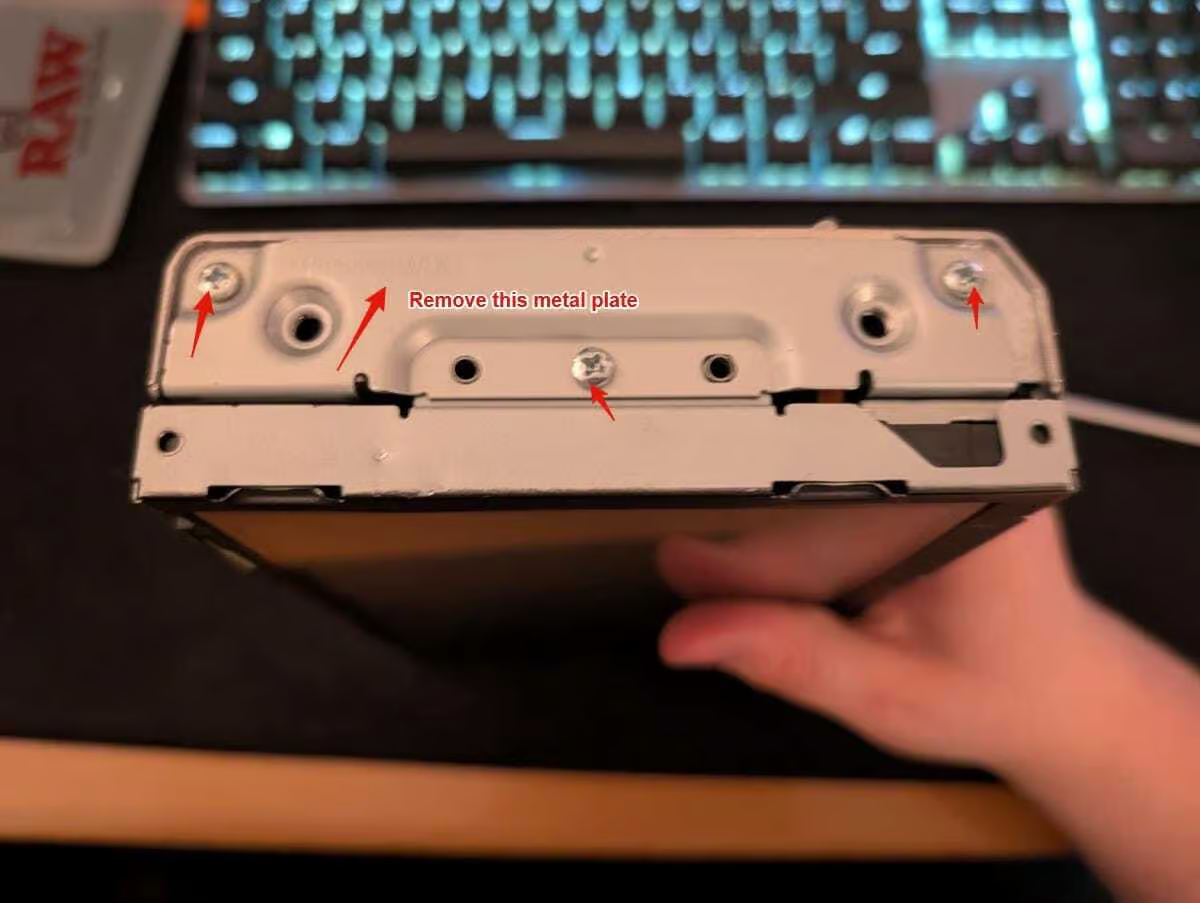
- Step 1c: Remove the screws, and metal bracket from the second side.
-
-
-
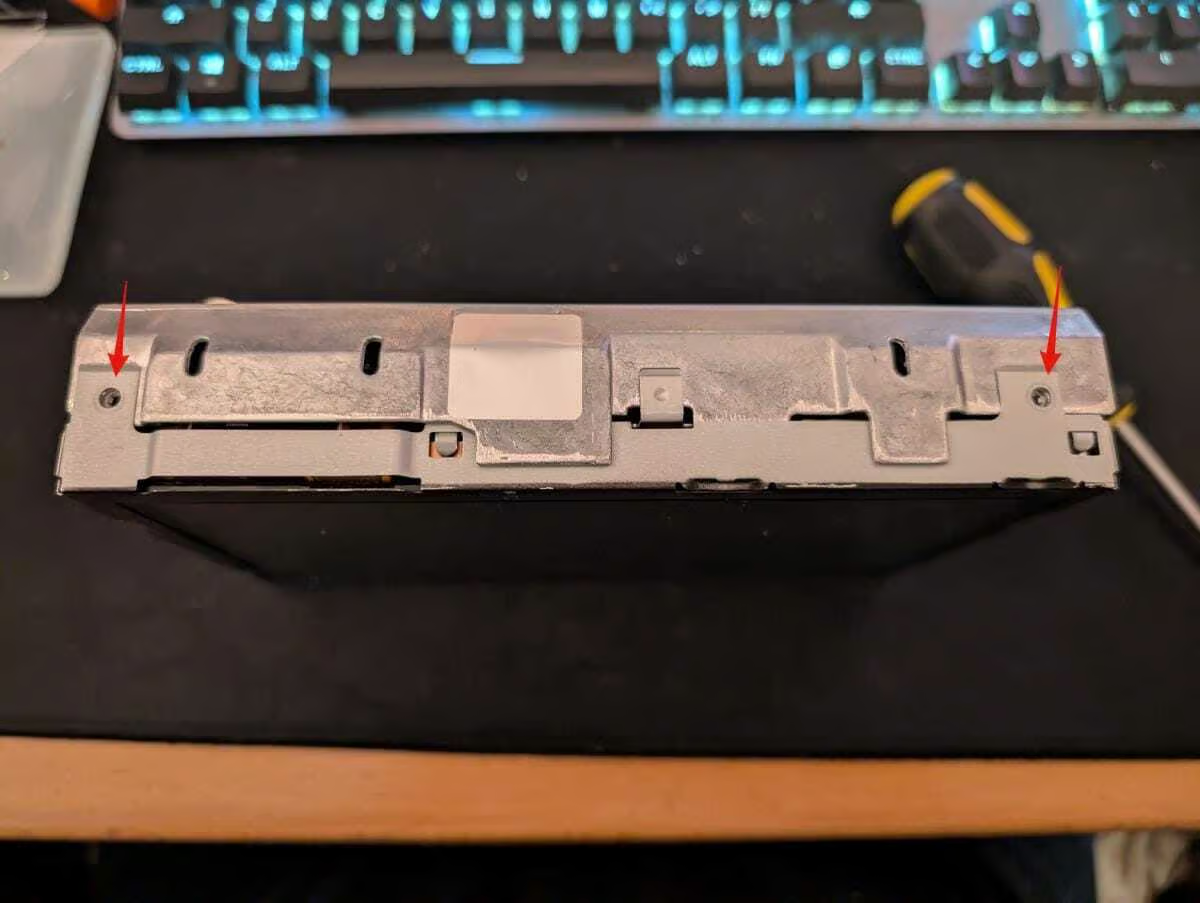
- Step 1d: Remove the two screws from the top.
-
-
-
- Step 1e: Remove the two screws from the bottom.
-
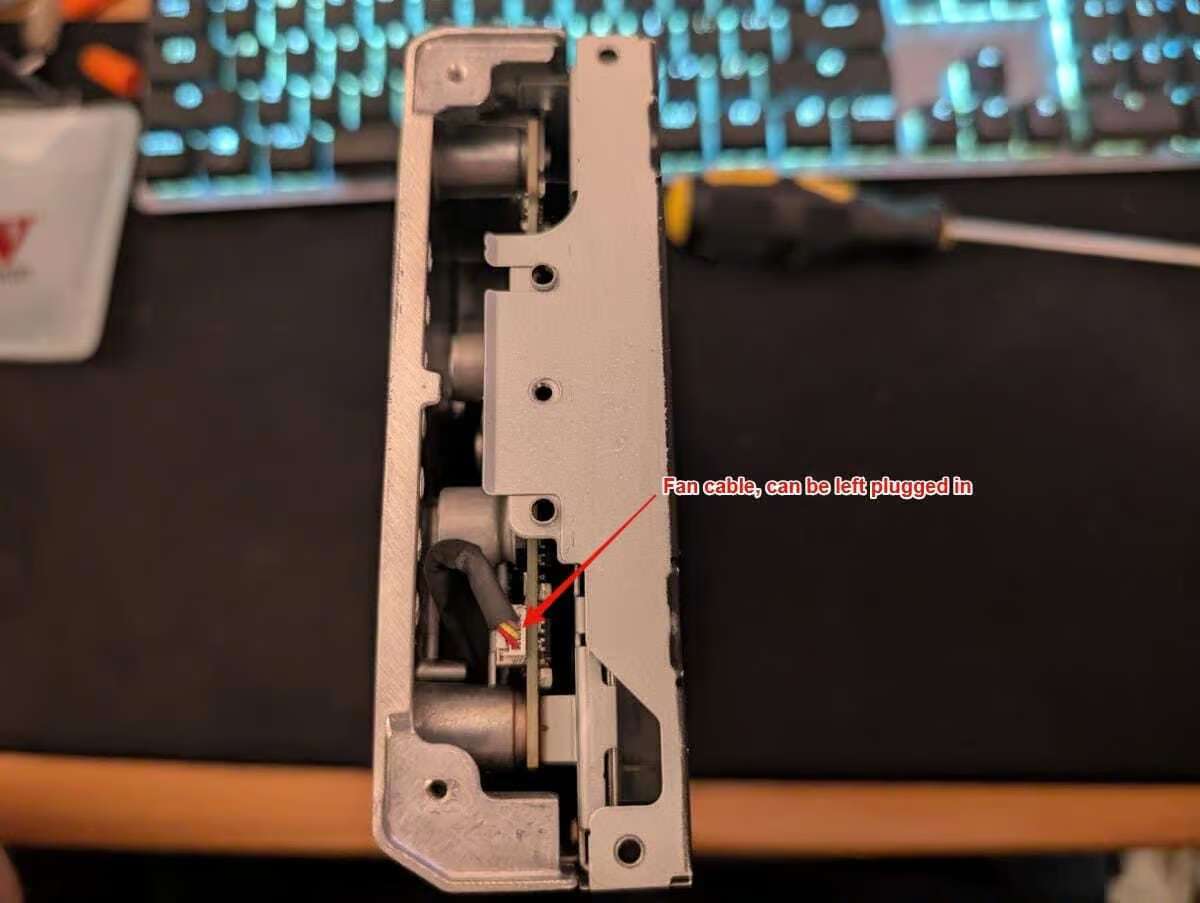
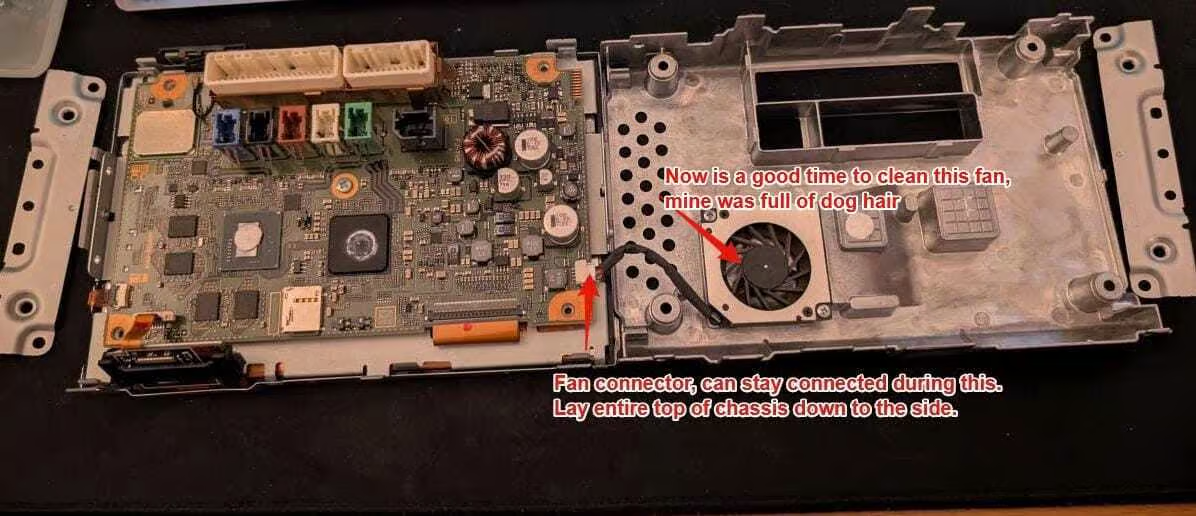
💡 Info: This fan cable can be left plugged in, or you can unplug it if you’re concerned about breaking it. There’s plenty of extra cable as you’ll see later.
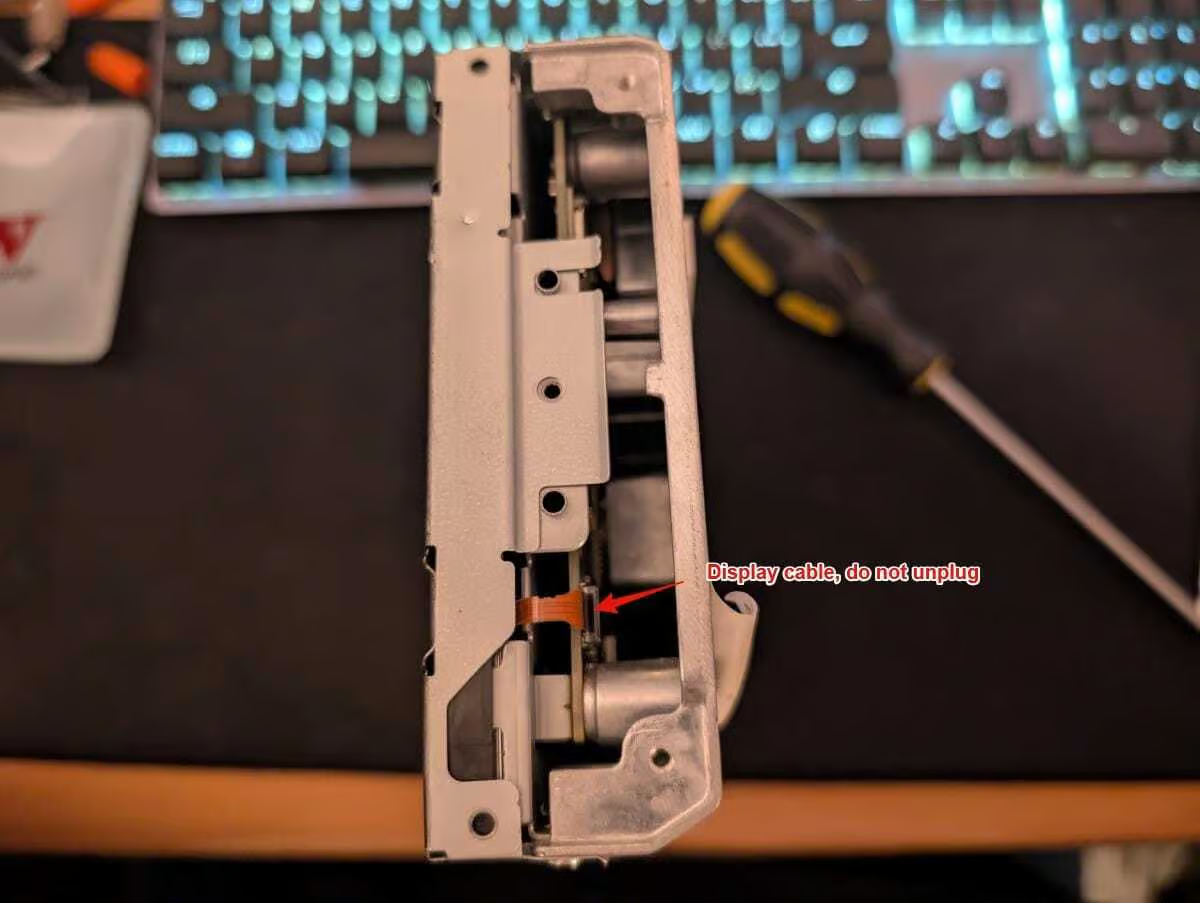
💡 Info: This display cable should be left plugged in, as it never moves with the top case.
Step 2: Split the DCU apart and remove the SD Card
-
-
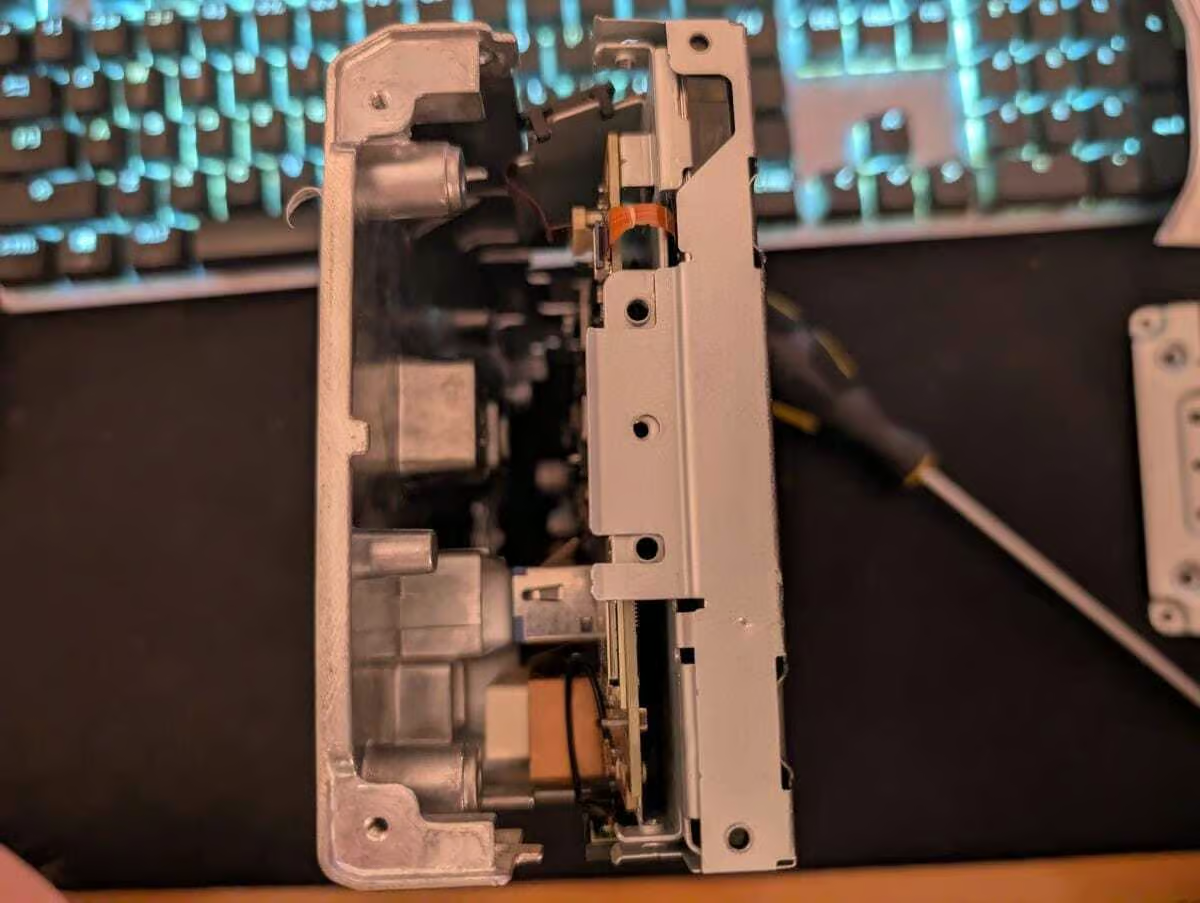
- Step 2a: Stand the unit up on it’s end, and gently but firmly split the unit. Pull only straight out, and once it splits, stop pulling. You’re got extra cable slack on the fan but there’s no need to go any further than this. (You can lever one side slightly if you need to, but do not use tools)
-
-
-
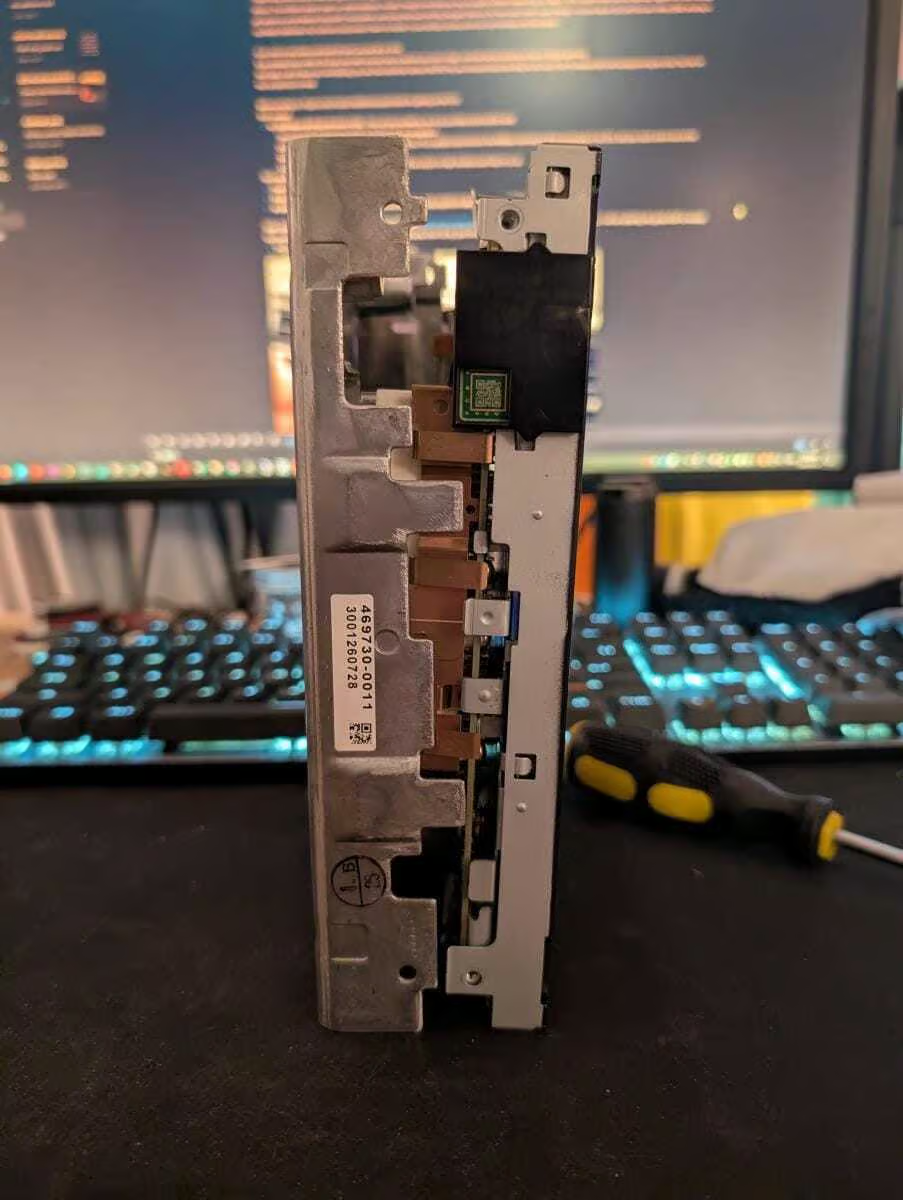
- Step 2b: A view from the side, you can see the dimples holding the halves together, they’re not large.
-
-
-
- Step 2c: Lay the display down on something soft like a cloth or mouse pad, and the metal shell with the fan can be laid down to the side. If you’ve left the connector for the fan on, it should look like this.
-
Step 3: Remove the MicroSD Card to perform the repair.
-
-
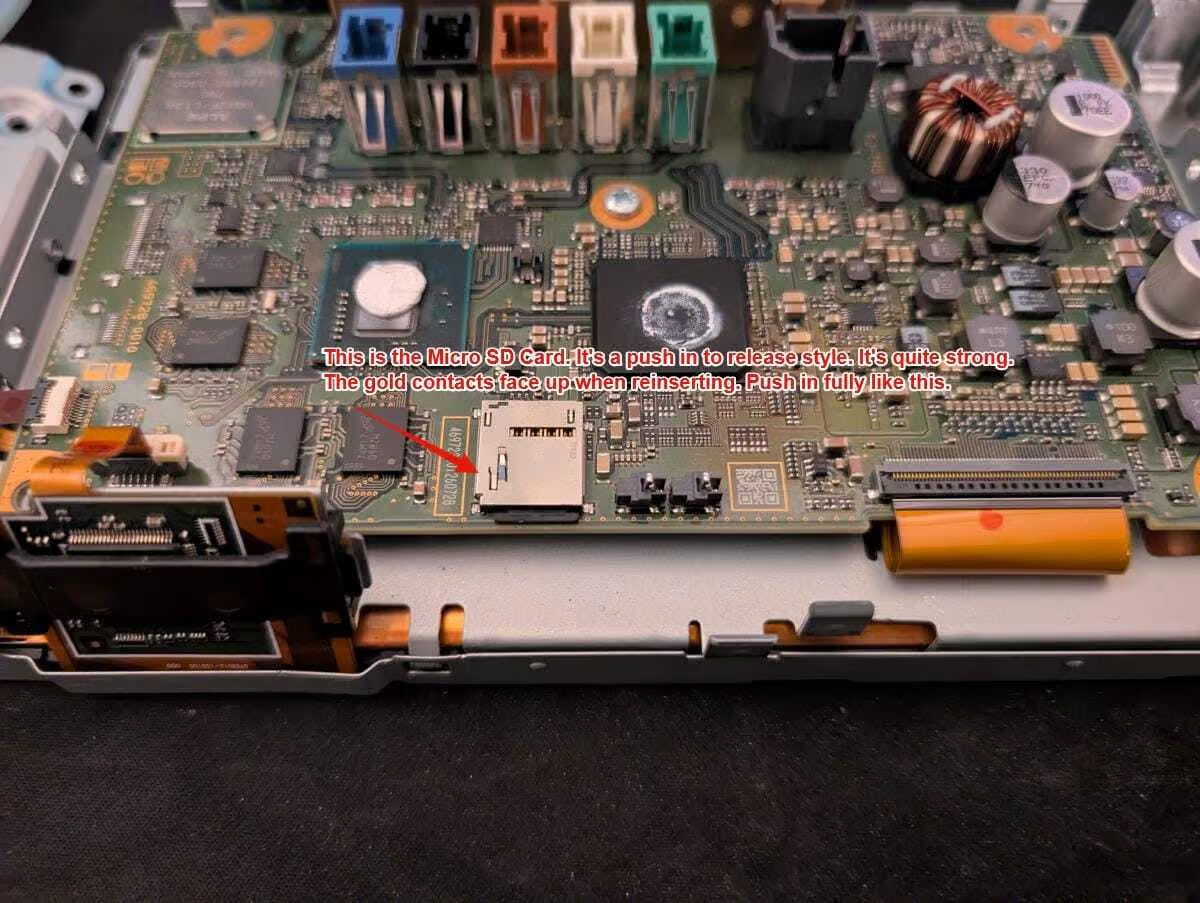
- Step 3a: Here is the MicroSD Card you need to work on. Push the card in with your fingernail until it clicks, and then release. The card will pop out. When replacing with the new repaired card, insert with the gold contacts facing up.
-

Step 3: Locate & Mount the SD Card in Gnome-Disk Utility.
-
- Step 3a: Once booted into Ubuntu, open a terminal and type “sudo apt-get install gnome-disk-utility”, enter your password and follow the prompts.
- Step 3b: After it’s installed, open it with terminal by typing “gnome-disks”.
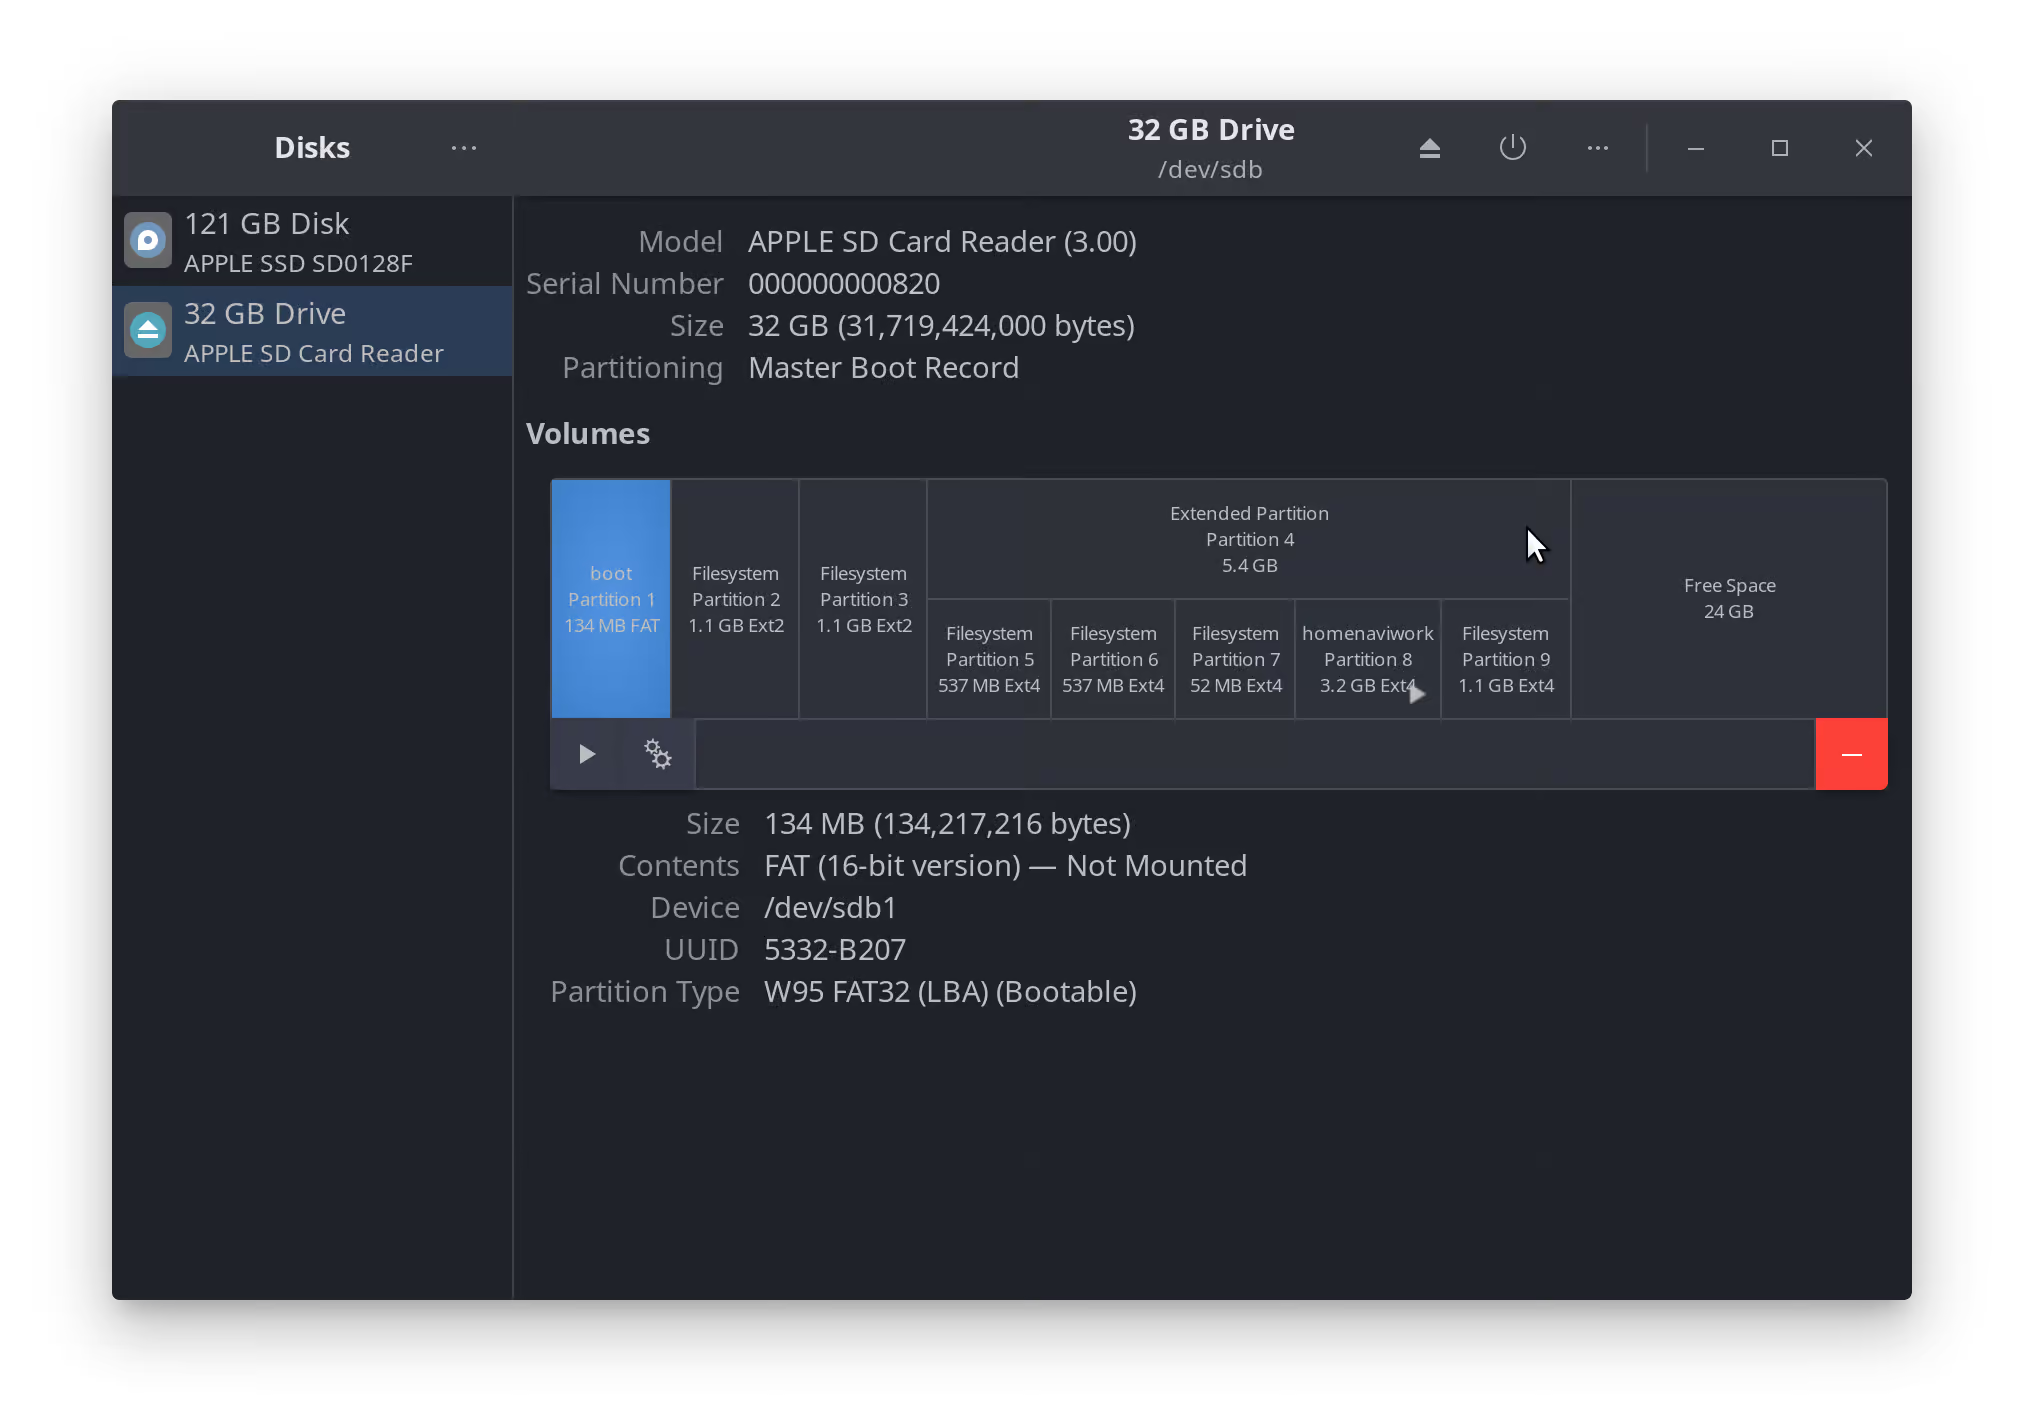
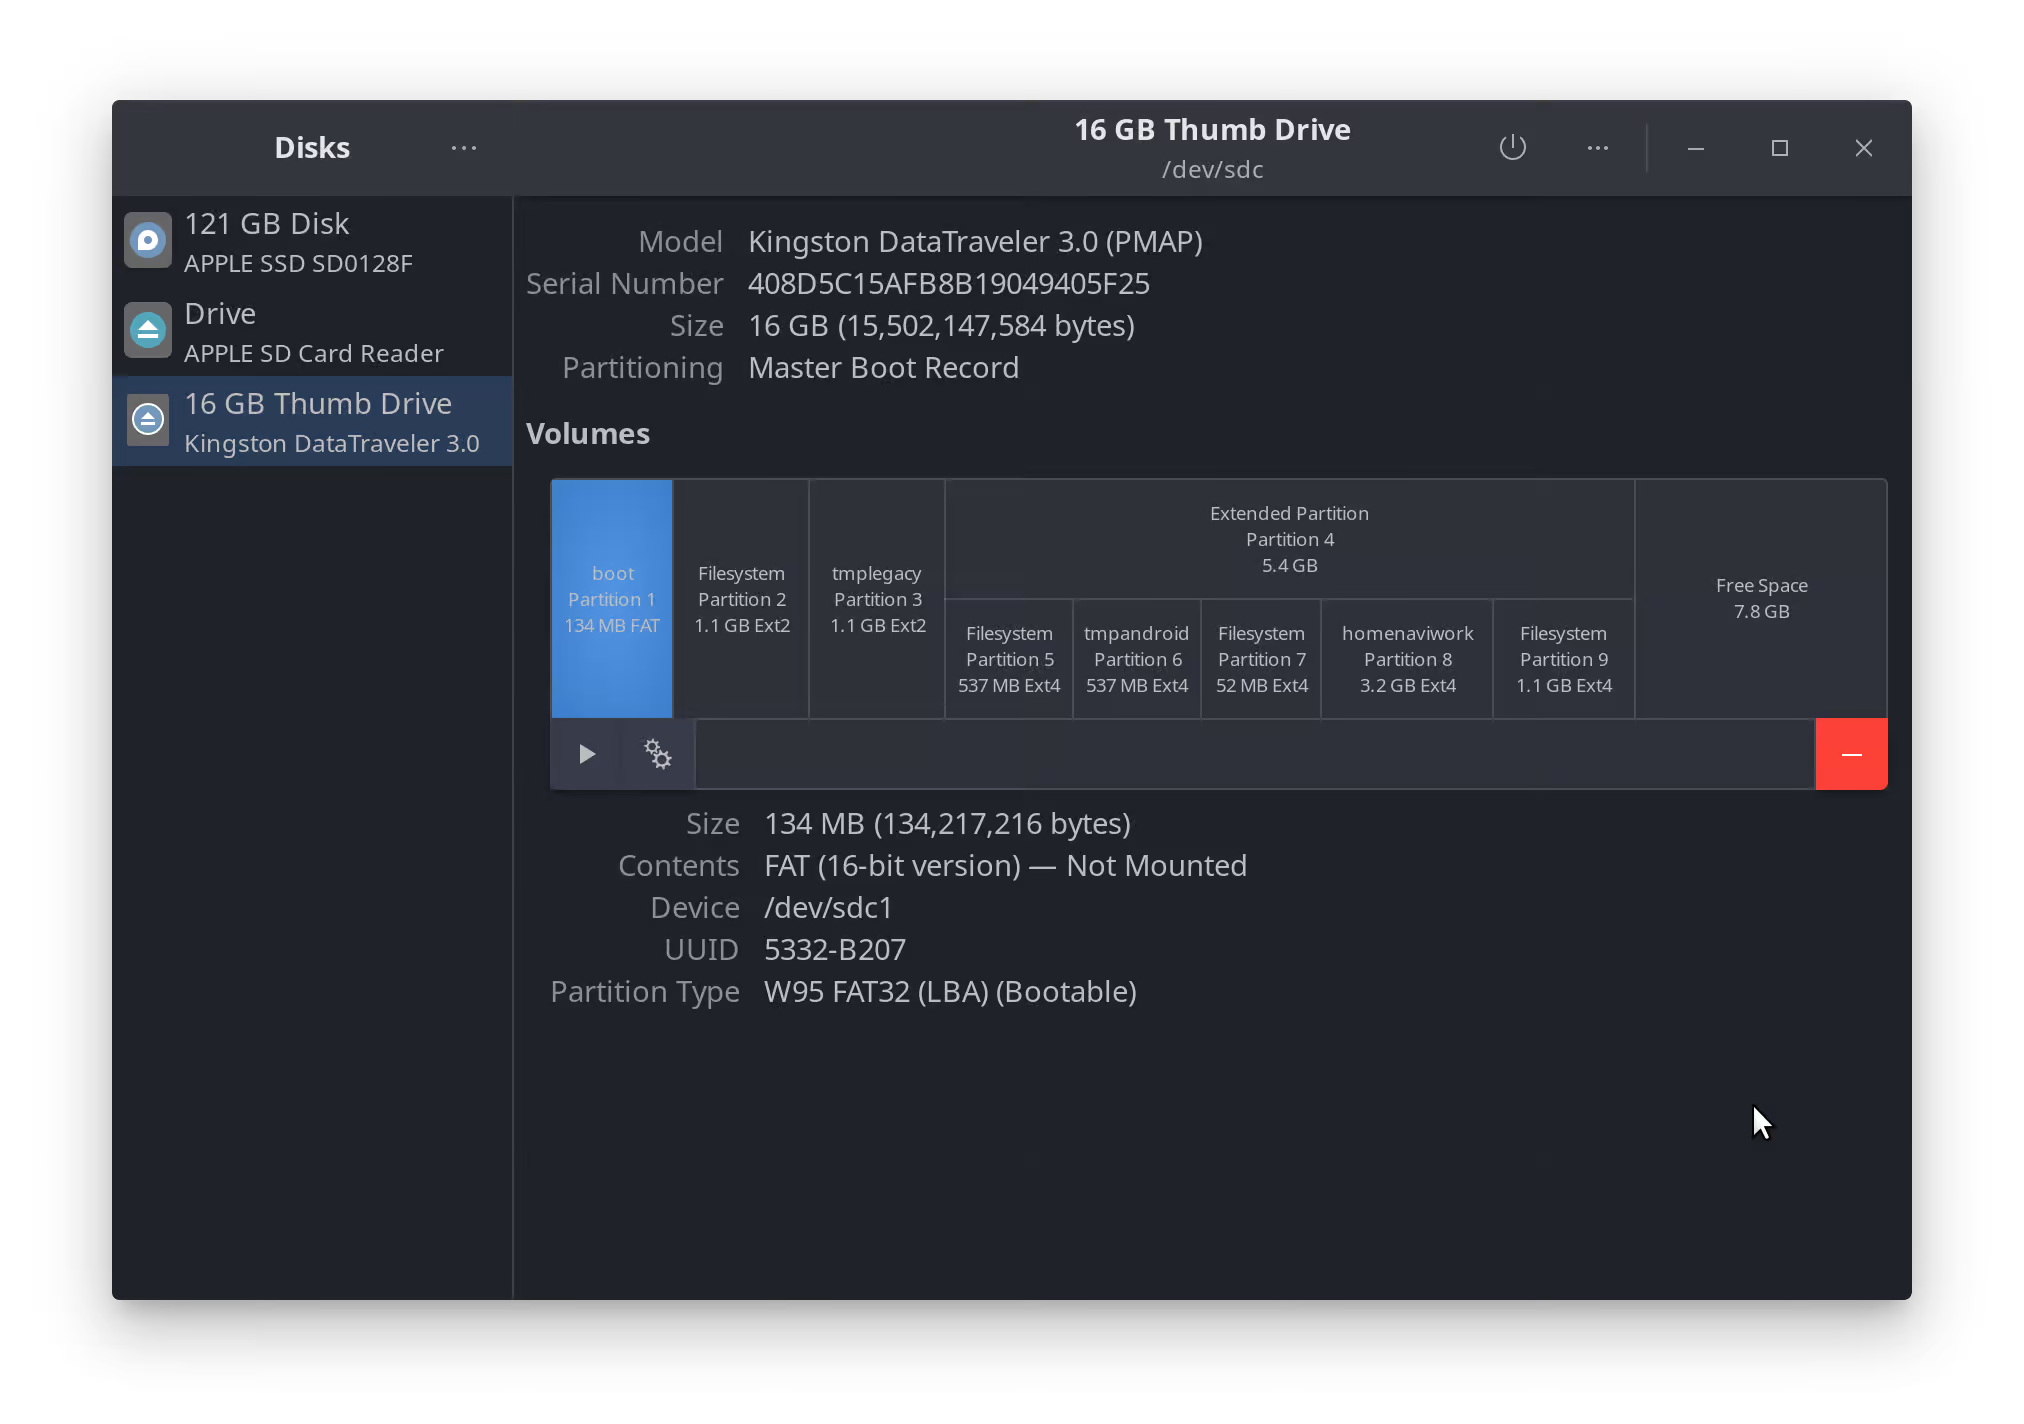
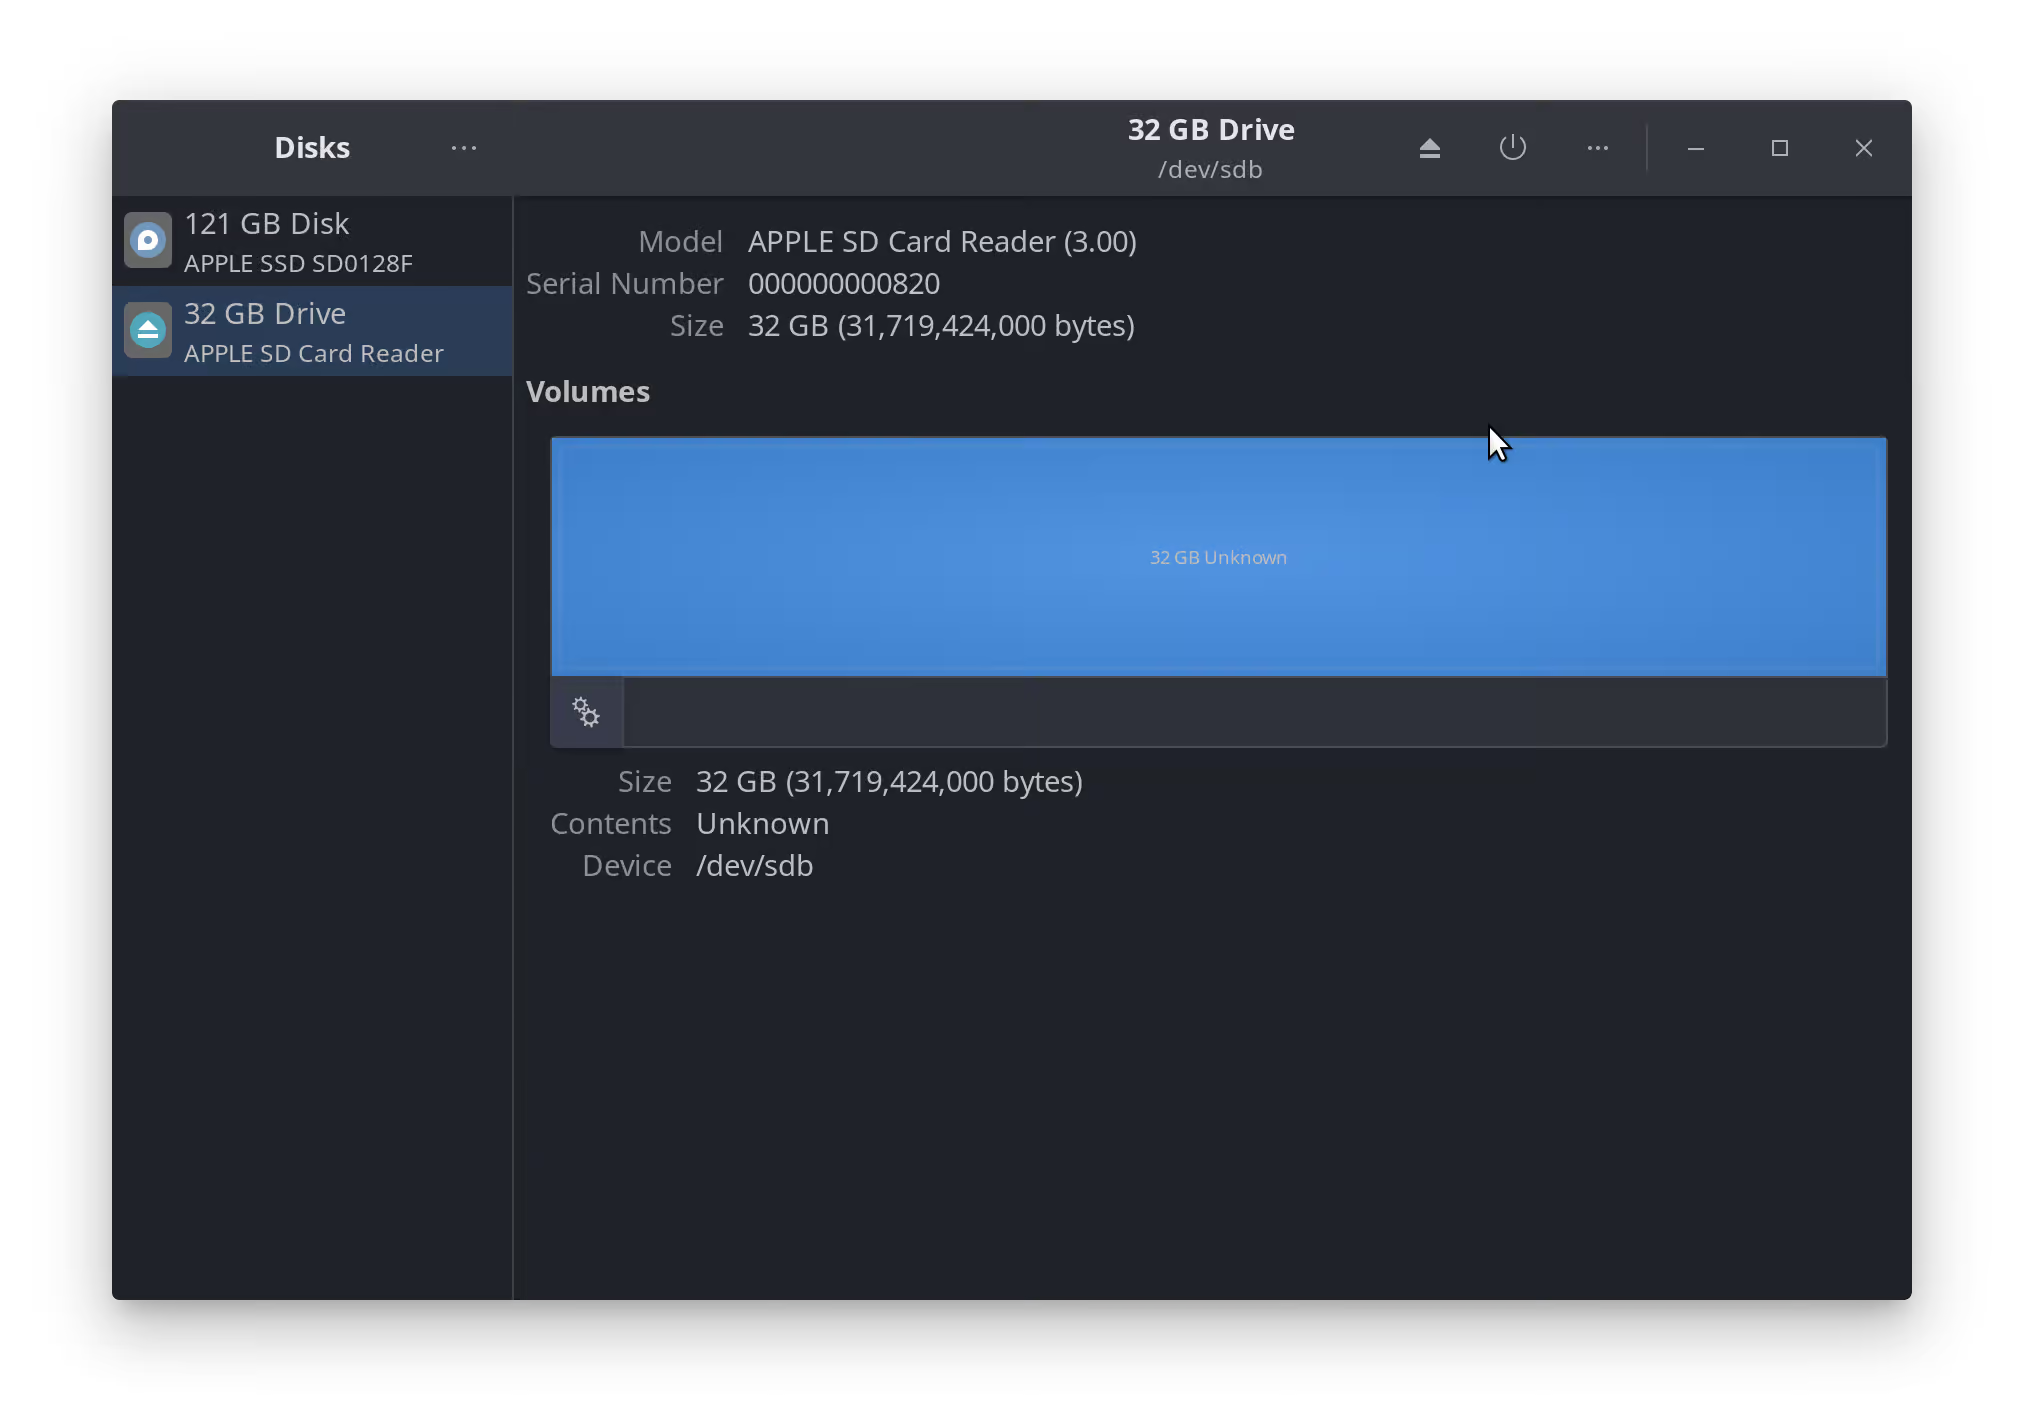
- Step 3c: In the program that opens up, you should see a list of disks. Find the Micro SD Card, it should be an 8GB Disk with a bunch of partitions; select it.
Step 4 & 5: Repair & Clone Micro SD Card to .img file using linux
- Step 4: Change the Boot Configuration File on the old Micro SD Card, before cloning it.
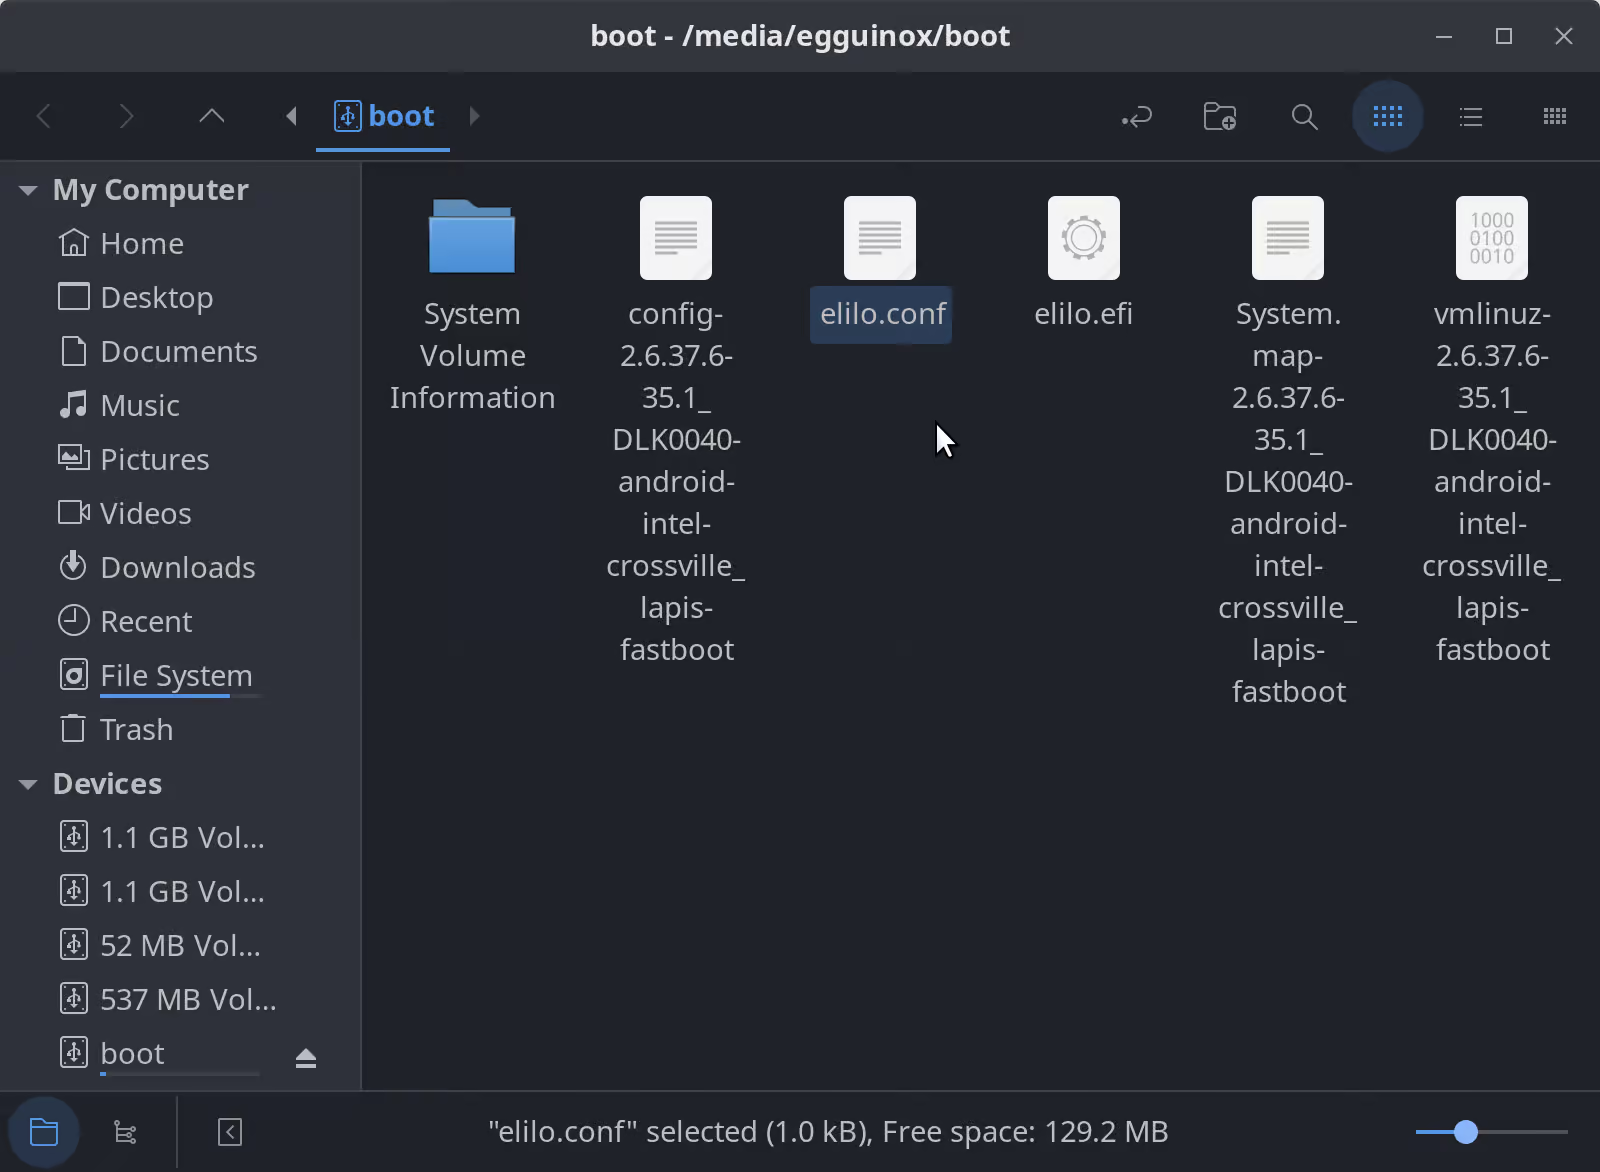
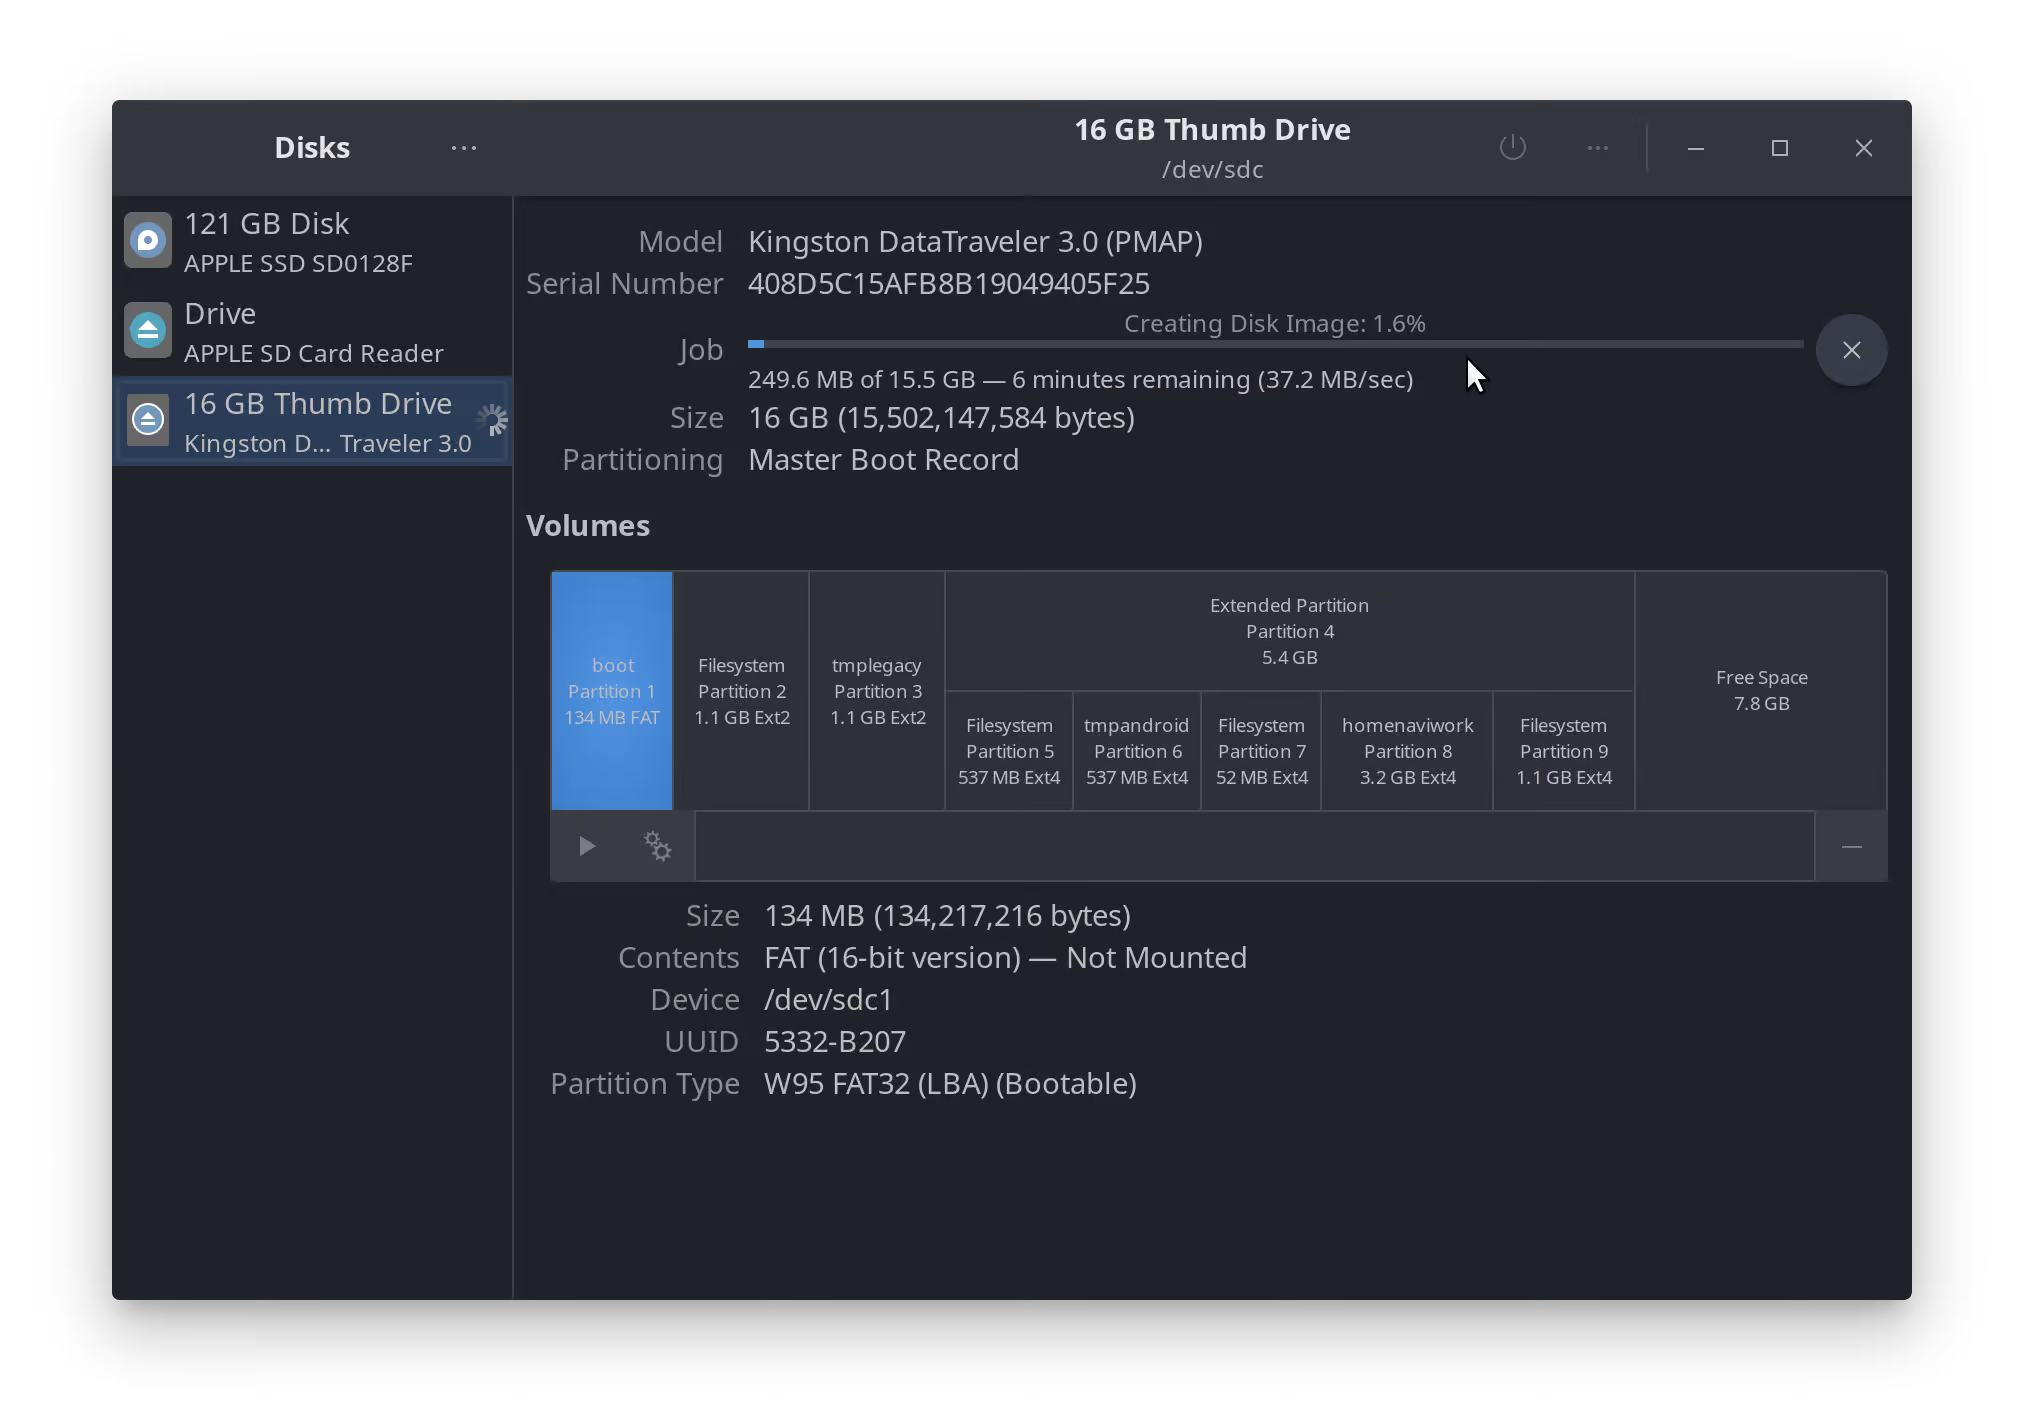
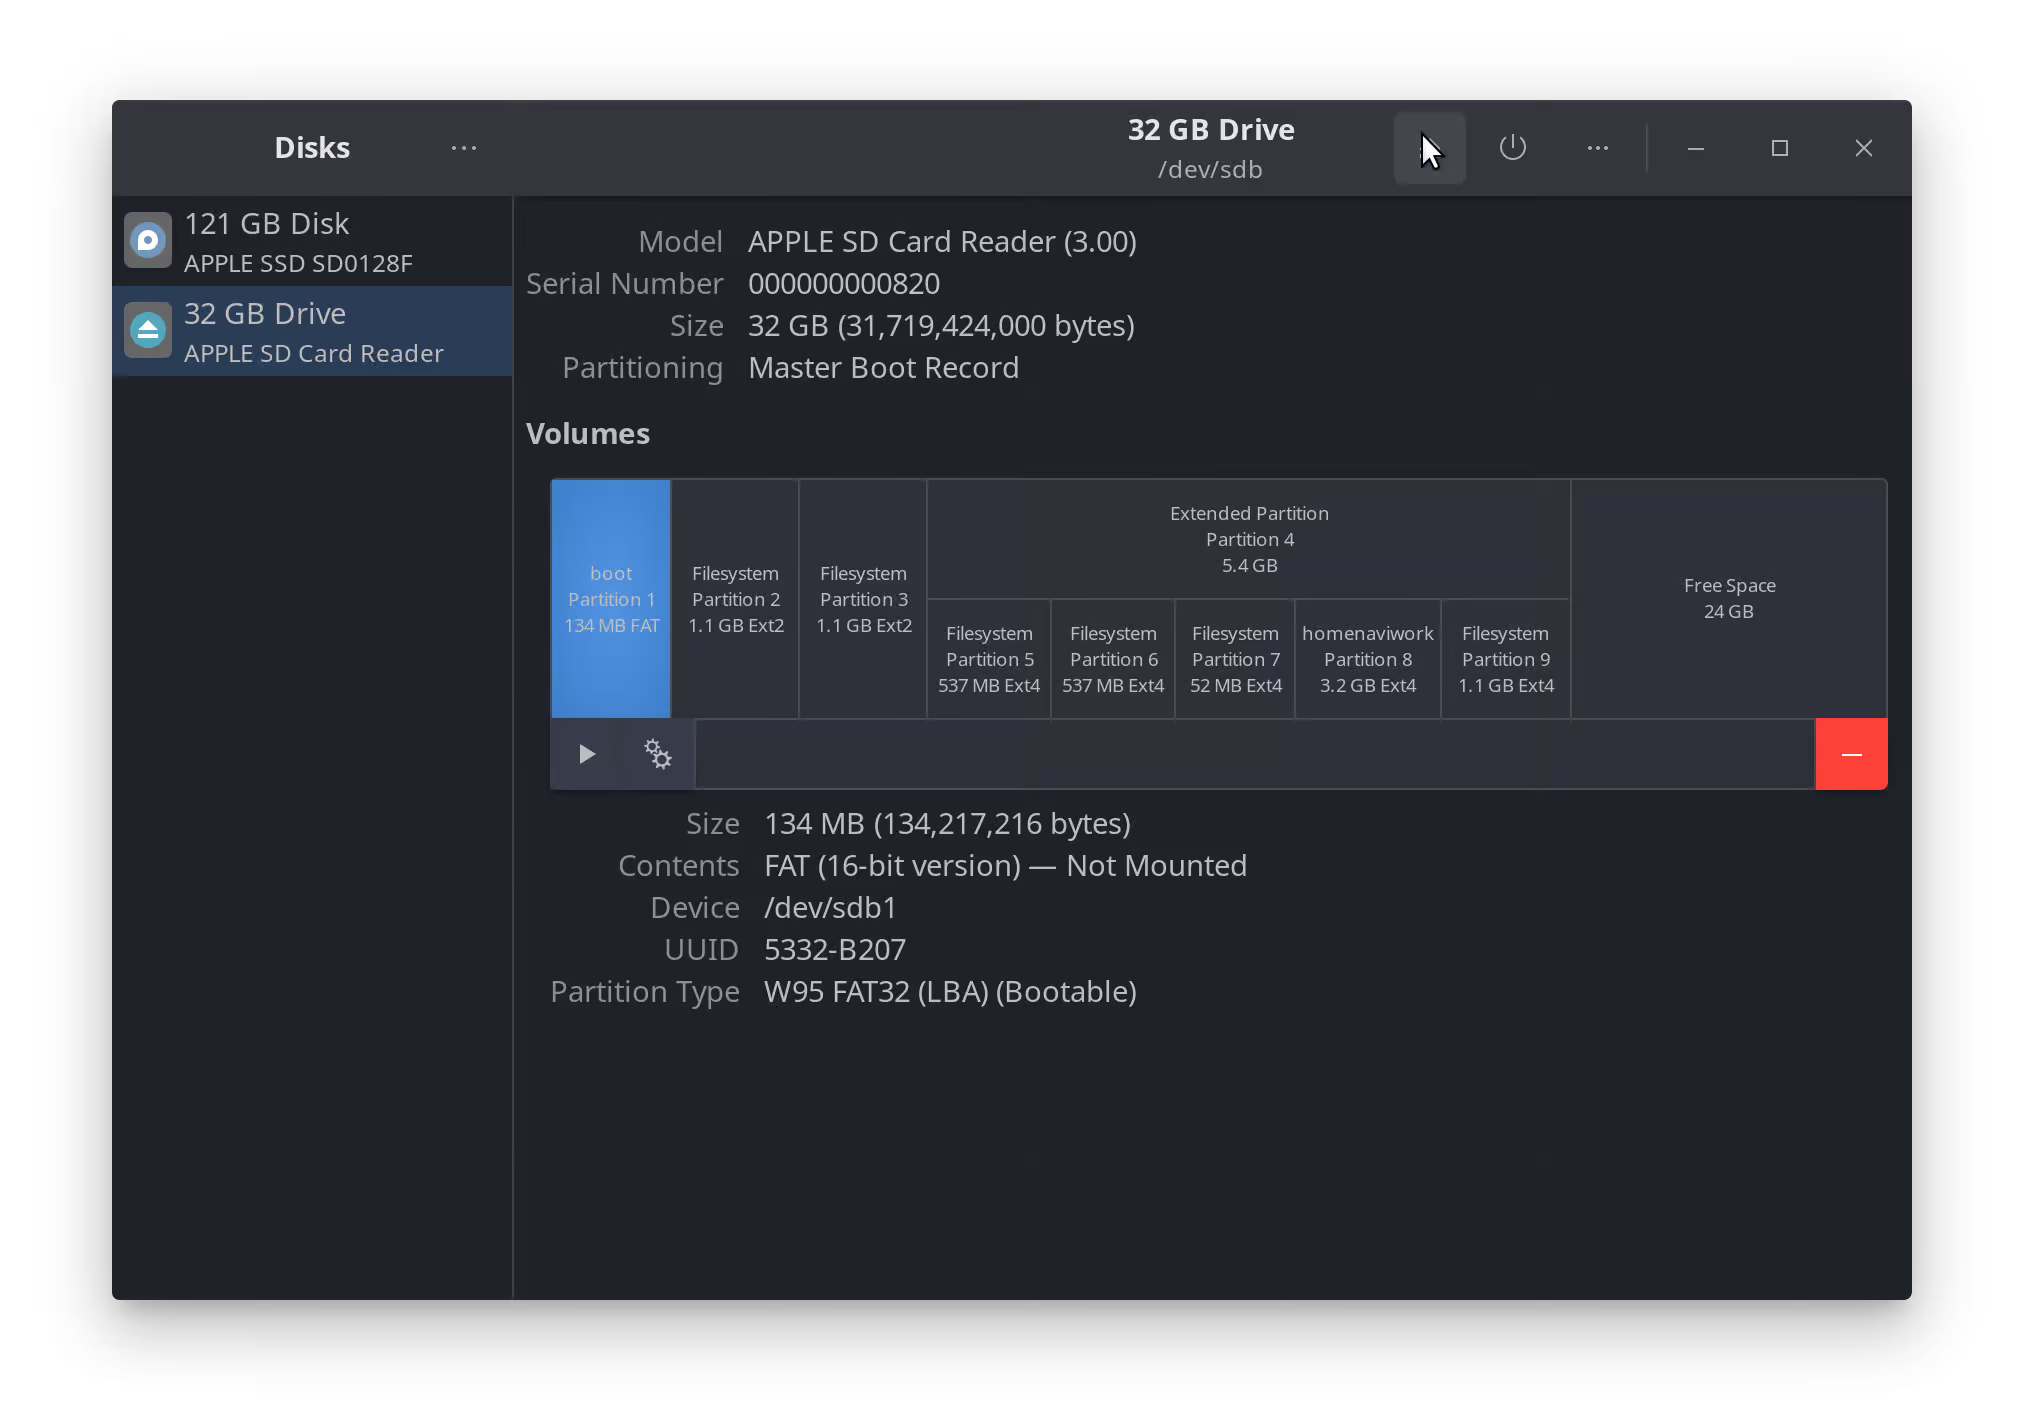
- Step 4a: Locate the first partition on the drive and mount it, it will be 134MB in size and contain a file called “elilo.conf” that we need to edit.
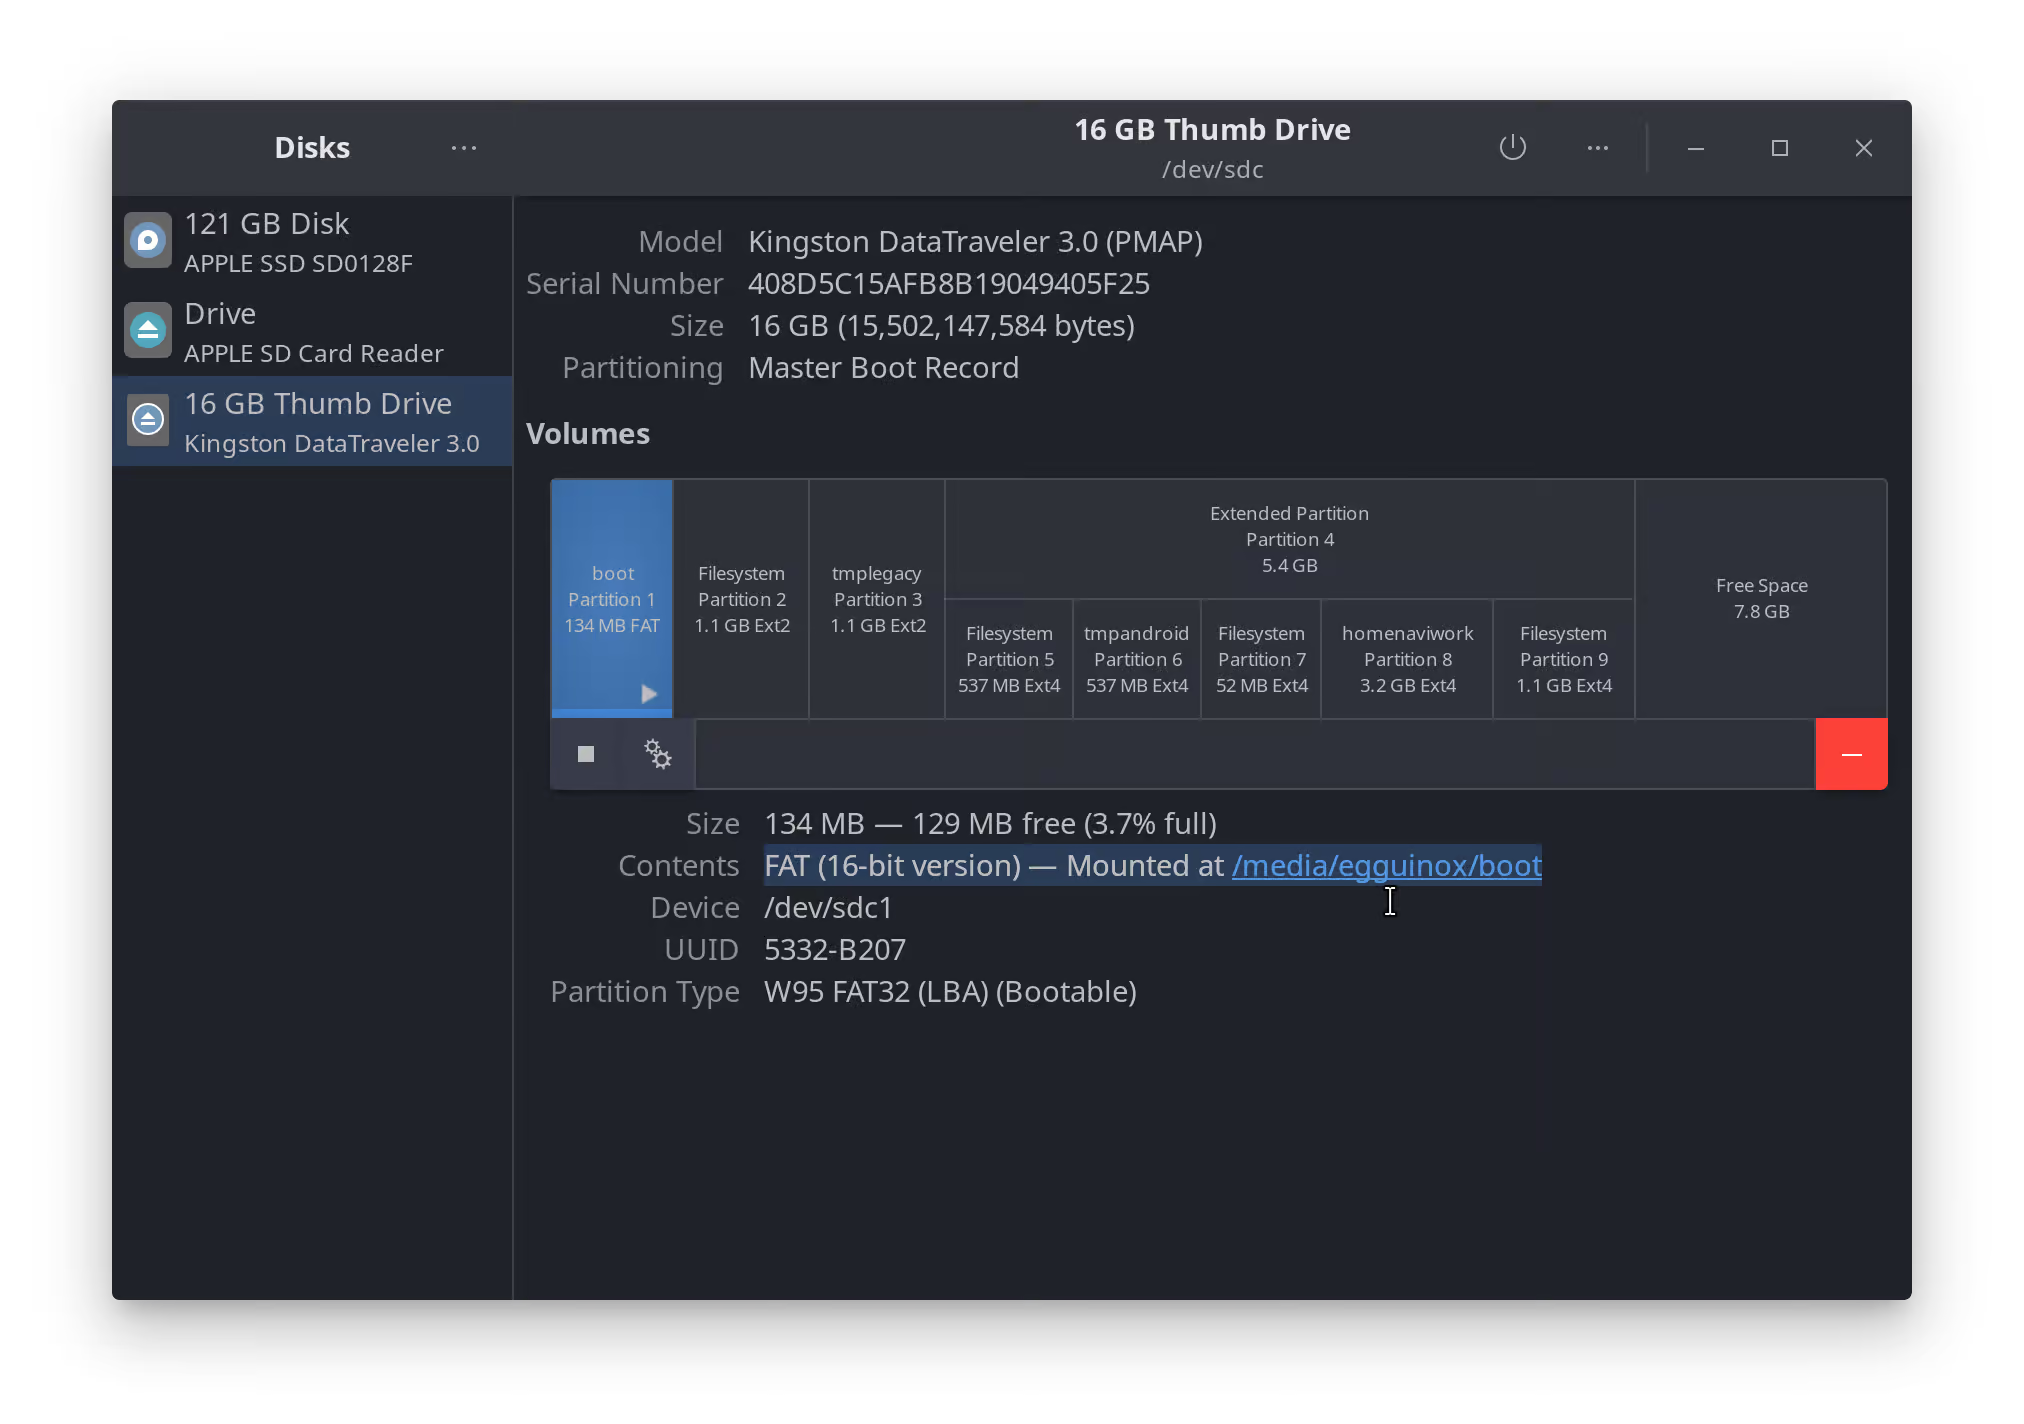
- Step 4a: The partition may not be mounted, if not it will say as much in the highlighted section of this screenshot; “Not Mounted”. To mount it, click on the 134MB partition so it’s highlighted like in the screenshot above, and click the play button where my cursor is.
- Step 4a: It will then show “Mounted at /media/etc/boot”. You can click on this, as it’s a link, and it’ll take you right to the mounted files.
- Step 4a: Locate the first partition on the drive and mount it, it will be 134MB in size and contain a file called “elilo.conf” that we need to edit.
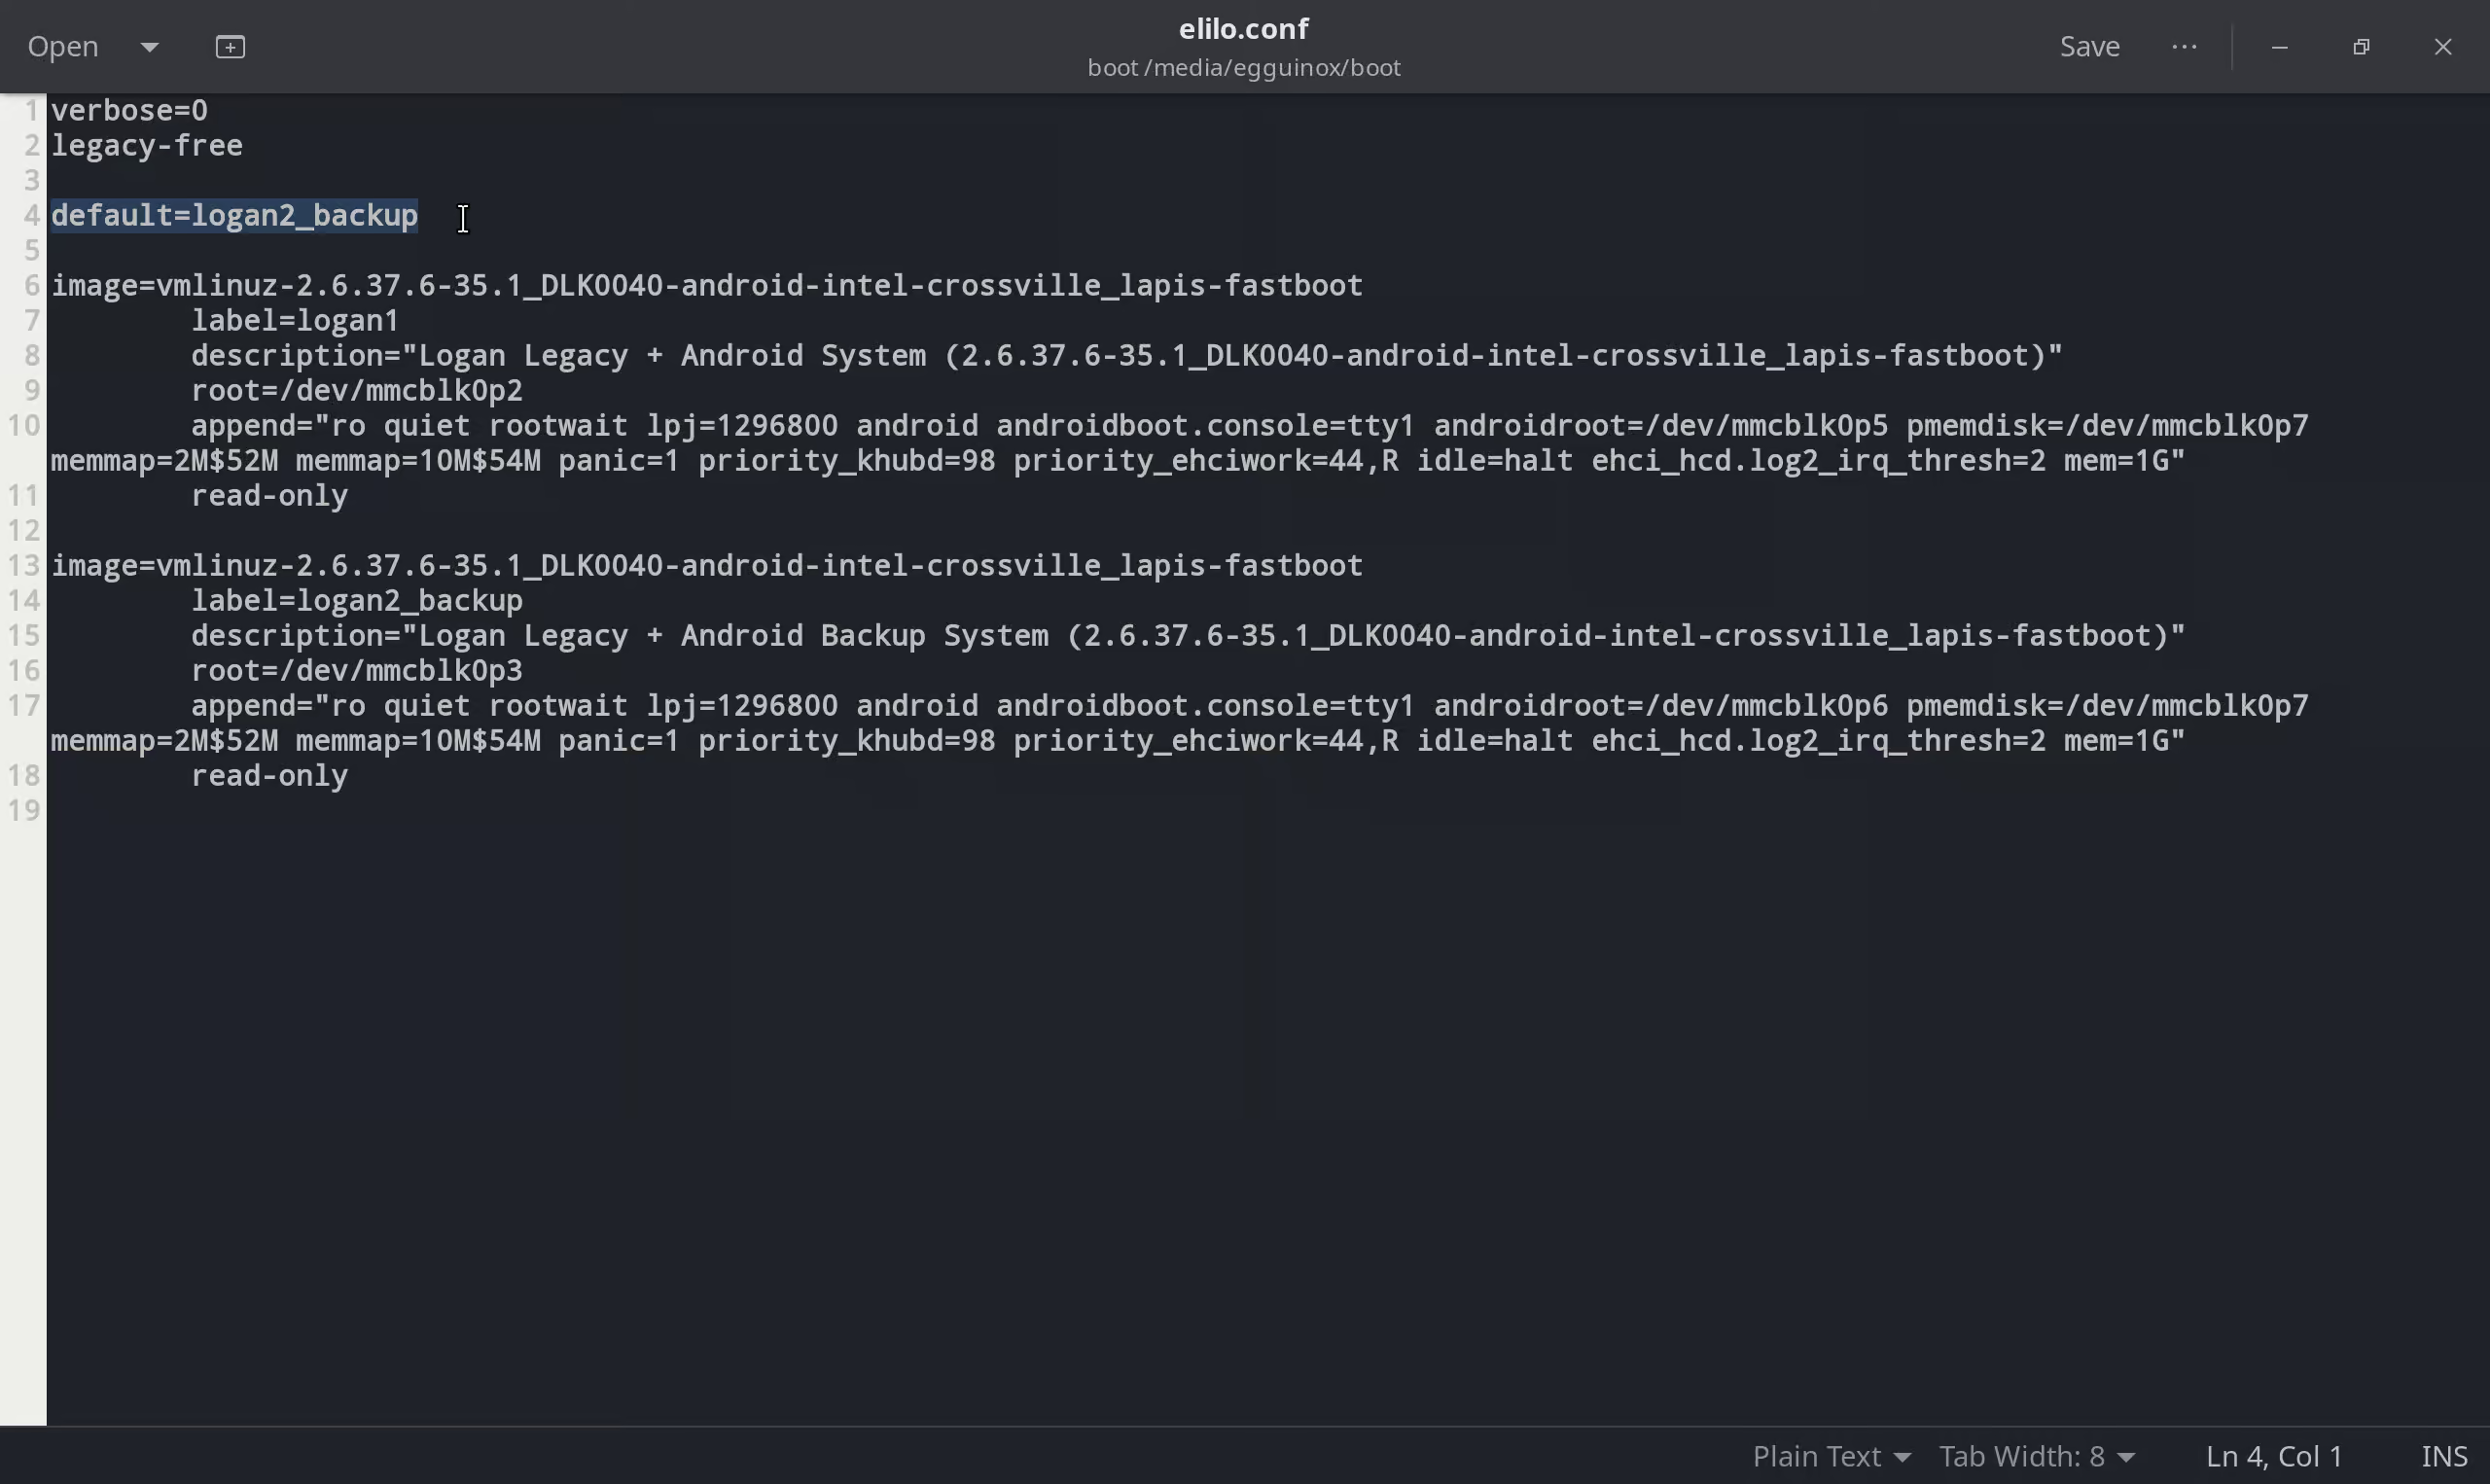
- Step 5a: Open the file called “elilo.conf”, and edit line 4.
- Step 5b: Replace “default=logan1” with “default=logan2_backup”, and save the file.

Step 6: Create an image of your repaired SD card so you can flash it onto your new SD Cards. The process is illustrated step by step below with images.
-
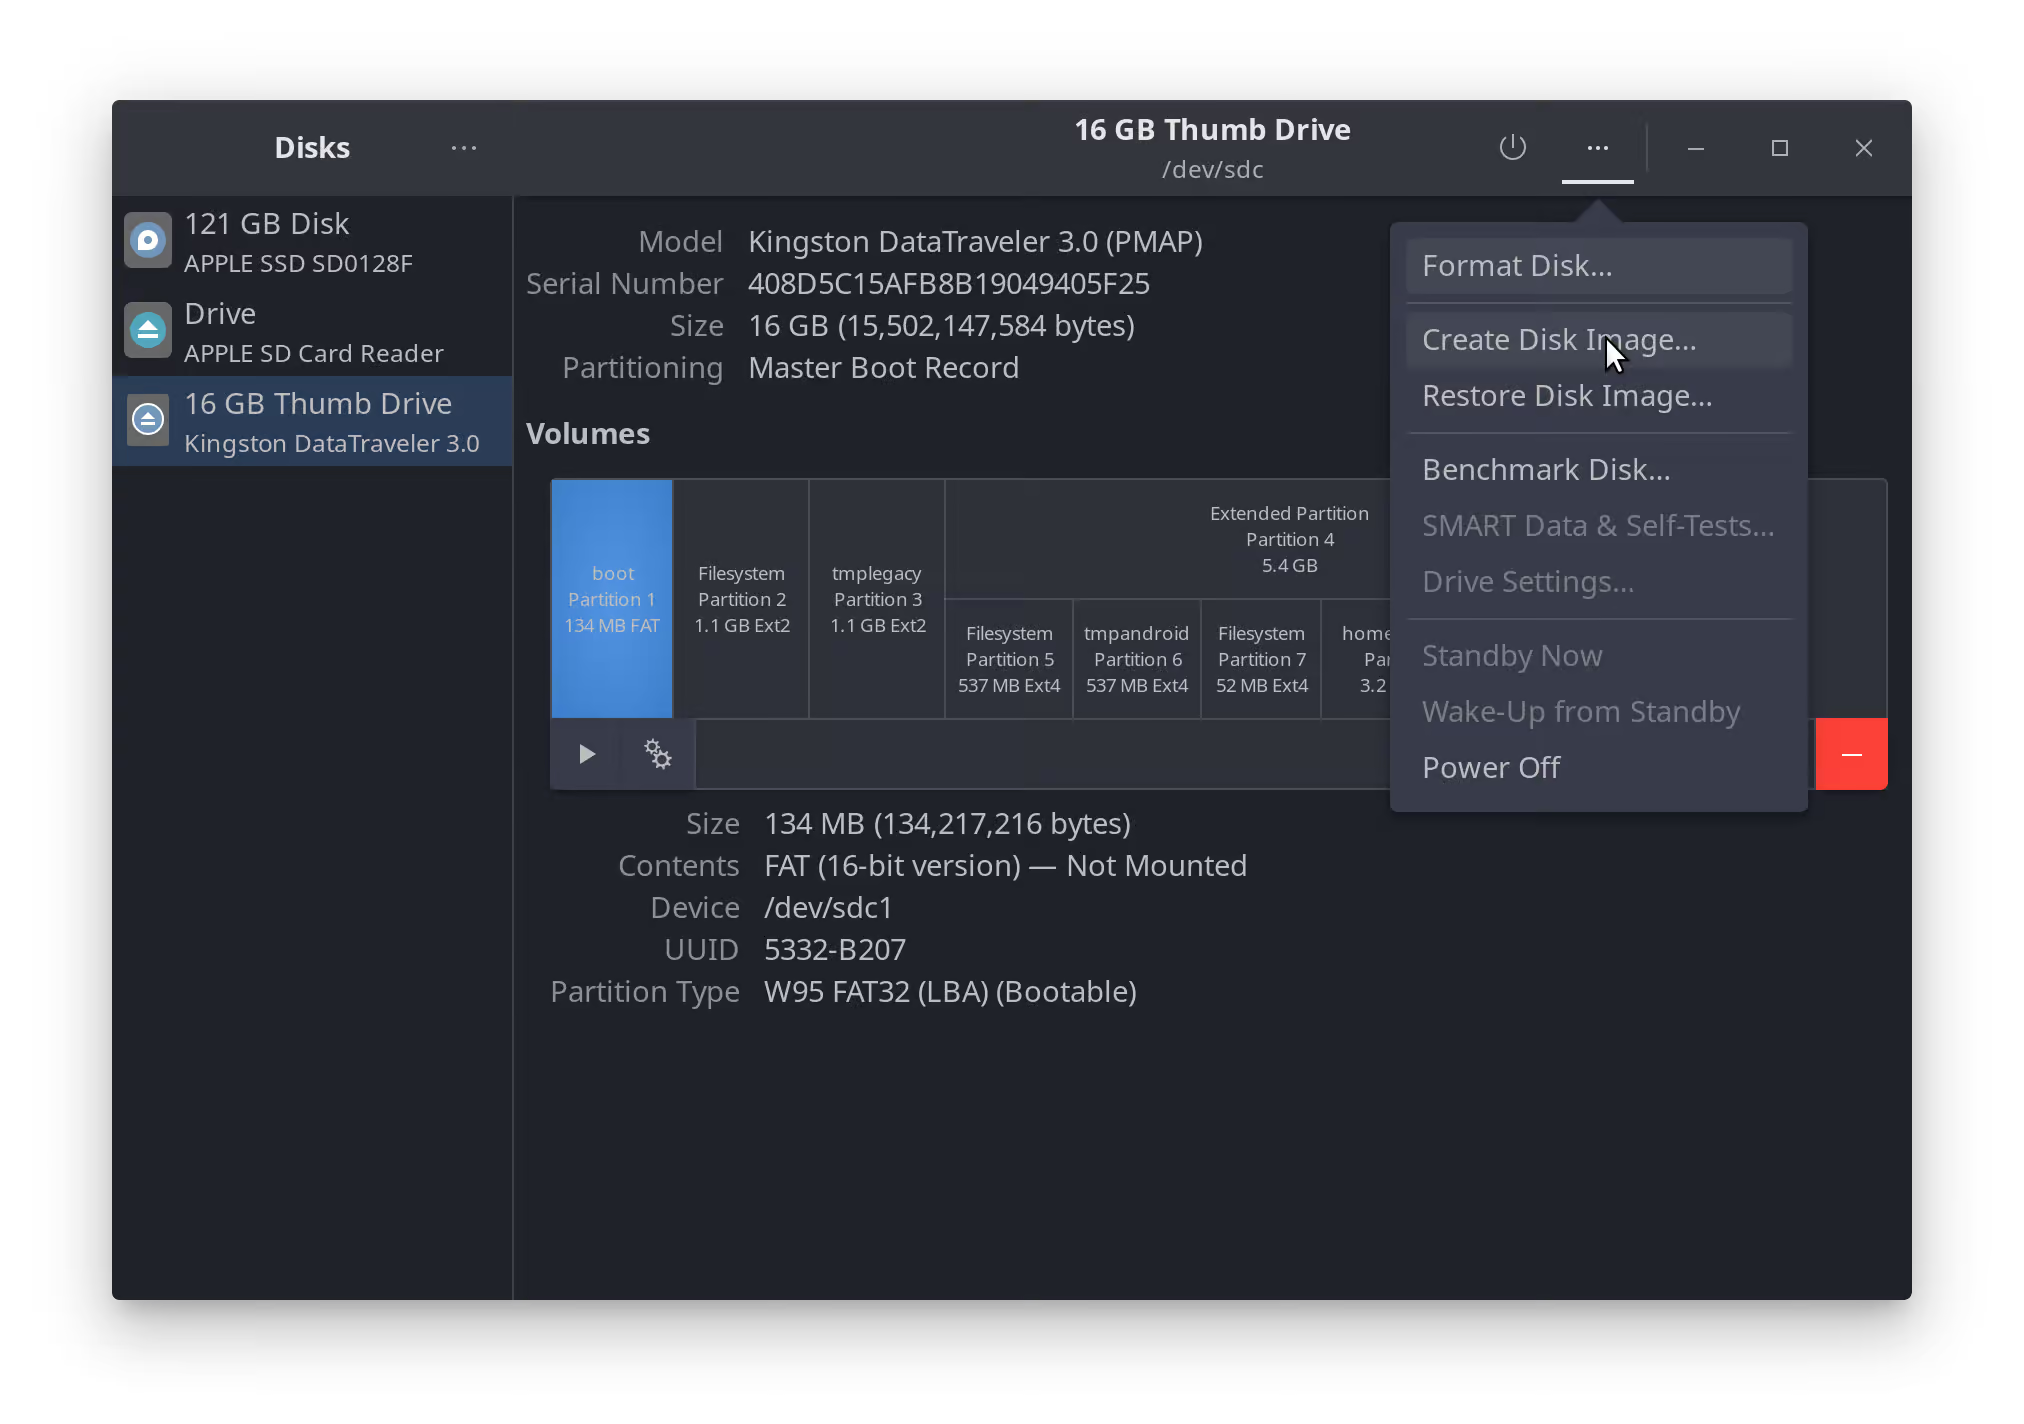
- Step 6a: Locate the correct disk in Gnome-Disk on the left panel.
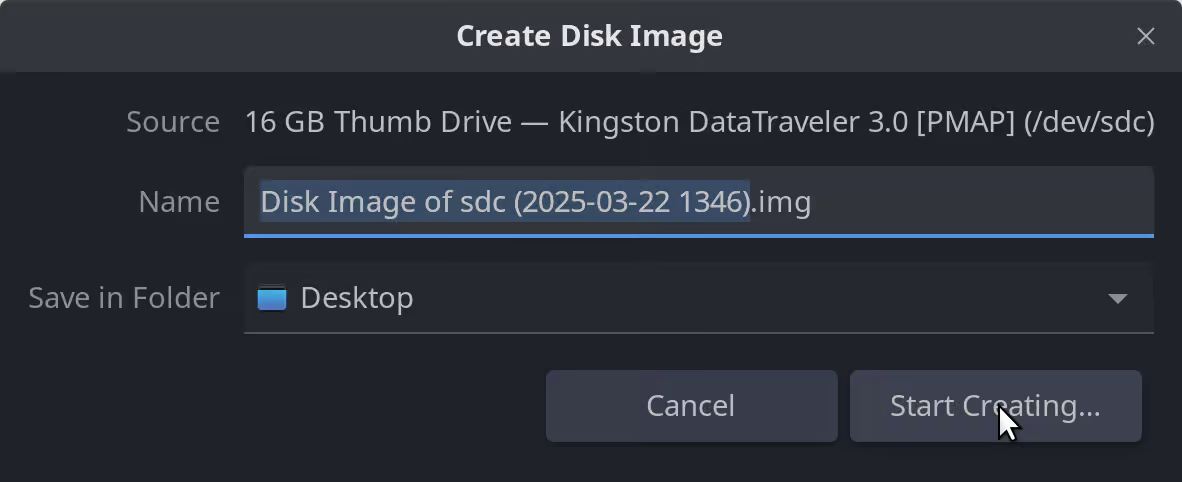
- Step 6b: In the top left, click on the three dots (or gear icon) and click on “Create Disk Image”.
- Step 6c: Give it a name, and choose where to save it. The default is the desktop, normally. Then click on “Start Creating…”.
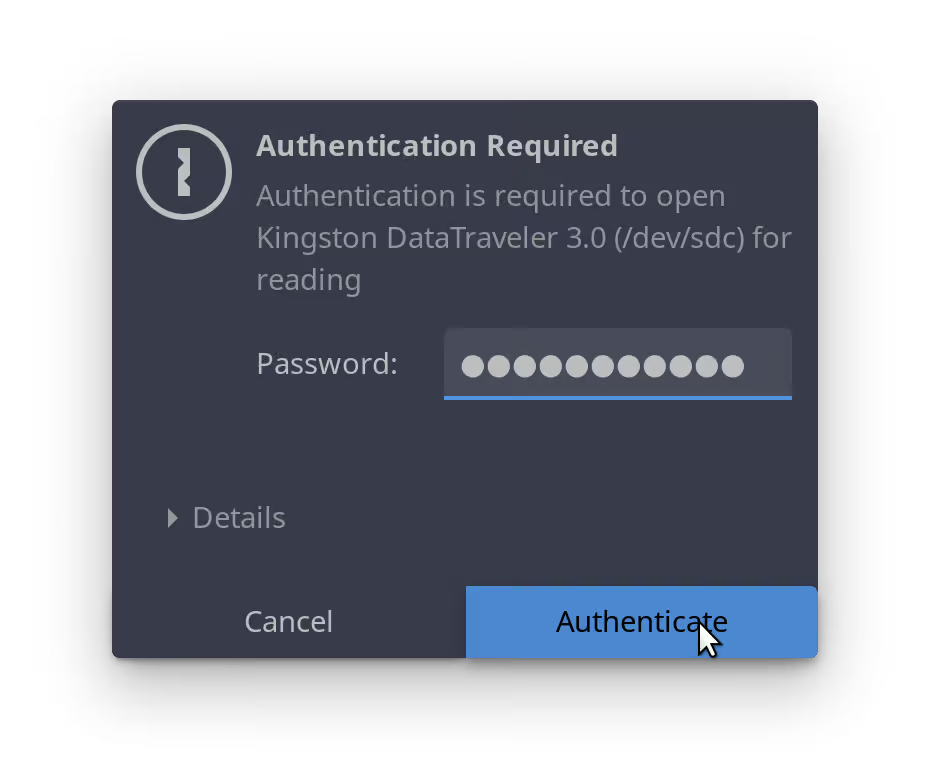
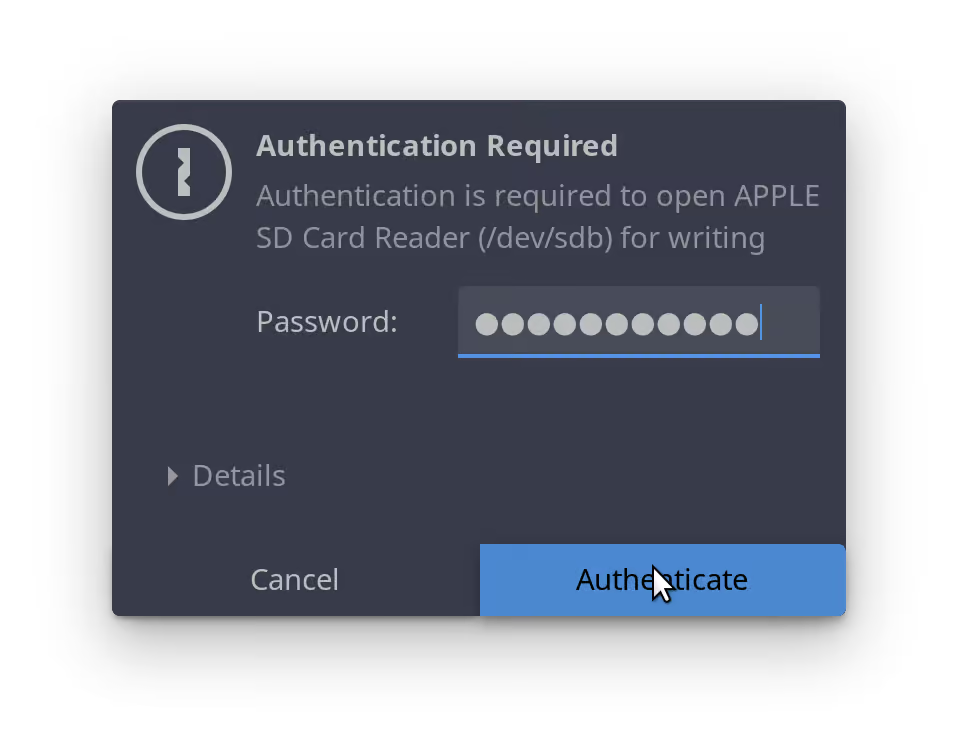
- Step 6d: Enter your password, and click “Authenticate”. .
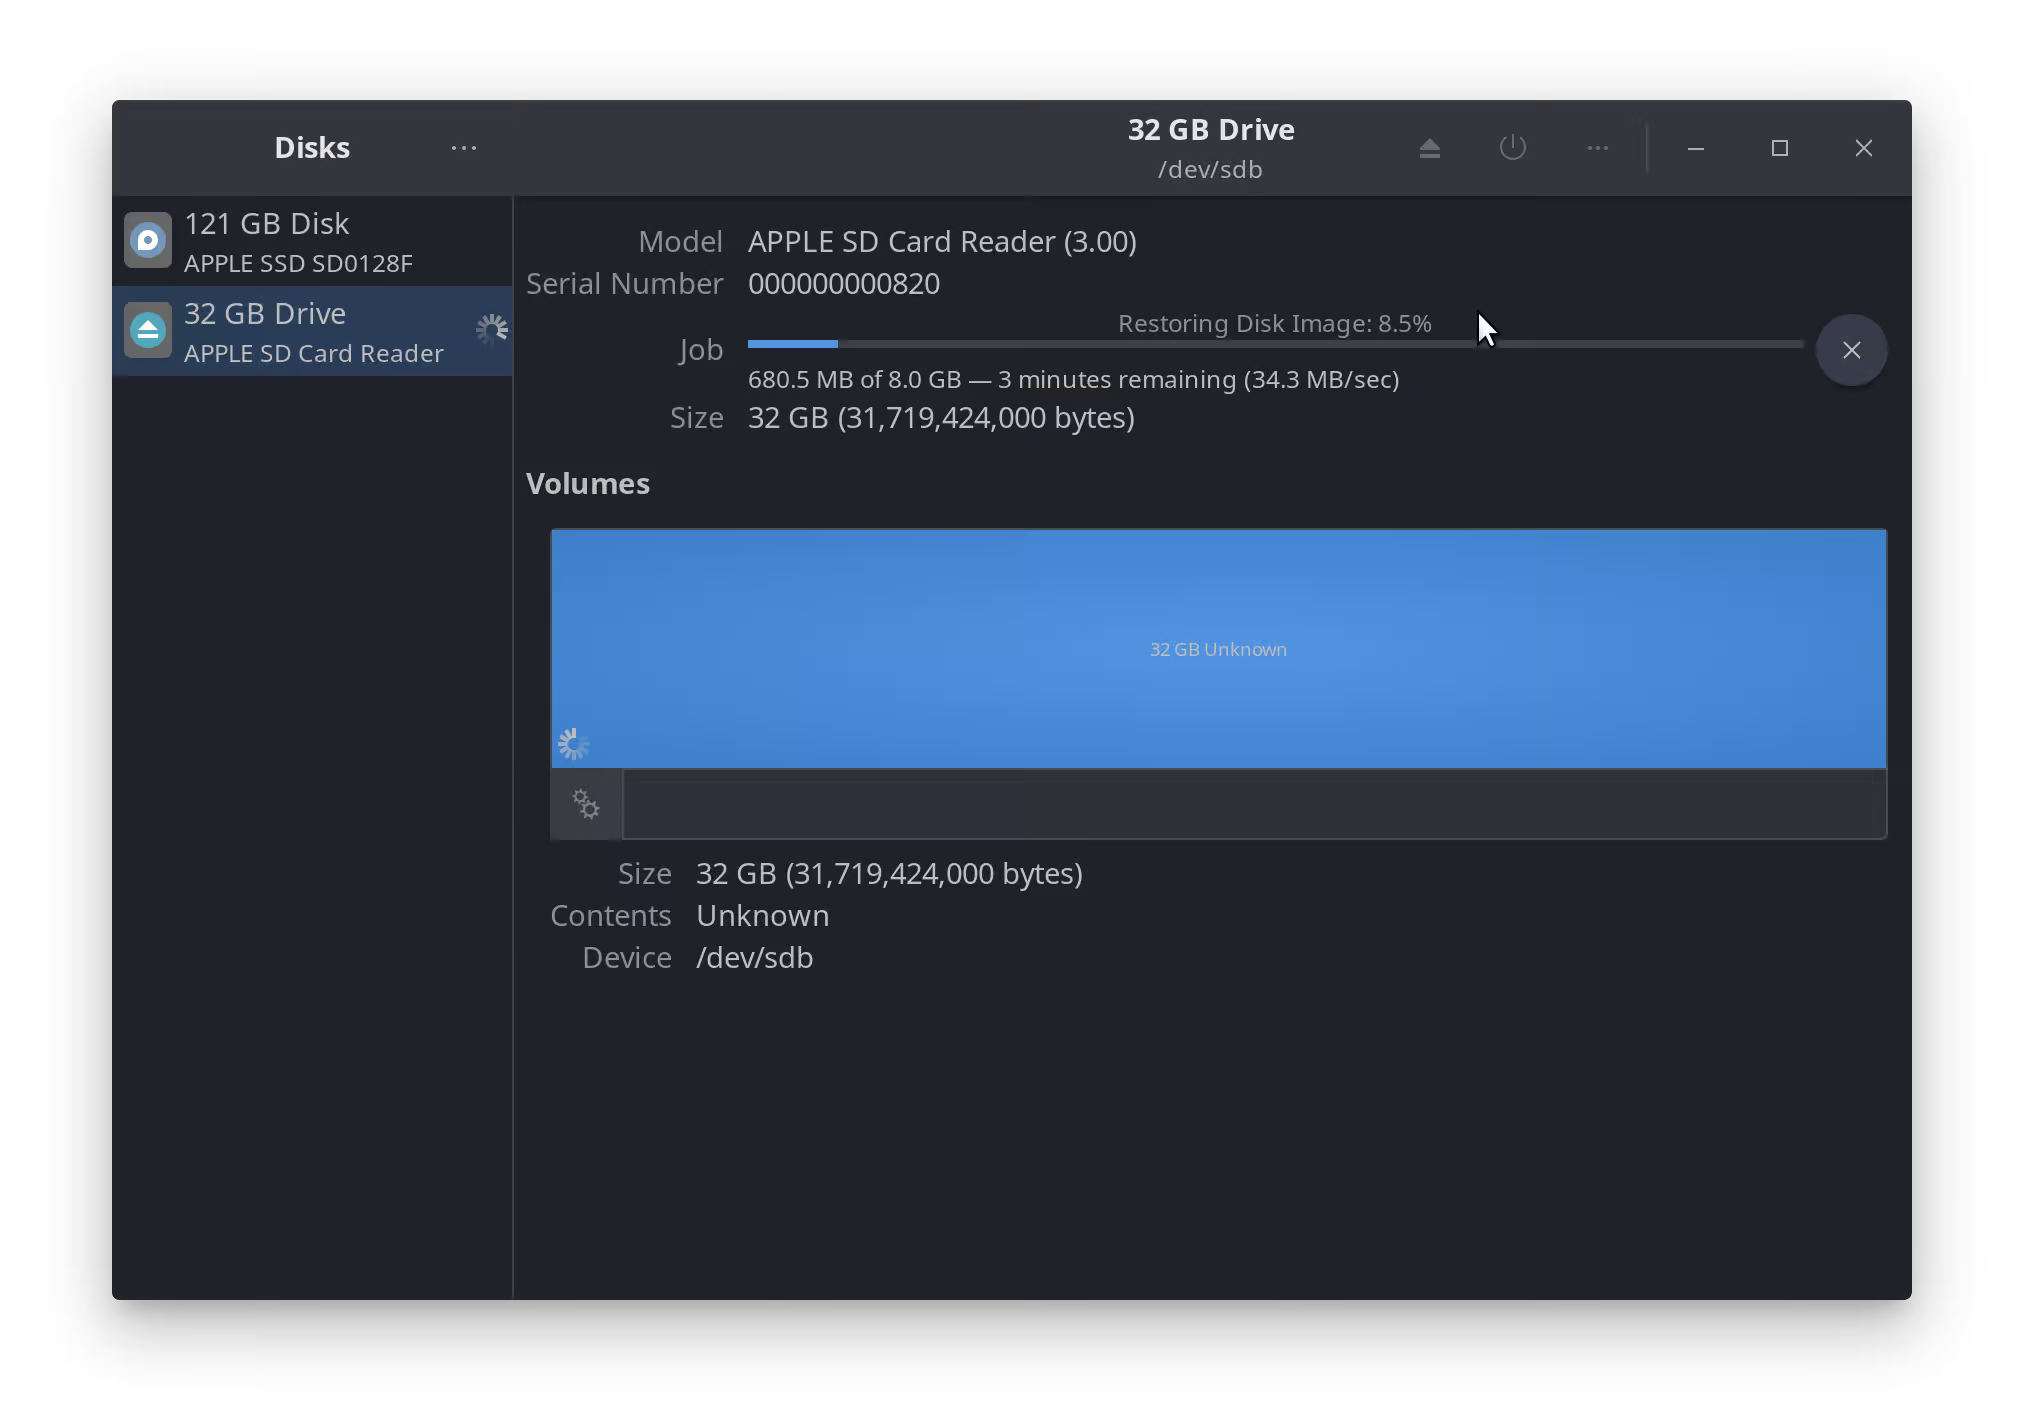
- Step 6e: Wait for the Job progress bar to finish completely, you should see your image in the location you chose to save it. You can proceed to the next step. .
Step 7: Clone .img file to a new Micro SD Card using Linux
-
- Step 7a: After the image has been created, remove the old SD Card and insert the new SD Card.
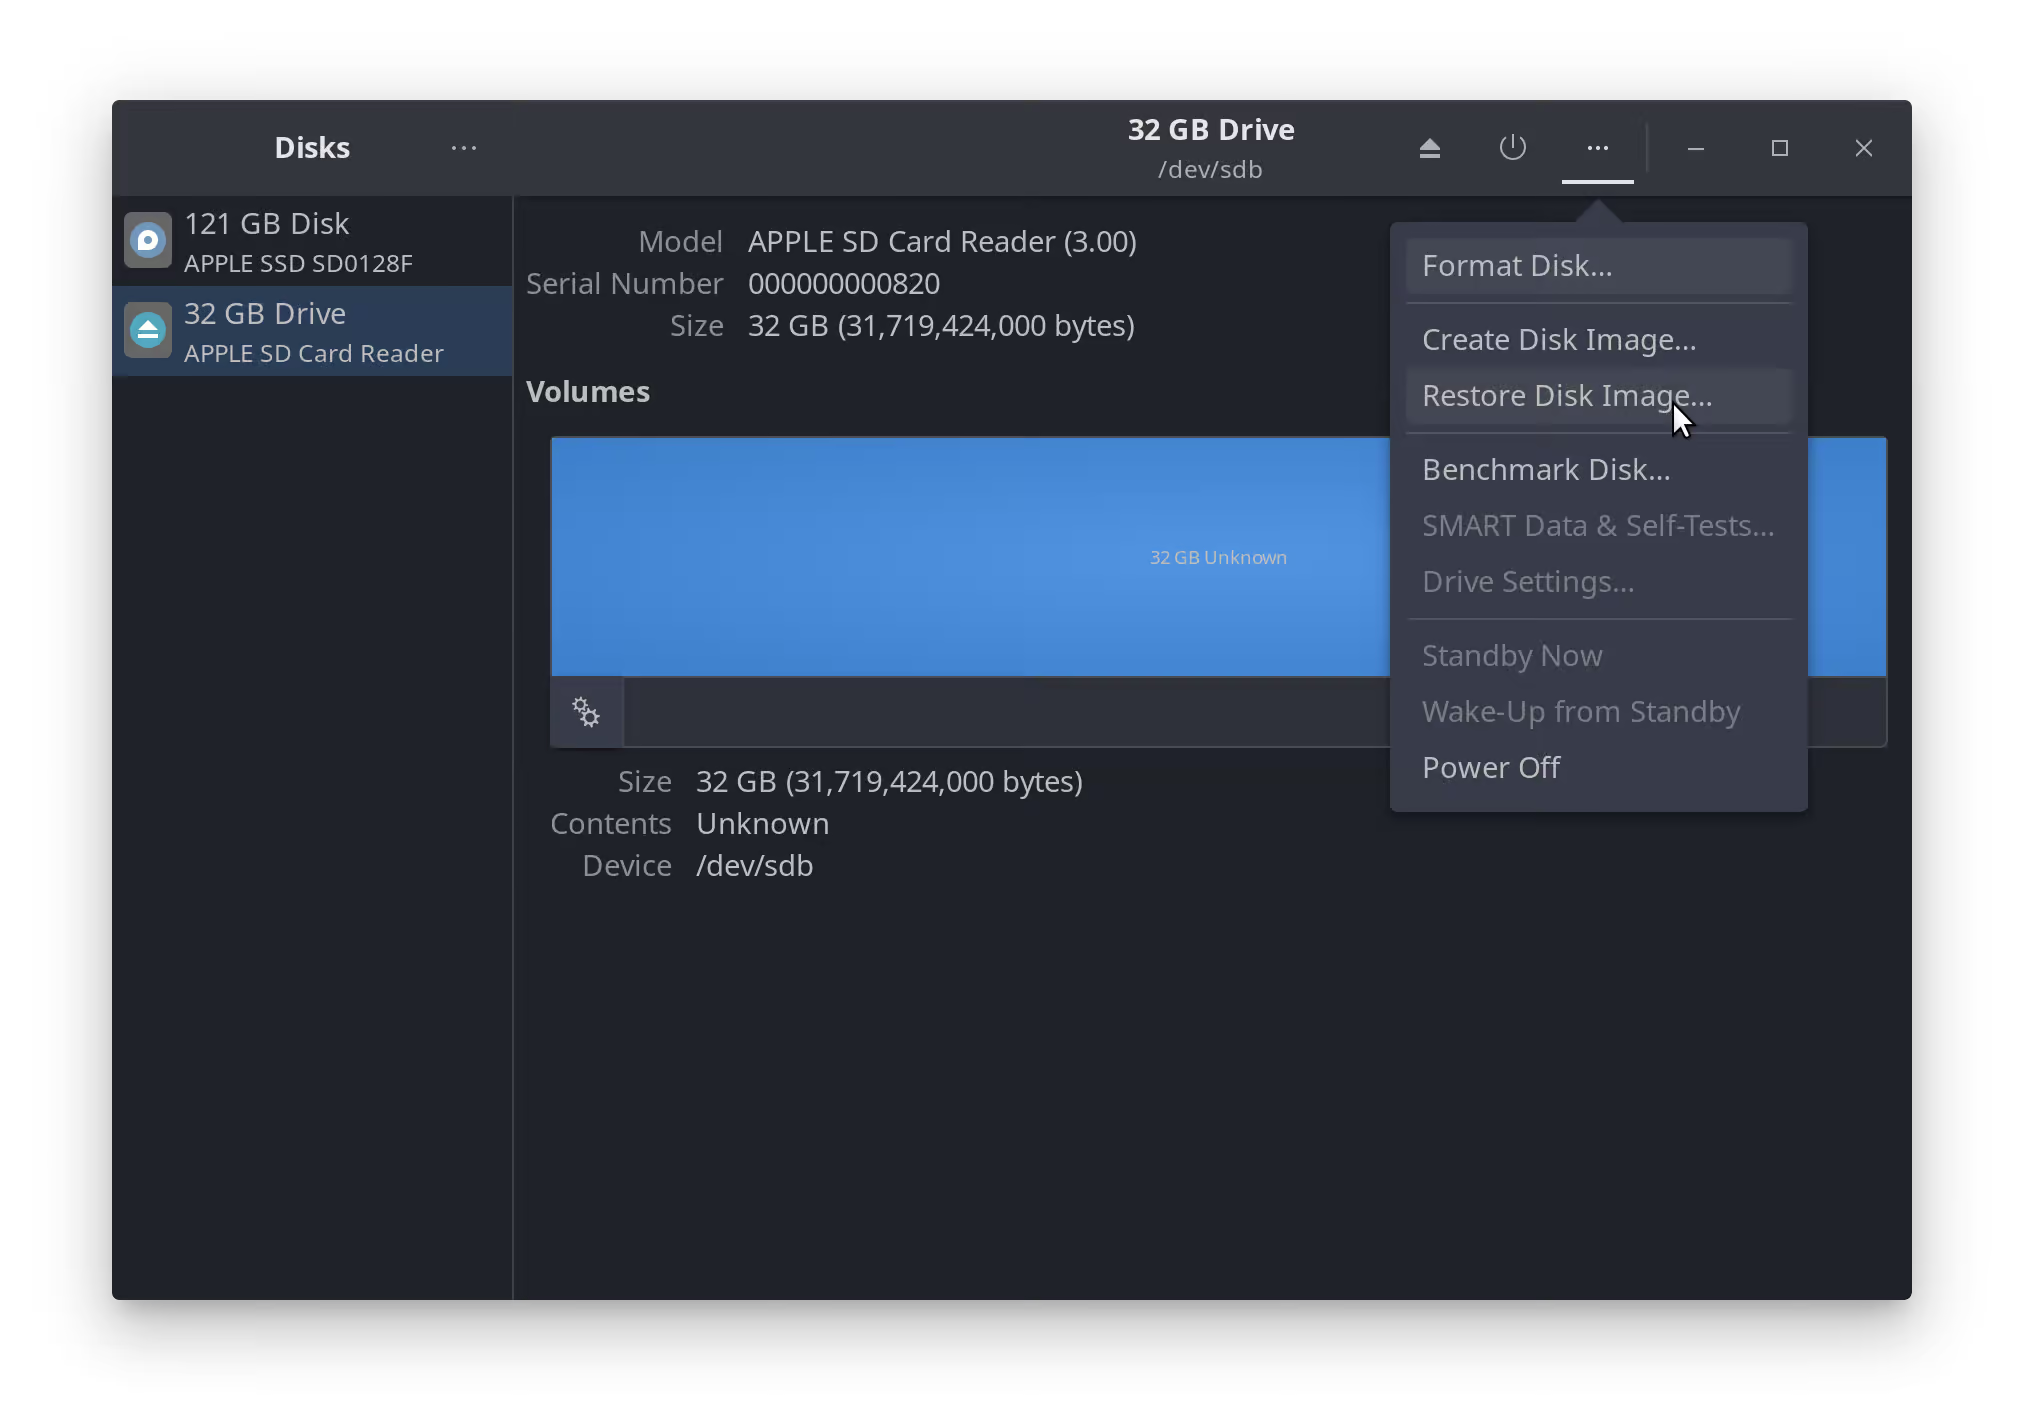
- Step 7b: In the main window of “gnome-disks”; Select the correct disk shown on the left & click the same little gear icon (or three dots), but this time click “Restore Disk Image”.
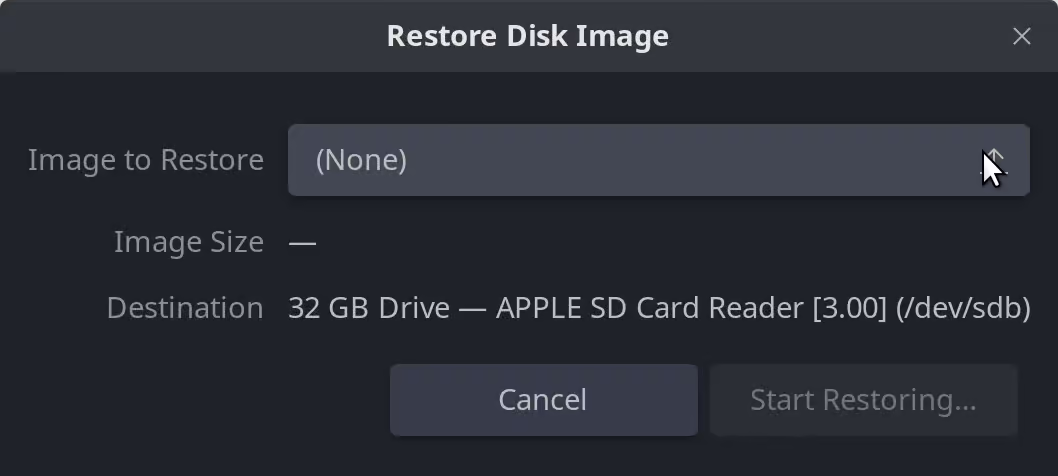
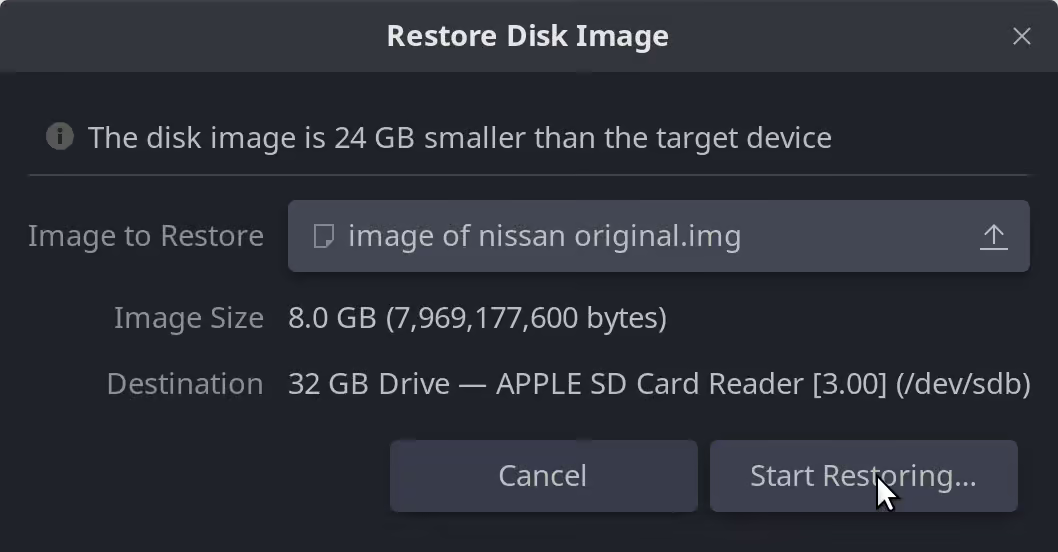
- Step 7b1: In the new window that pops up, click “Image to Restore” and navigate to where you saved the previously created image; select it.
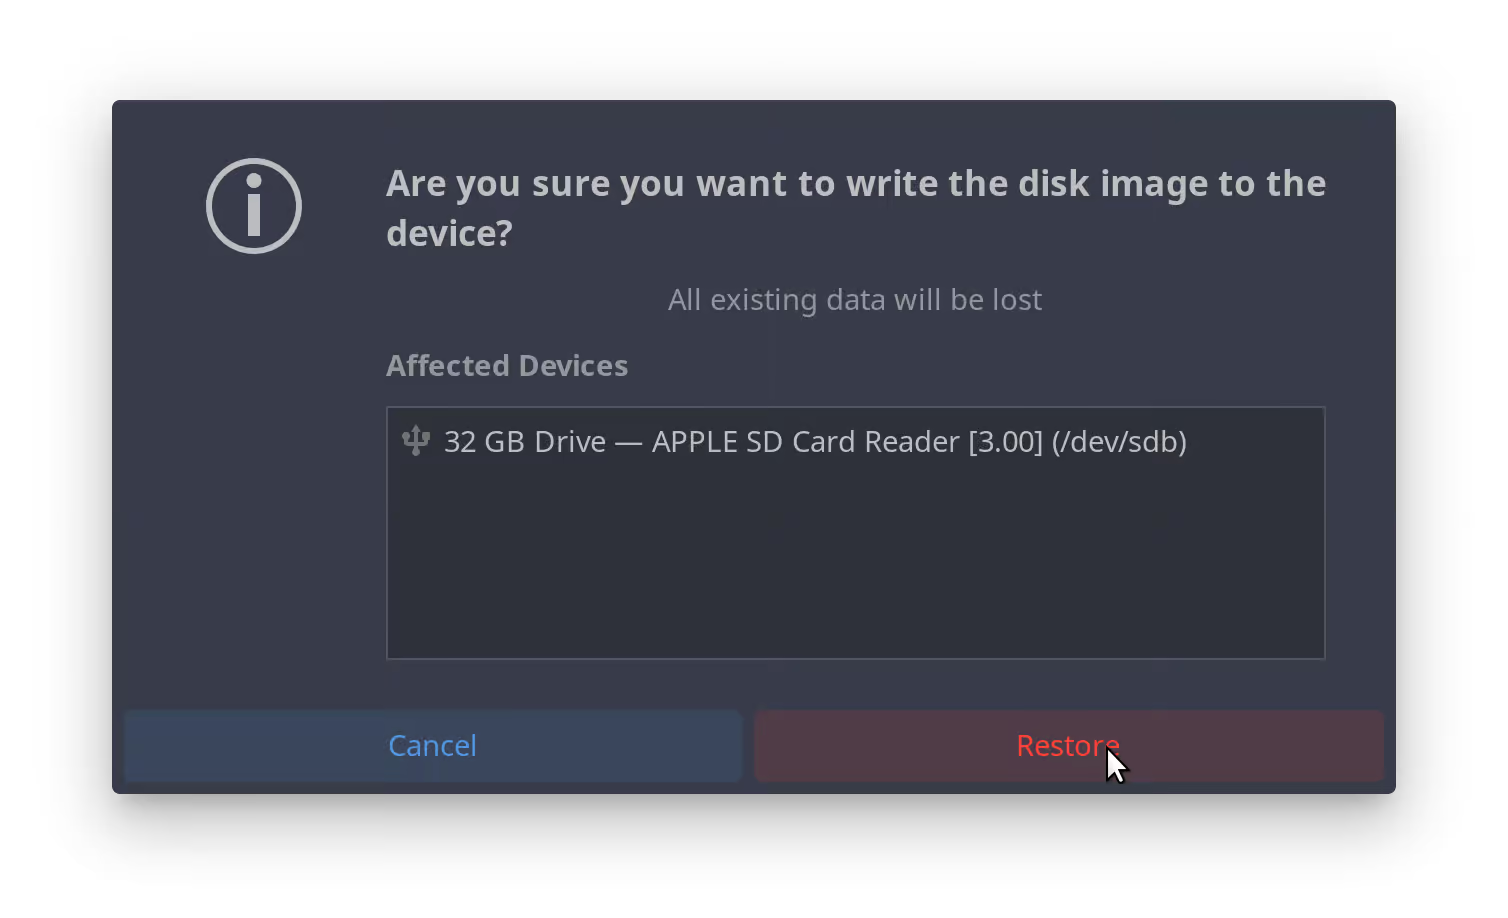
- Step 7c: Verify that the destination is correct, and hit “Start Restoring…”; wait for it to finish and eject the disk.
The process is illustrated step by step below with images.


Step 8: Reinstall the MicroSD Card into the DCU
-
- Step 8a: Install the new card, gold contacts facing up. Ensure it’s fully inserted like the photo, it should not come out when pulled gently.
Step 9: Reassemble the DCU
-
-
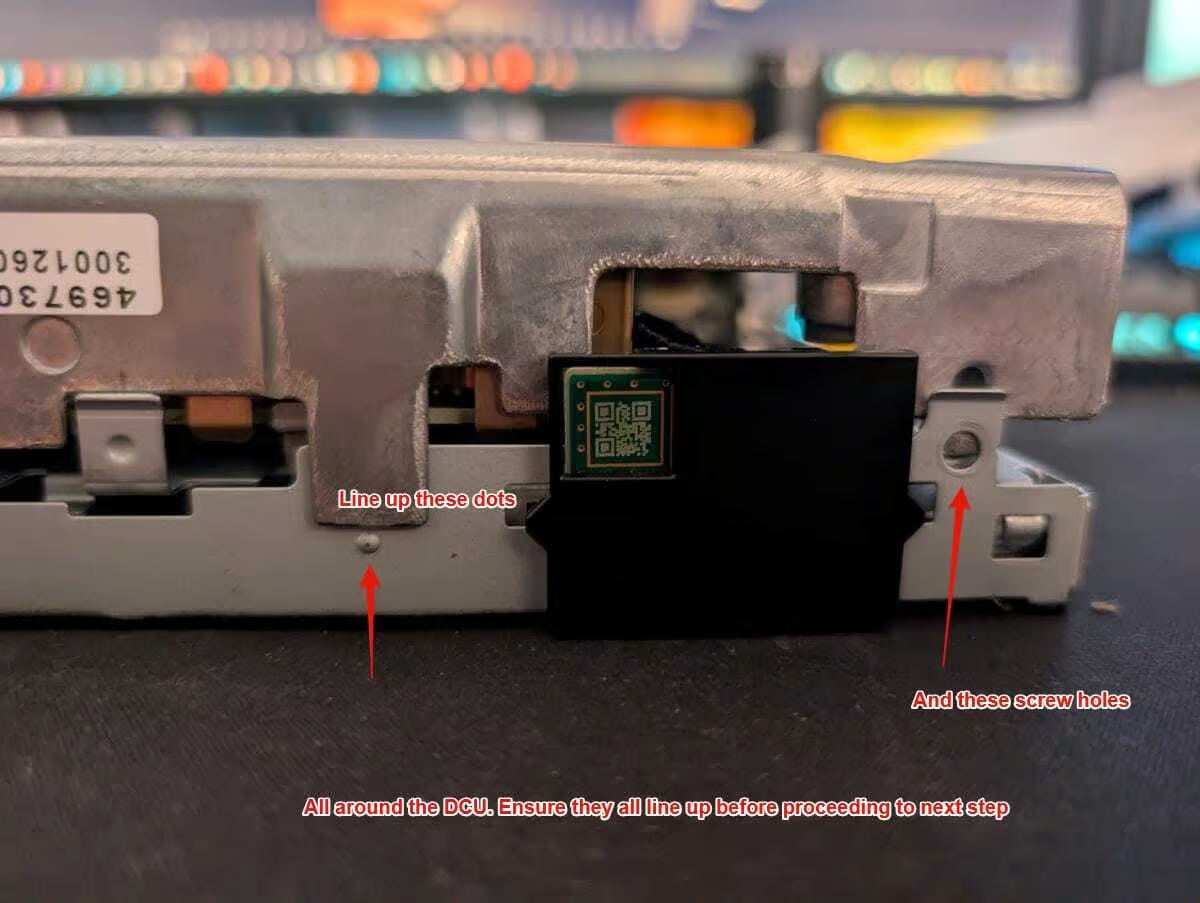
- Step 9a: Close the shell, and line up all the dots, screw holes and tabs around the device.
-
-
-
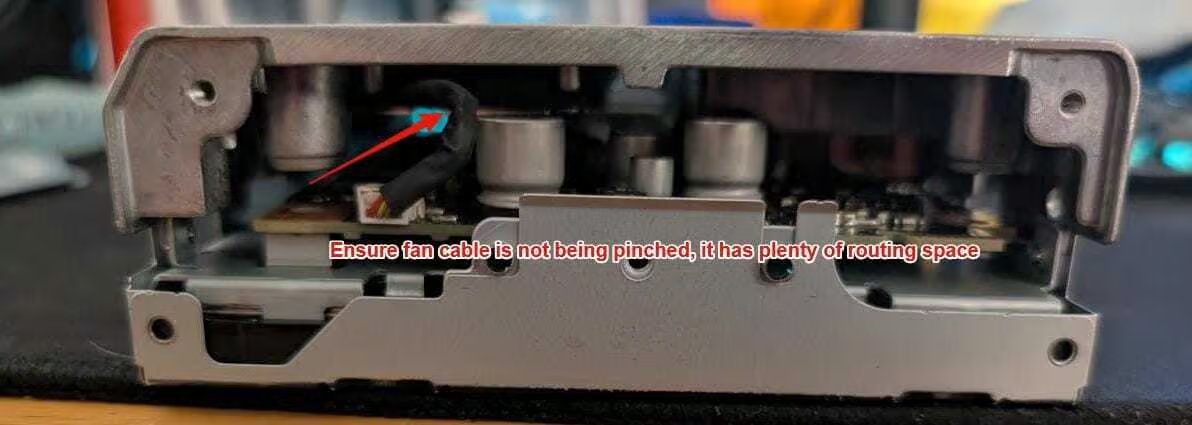
- Step 9b: Ensure the fan cable is not being pinched.
-
-
-
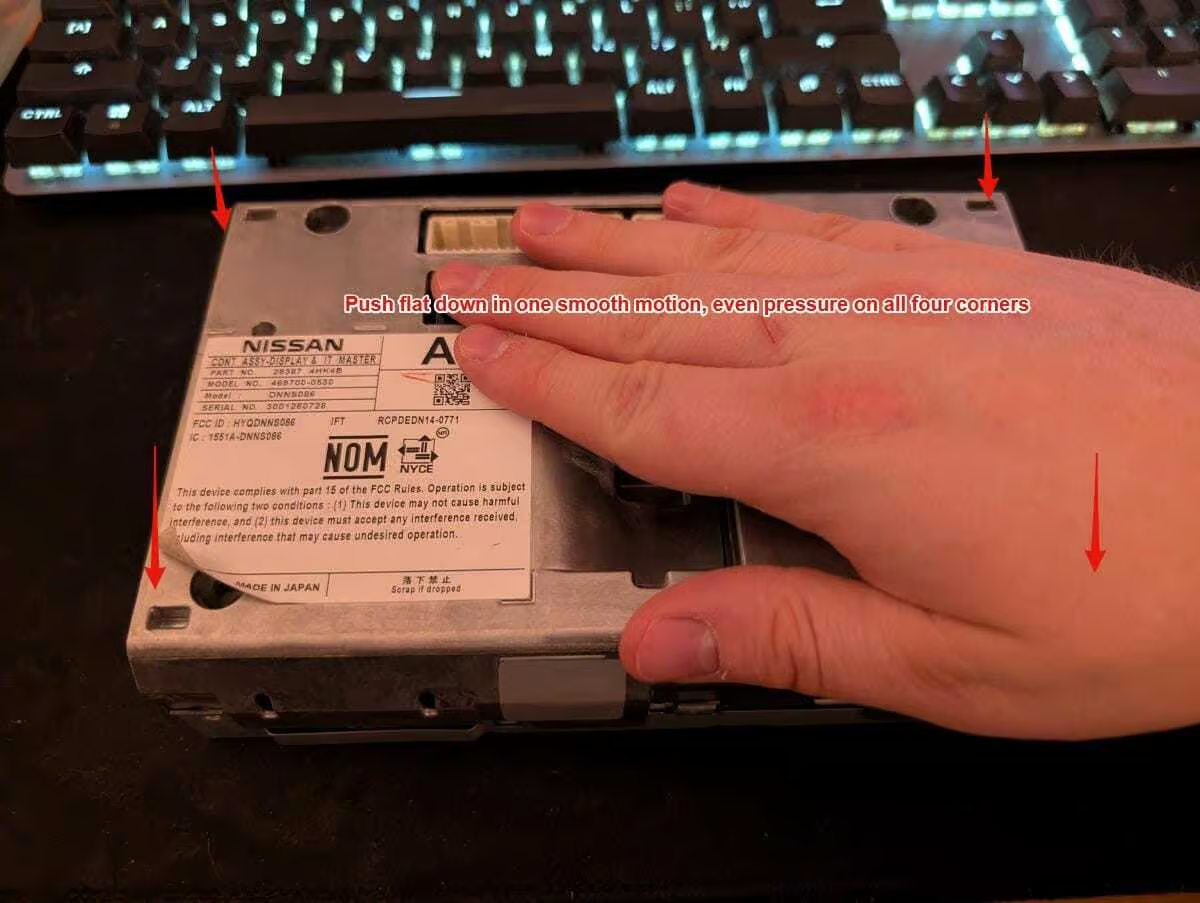
- Step 9c: Apply even pressure on the back of the DCU, in one smooth motion. It requires some force but not enough to break anything. If it feels like you’re breaking something, stop and reassess.
-
-
-
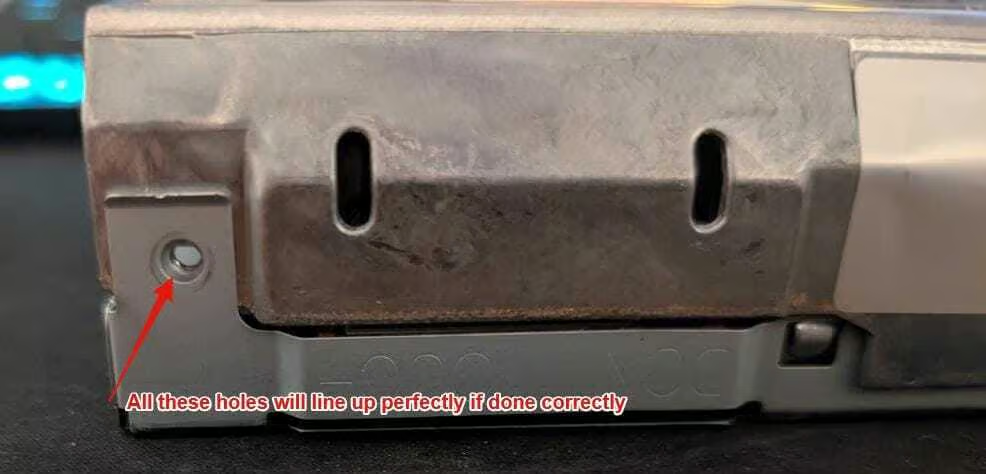
- Step 9d: All these holes should line up perfectly for your screws to go back into.
-
-
-
- Step 9e: Screw the back four screws in, in a criss-cross pattern.
-
-
-
- Step 9f: Do the top two screws.
-
-
-
- Step 9g: And the bottom two screws.
-

-
-
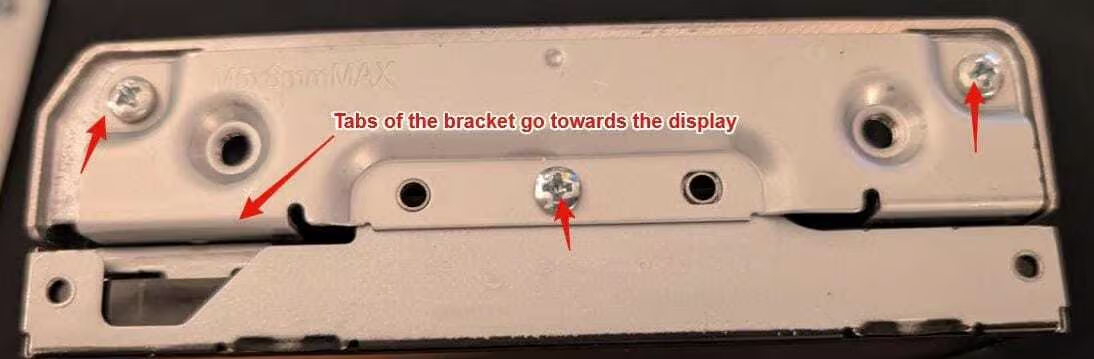
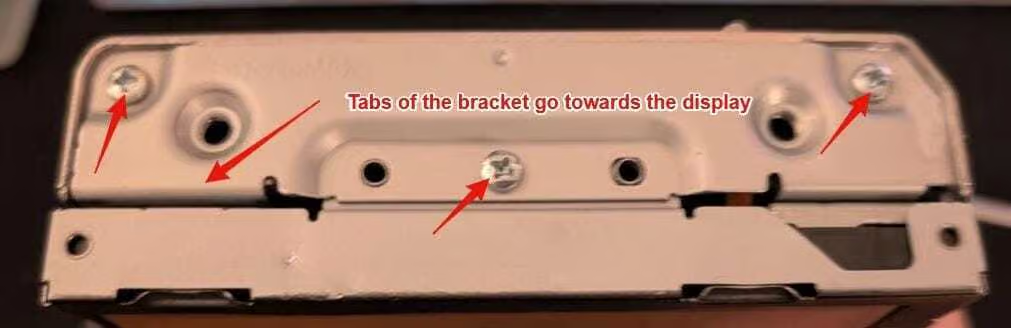
- Step 9h: Now put one of the side brackets on, the tabs of the brackets go towards the display inwards as shown.
-
-
-
- Step 9i: And the other side, same as before.
-
- Step 10: Test DCU in Vehicle (Note: Future versions of vehicle specific guides will have photos for this section, and beyond).
- Step 10a: Plug in all the cables for the DCU, and mount it with one screw so it doesn’t fall out.
- Step 10b: Plug in all the cables for the Infotainment control trim.
- Step 10c: Plug in all the cables for the Climate control panel.
- Step 10d: Start the car (Engine, not just battery, we want full alternator voltage), and verify the functionality of the DCU.
- Step 11: Install DCU in Vehicle (Reverse of Removal) (Note: Future versions of vehicle specific guides will contain instructional images for installation, and a video)
- Step 11a: Ensure the top two hooks of the DCU are in their slots, remove the one screw from the test, install the support brace and reinstall the four screws.
- Step 11b: Clip the two clips of the Climate control panel back in, ensure the data connector is fully inserted with a click, and close the panel. Reinstall the two screws.
- Step 11c: Ensure the climate vents are fully inserted in their clips (they like to pop out sometimes, if they do fully pop out, they can be reassembled), and insert the panel straight into the slot. Ensure the clips on top fully seat before reinstalling the screws on the bottom. Some hard smacks with your palm may be required.
- Step 11d: Plug in all the connectors for the Infotainment control panel (and test it’s functionality— as well as the functionality of all the buttons on the climate stack and hazards etc) before inserting the clips at the bottom and angling it back into place (reverse of removal). Reinstall the screw.
- Step 11c: Replace the vanity cover directly under the display, the clips go straight back in.
- Step 12: ???
- Step 12a: Do a little dance because you just saved $5600 USD + labour and that was really easy. (Hint: Most of the work on your car is that easy or easier)
- Step 13: Profit
- Step 13a: If you were unable to repair your original image and had to restore from a different one (or use a repair kit), head into the bluetooth settings to remove any phones and re add yours. If you had custom settings, you may need to re apply them.
- Step 13b: Mail your local/state/provincial etc representative to let them know that you DEMAND the right to repair your things. Some guy on the internet just did something that a $1.6 Trillion dollar company didn’t do (not couldn’t, didn’t, that was a choice), and that’s tell you how to fix your car yourself and avoid more perfectly functional hardware ending up as E-Waste in the landfill. I hate that, and I think you should too; especially since they wanted to charge you so much to do it.
- Step 13c: If I got your device up and running for free or cheap, and you like what I’m doing by providing these instructions for anyone to use, buy me a pizza or two! https://www.paypal.com/paypalme/TDPEquinox
-
- Step 13d: If you require some additional support, reach out to me on the pathfinder forums, or join the discord. I’m happy to lend a hand with diagnostics.
- Step 14: Enjoy this picture of my Pathfinder 🙂

Guide (v1.0)
I try but didn’t work.both card didn’t work.
No idea what reason. I used disk utility from apps in ubuntu instead of new terminal to create disk image.is that the reason .
In my computer I can’t download or open disk utility in terminal.
It’s possible your original Micro SD card was too far corrupted to repair. You can try flashing the known working image from the support discord server here: https://discord.gg/WbHqbw8bA4 onto your new SD card. If that doesn’t work, it may be an issue with your Linux machine and you may want to consider a repair kit instead. Let me know if I can help!
Thanks,
I just wanted to give you a shout out! Your pre-programmed SD card worked great. I am very impressed with everything you offered. From ordering the repair kit, to the timely shippment, even the instructions on how to replace the SD card. You saved me a lot of headache and money. Thank you very much!
Hey Nick,
I’m glad I could help, thanks for your kind comment!
-Quinn
Repair kit worked exactly as stated.Easily installed in less than 10 minutes.Quinn was very responsive with answers .
Would reccomend!
Now if only there was a quick fix for my lift gate not opening automatically.
Thanks for the comment, I’m glad to hear everything worked well!
-Quinn
Mr Burgess,
The information you have provided is very impressive and such a gift to all of us Nissan owners. I read your diagnosis cautions, specifically regarding the back-up camera. The DCU in our Pathfinder will only display the time of day and when shifted into reverse the camera will be displayed but only for 10-20 seconds, then flutters off.
Do you believe your pre-programmed SD card will correct the entire problem?
Thank you
Eric
Hello Eric,
Thank you for your nice comment! Regarding your display, it sounds like you may have two issues; the DCU failure and possibly a camera failure as well. The backup cameras in these vehicles fail quite often (the one in my pathfinder is also failing), and the way they fail is often how you described with a slow fade/flutter out or shifting out of the view screen. As far as your display goes, the pre-programmed SD card should resolve that; but it may not resolve the Camera.
Thanks,
Mr. Burgess: thank you for your Nissan image and instructions. My card was dead, so you really saved the day. Nissan parts couldn’t even find the micro sd card in their parts list. Needless to say, I’ll be sending you some pizza money.