These instructions are provided alongside a working, pre-configured MicroSD Card containing an image of the DCU Operating system from my 2018 SV-Tech Pathfinder, Sold in Canada, Made in Mexico. The software doesn’t seem to matter between models, though some features may be slightly different depending on region.
Some people have told me that their higher trim level vehicles got access to some features they didn’t have before, and some have said nothing changed. None so far have said it didn’t work, though. I’ve even had an SD Card from an infinity QX60 working in my Nissan Pathfinder, as seen here; the hardware really doesn’t seem to matter.
If your backup camera works but not the infotainment, this fix should.
If you wish to purchase a pre built SD card, you can do so here or below.
If you already have a Micro SD Card, and want to know how to recover your own image, I provide the full instructions free of charge right here.
And lastly, if all of this is too intimidating, you can have someone remove the DCU for you and send the entire thing to me, and I’ll do the disassembly and reprogramming for a fee. The link for that contact form is here.
Before jumping in, I’ll give a list of parts needed and useful tools for getting at the DCU. Parts needed:
- 16-32GB Micro SD (Class 10, UHS 1, V10) – (This will be provided by me if you purchase a Repair Kit)
- The card cannot be larger than 32GB, or the DCU will not recognize it.
- Class 10, UHS 1, V10 should give a speed rating of 10MB/sec. This is greatly improved over the 4MB/sec card that you’ll be removing from the DCU, and your touch screen should feel faster.
- A good quality name brand is highly recommended, it will be subject to high vibrations and heat.
Tools needed:
- Plastic trim removal tool
- Philips Screw driver, preferably magnetic tipped.
Note: Screenshots for this guide are currently taken from this video by electronicrepairs.com.au.
I will be updating this guide ASAP to remedy this, as well as posting my own video to show the common pitfall areas when taking apart the center console.
Done with the preamble, let’s begin with the guide.
- Step 1: Remove Micro DCU from Vehicle
- Step 1a: Remove the Vanity cover directly under the screen.
-
- Step 1b: Remove the screw under the vanity cover, set aside.
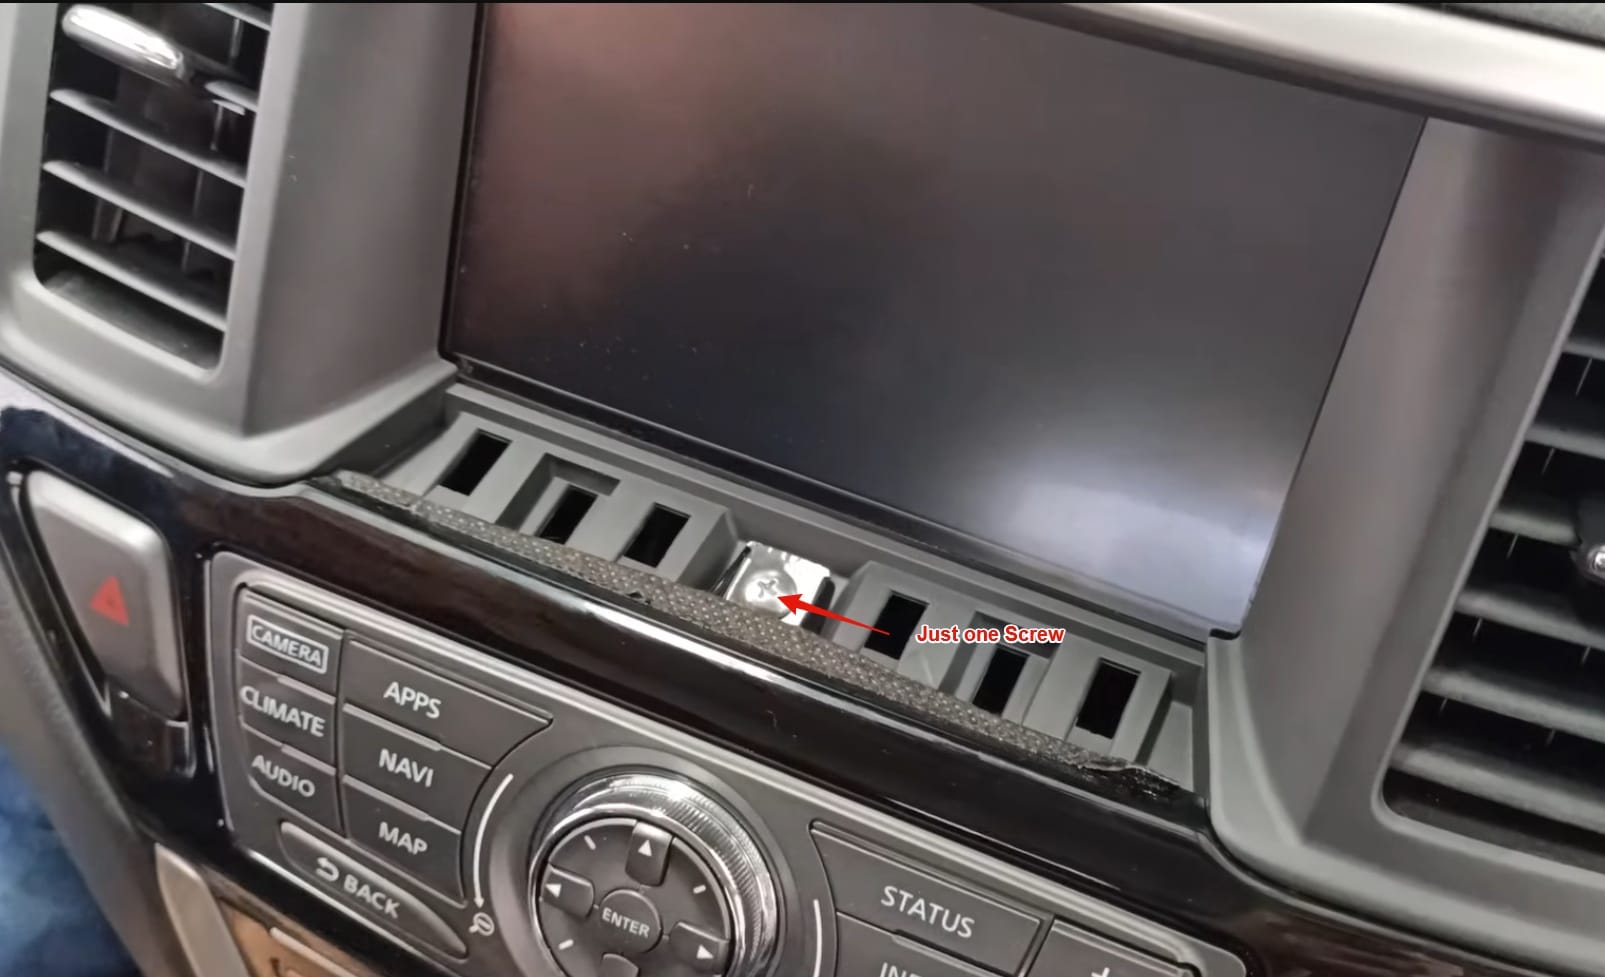
-
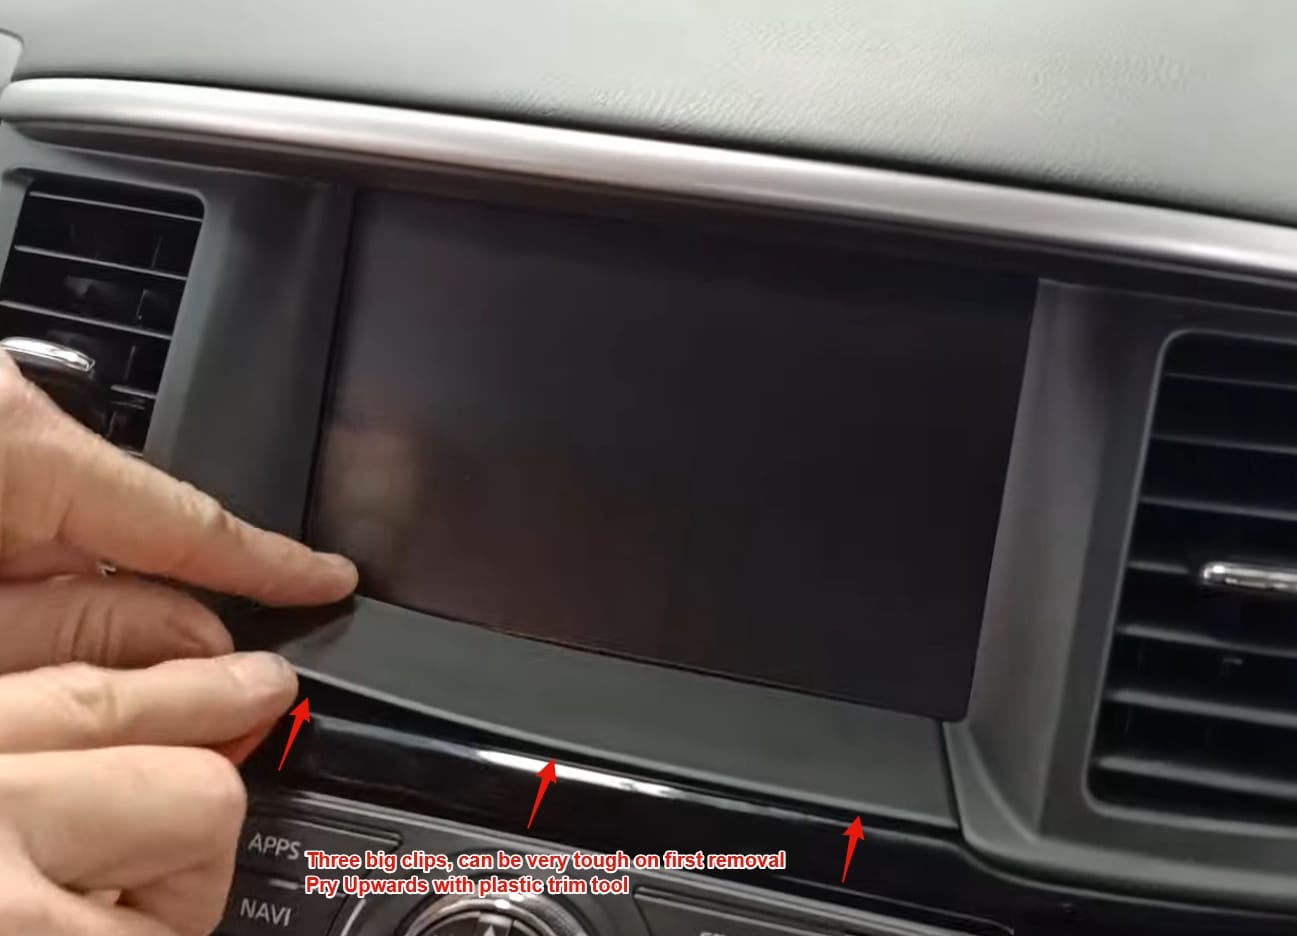
- Step 1c: Remove the infotainment control panel trim.
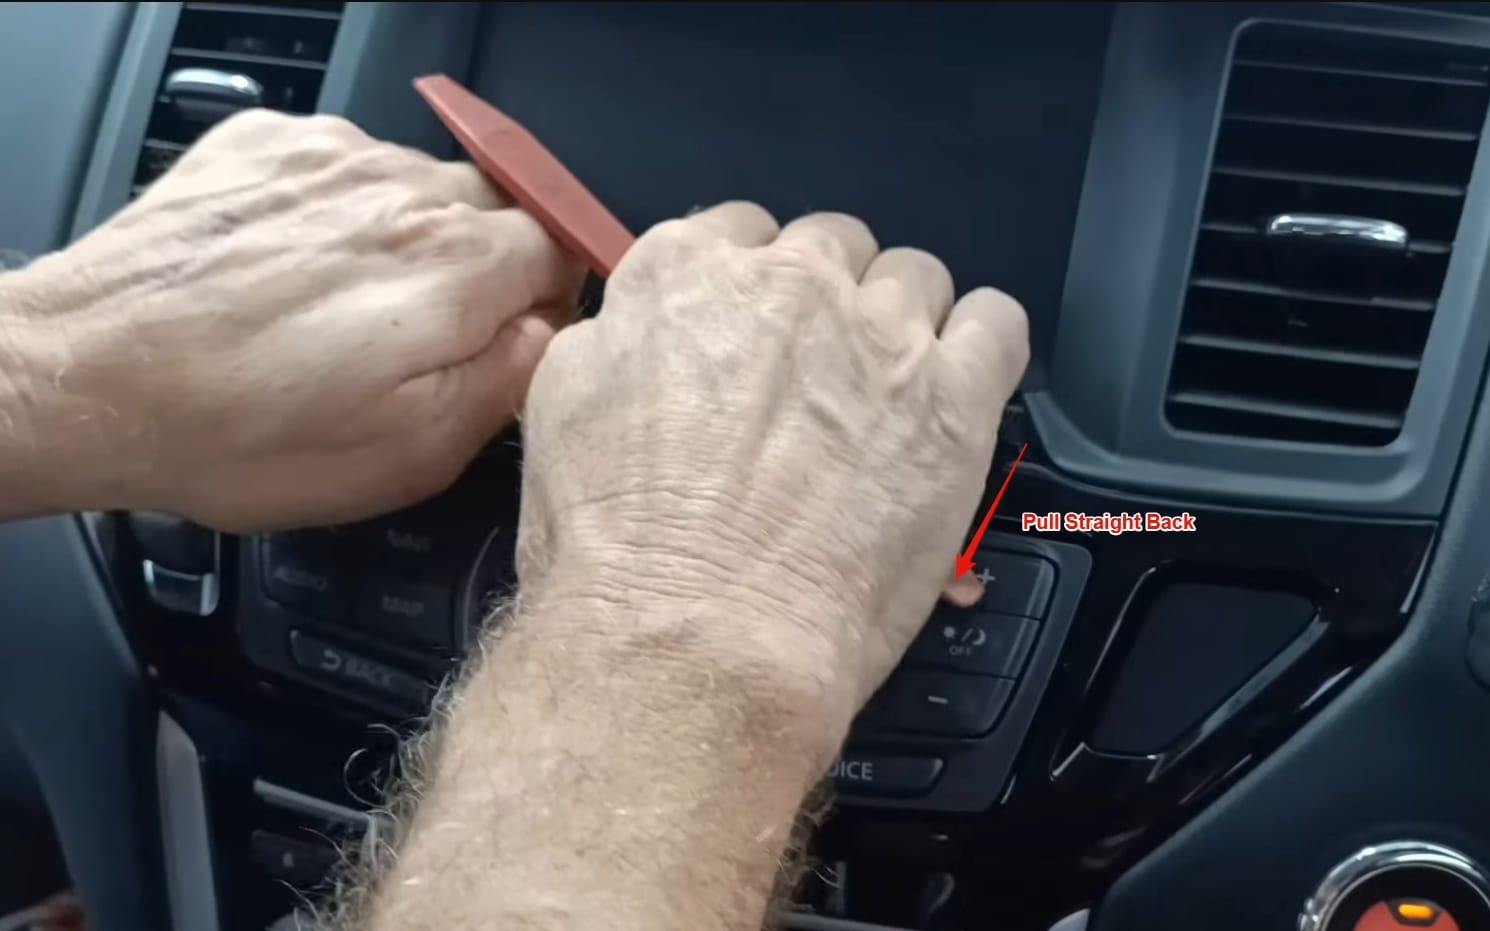
-
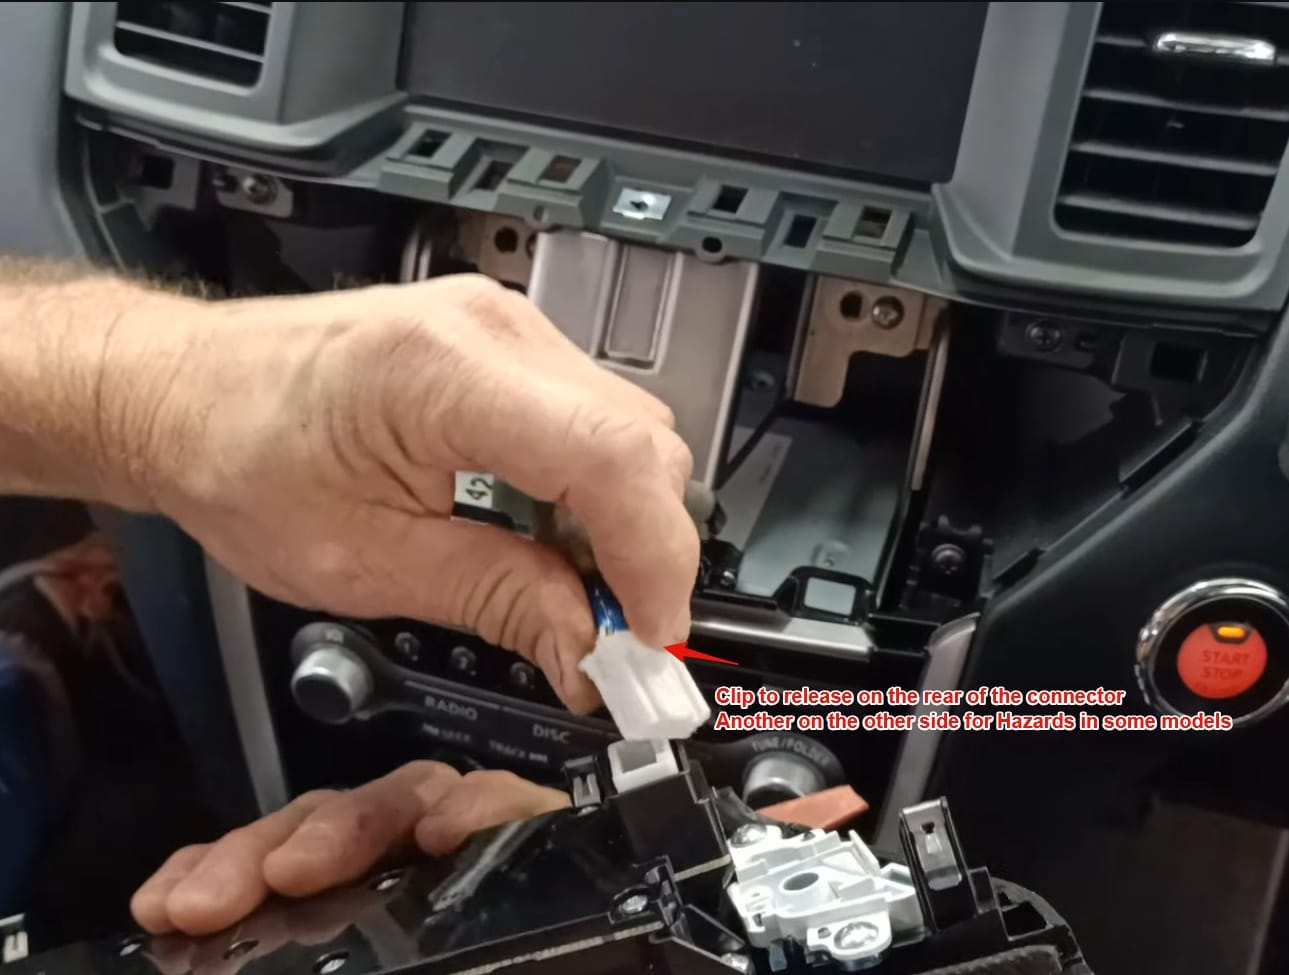
- Step 1d: Remove the clips on the back of the control panel, there may be two (one for the hazard and one for the airbag light).
-
- Step 1e: Remove the climate vents and trim. The vents come out with the trim. The top clips can be very strong.
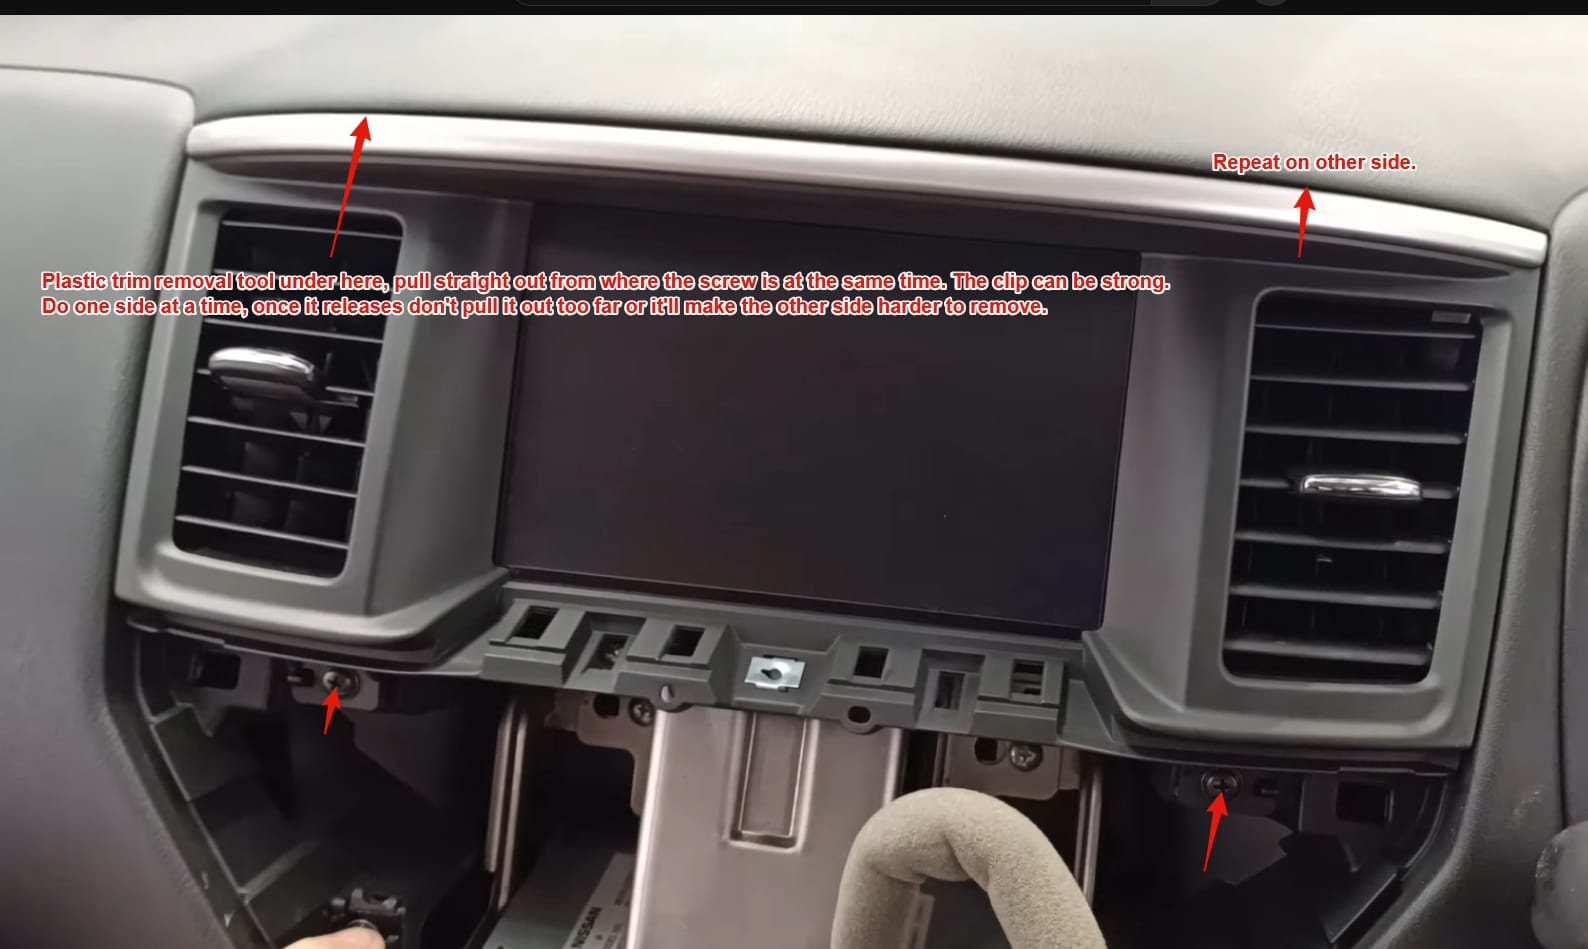
-
- Step 1f: Remove the climate control panel (part 1).
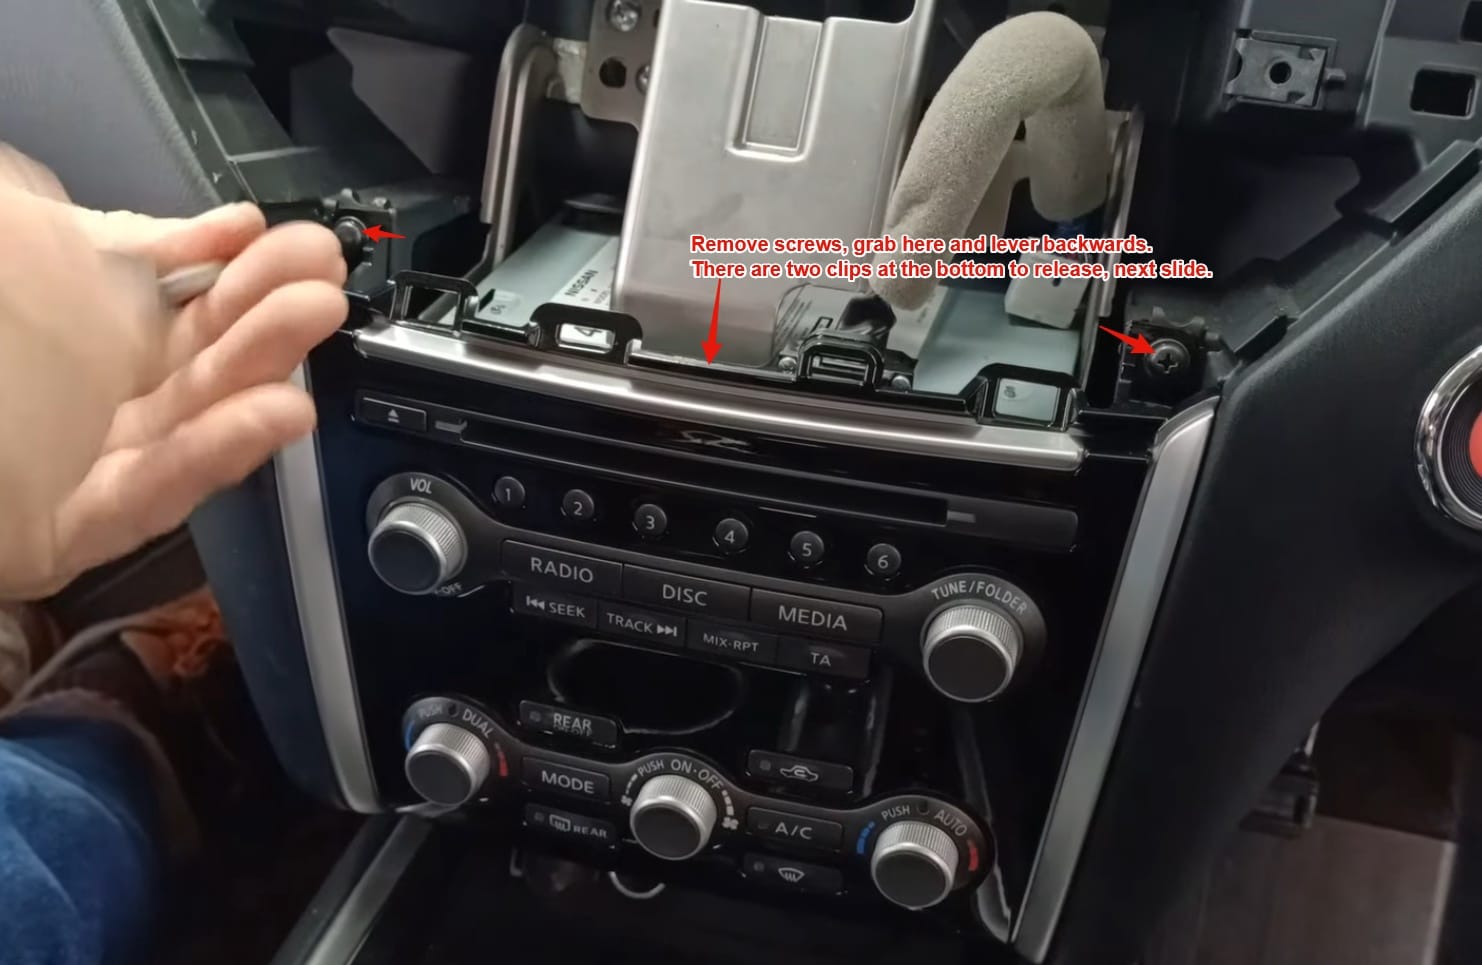
-
- Step 1g: Remove the climate control panel (part 2). You can skip this part if the clips give you trouble, it’s just nice to have it out of the way.

-
- Step 1h: Remove the support brace for the infotainment control trim, it’s in the way of removing the DCU.
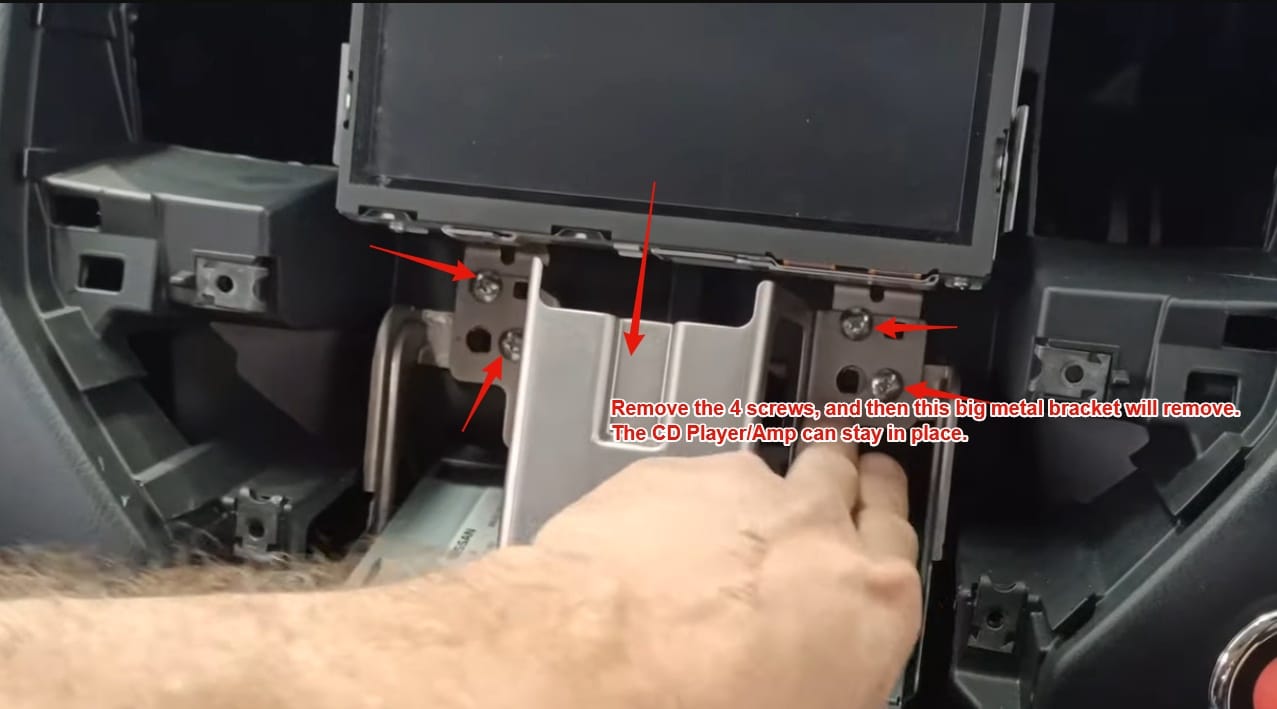
-
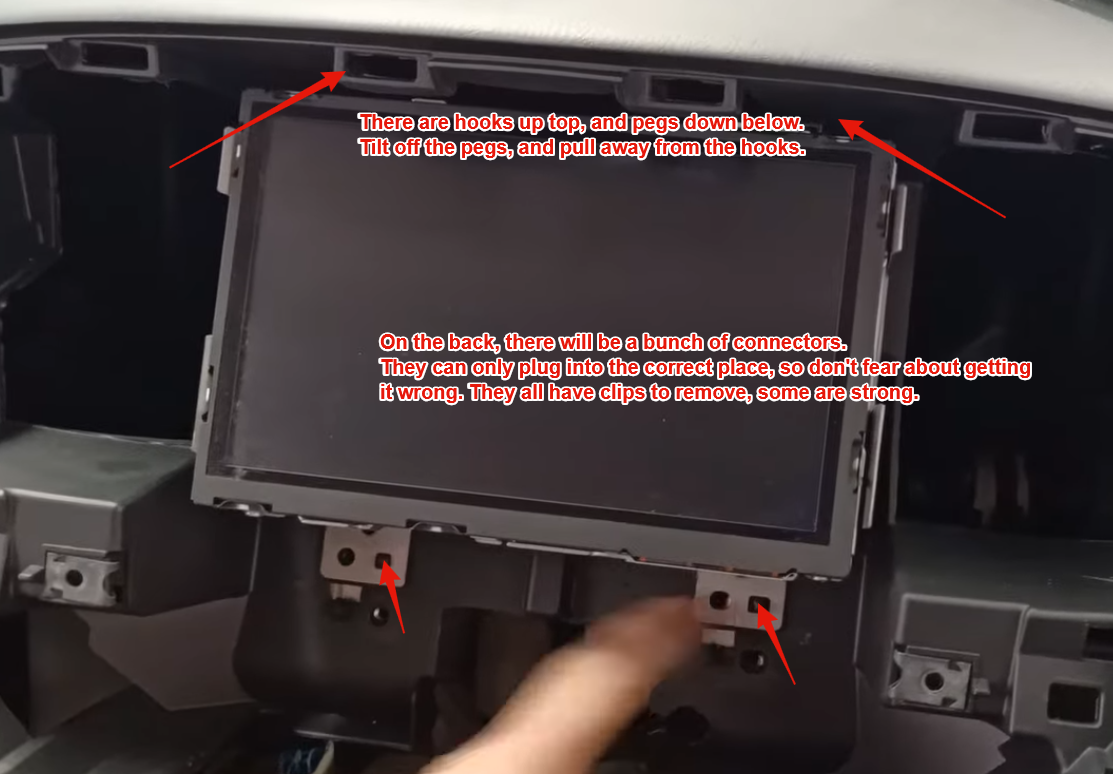
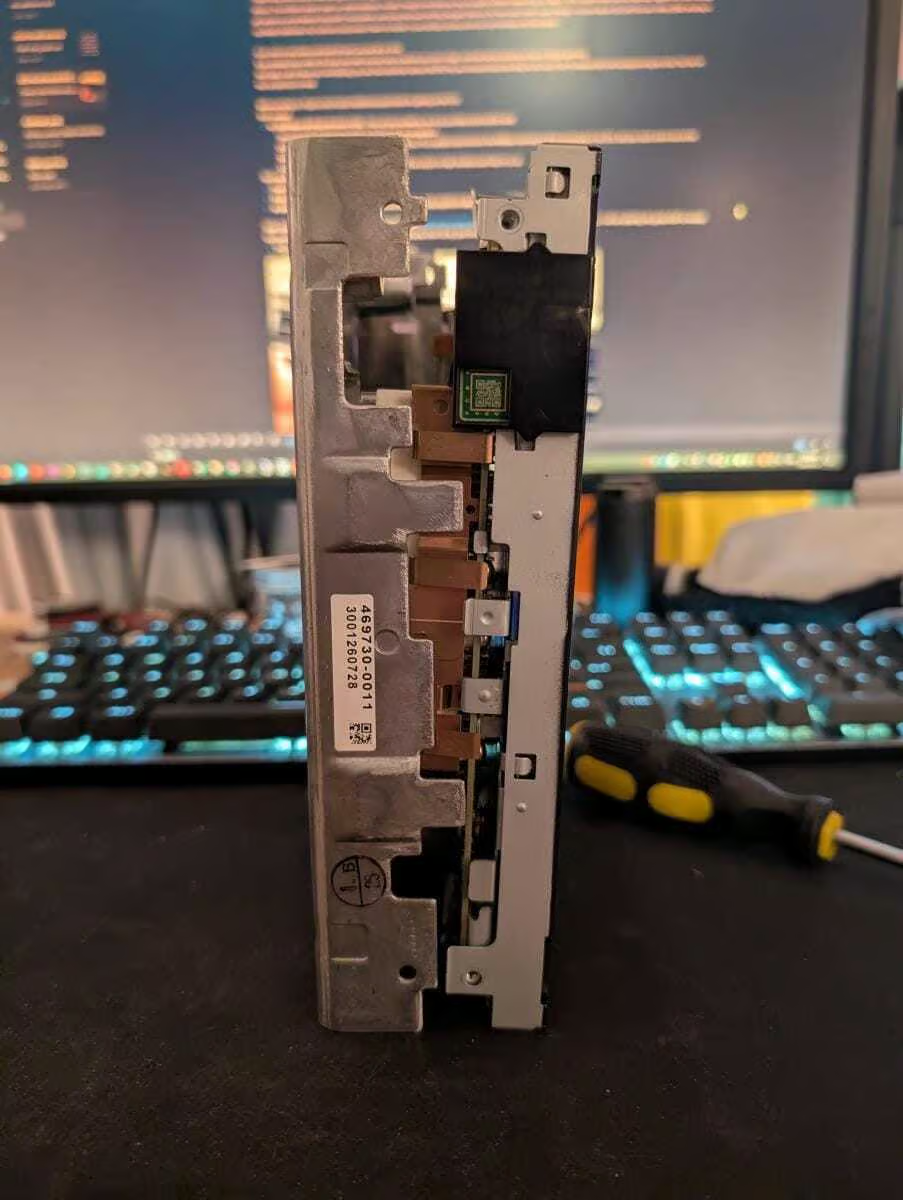
- Step 1i: Remove the DCU.
- Step 2: Disassemble the DCU and remove the Micro SD Card (Note: A video will be produced and this guide will be updated)
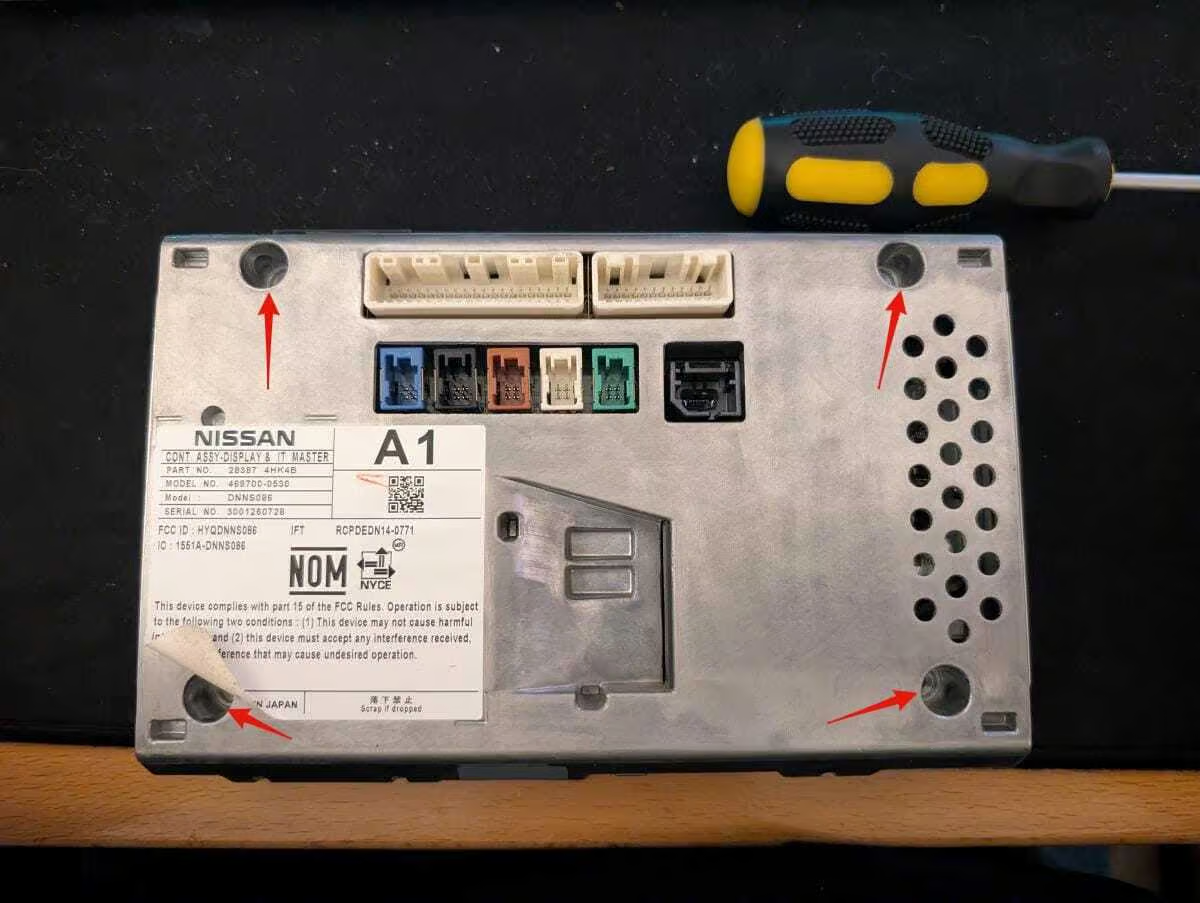
- Step 2a: Remove all screws and panels from the DCU
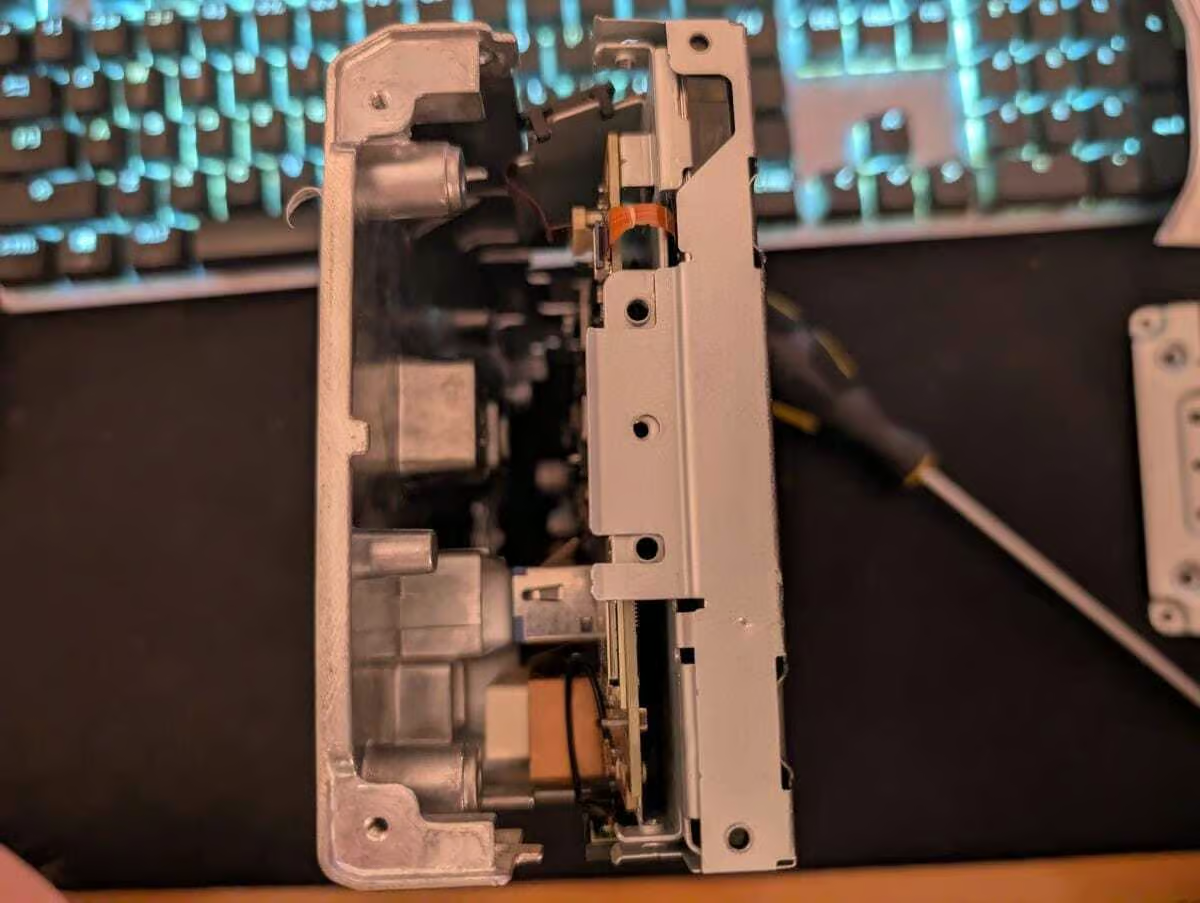
- Step 2a1: Remove the first four screws on the back of the unit, one of them is under the Denso logo on the label.
- Step 2a: Remove all screws and panels from the DCU
-
-
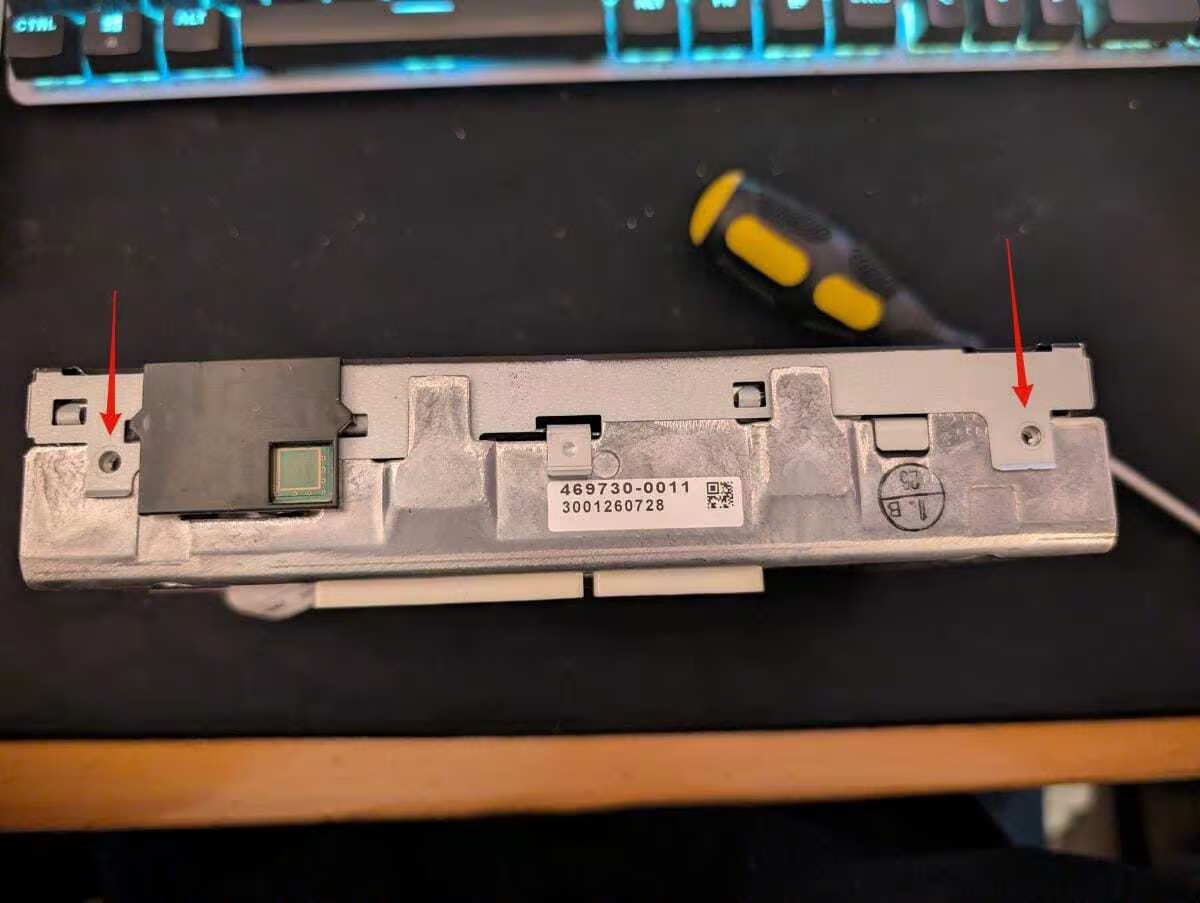
- Step 2a2: Remove the screws, and metal bracket from the first side.
-
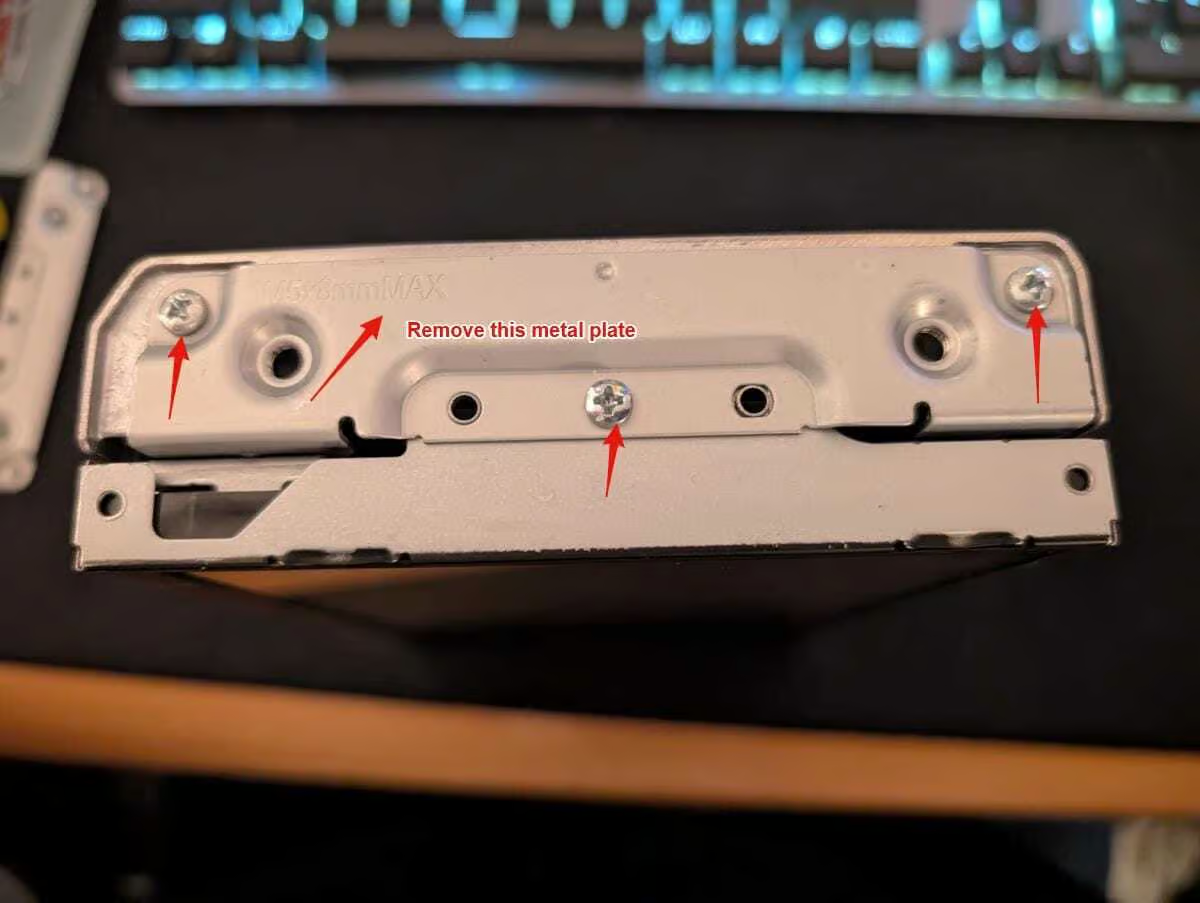
-
-
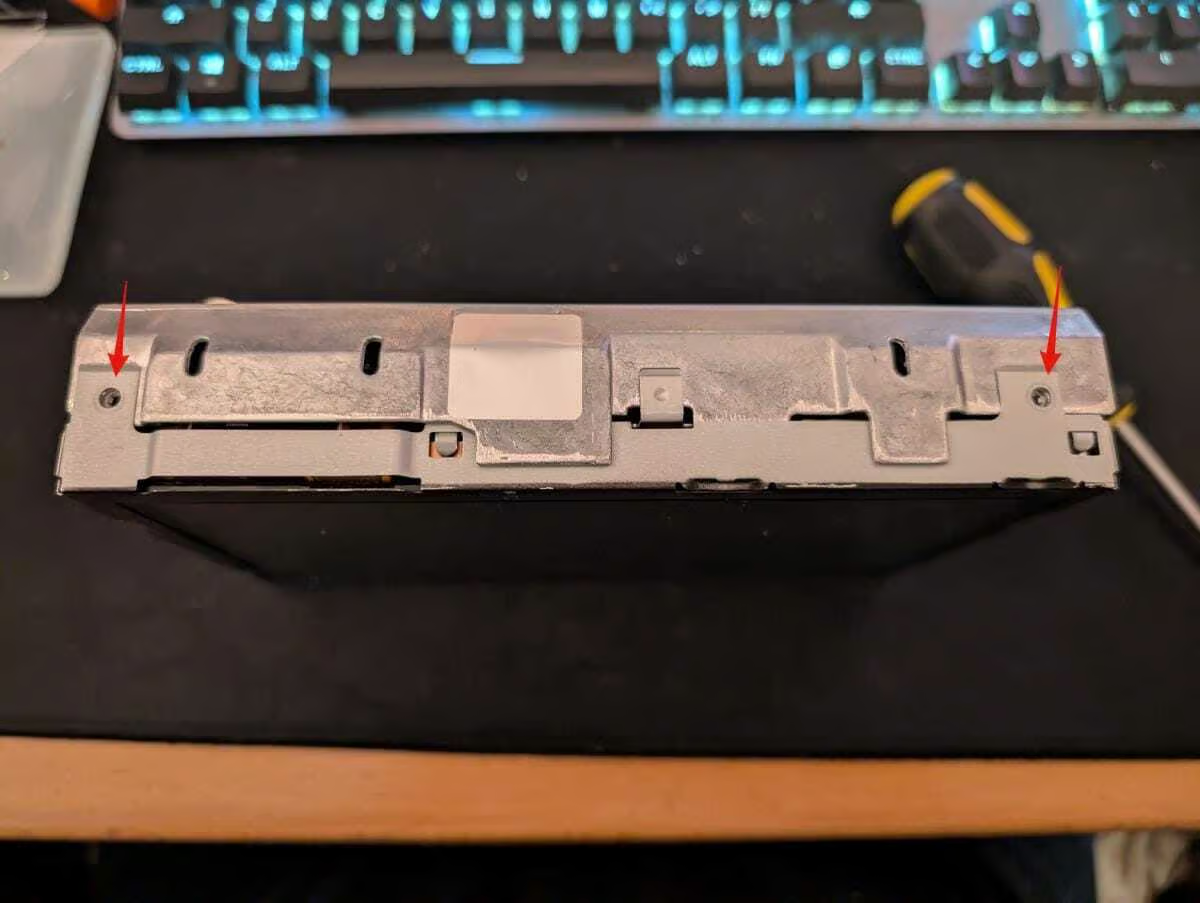
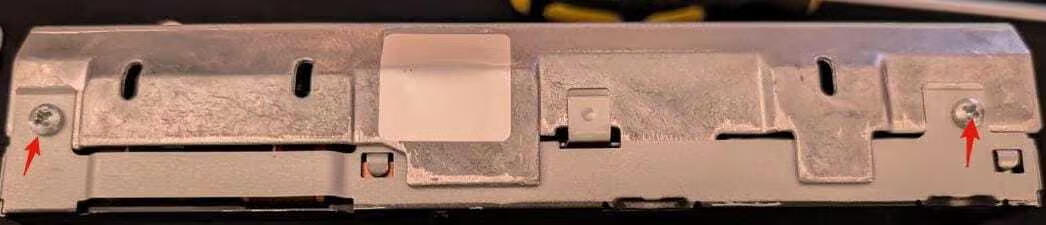
- Step 2a3: Remove the screws, and metal bracket from the second side.
-
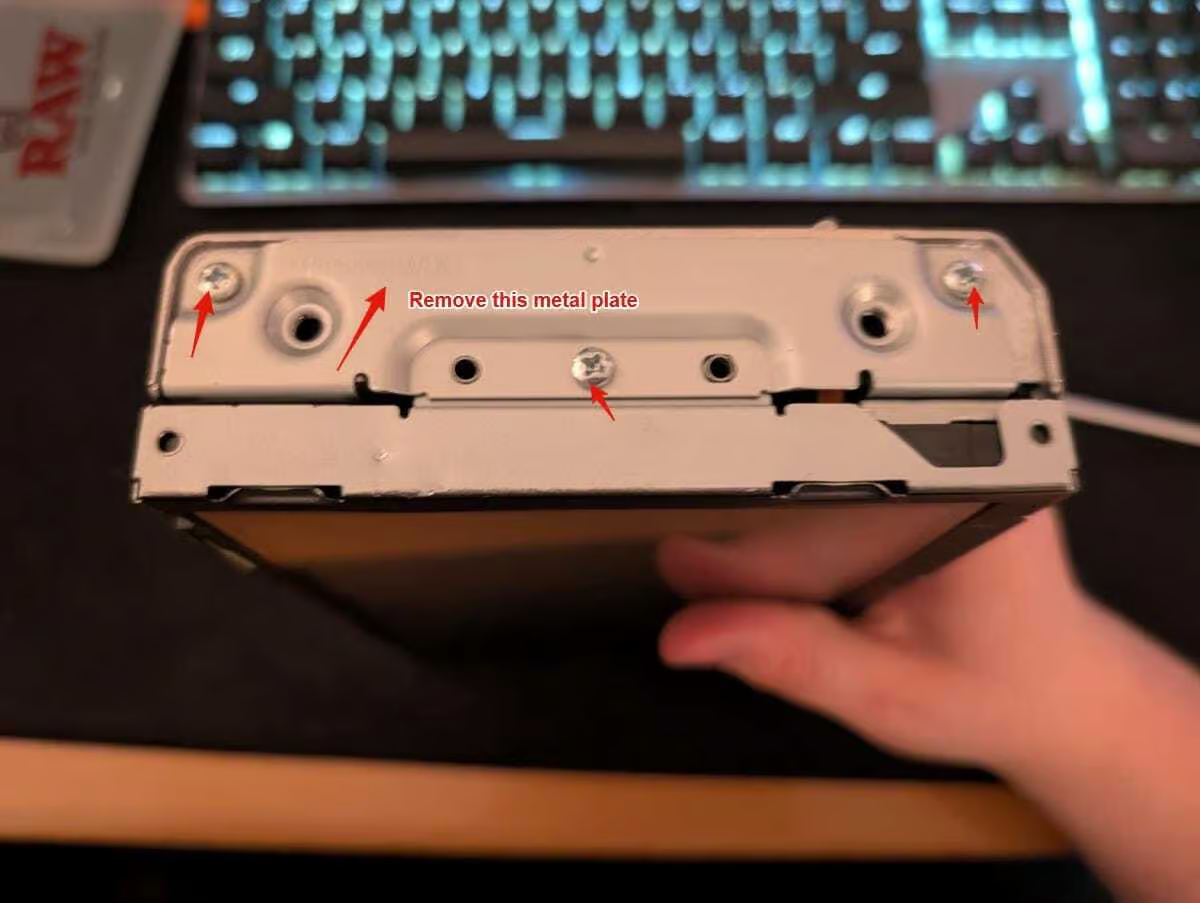
-
-
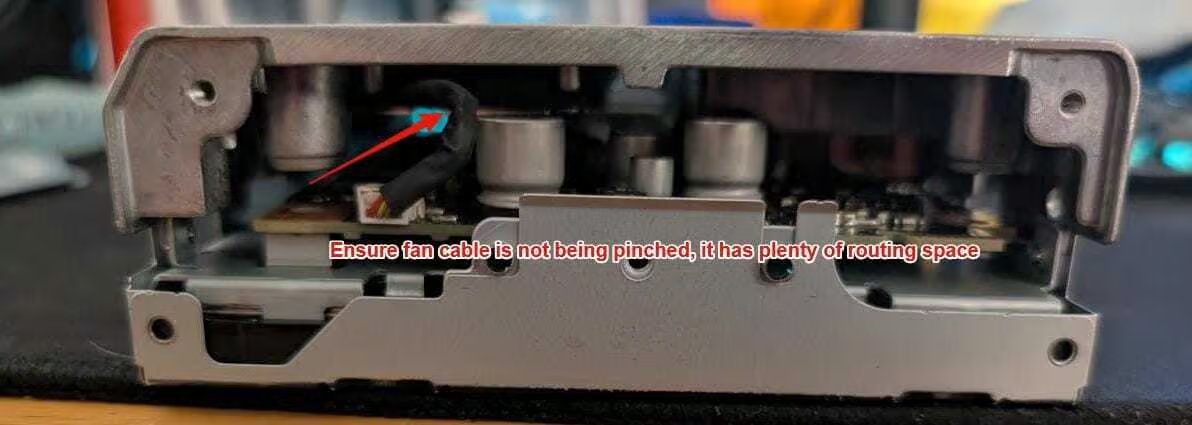
- Step 2a4: This fan cable can be left plugged in, or you can unplug it if you’re concerned about breaking it. There’s plenty of extra cable as you’ll see later.
-
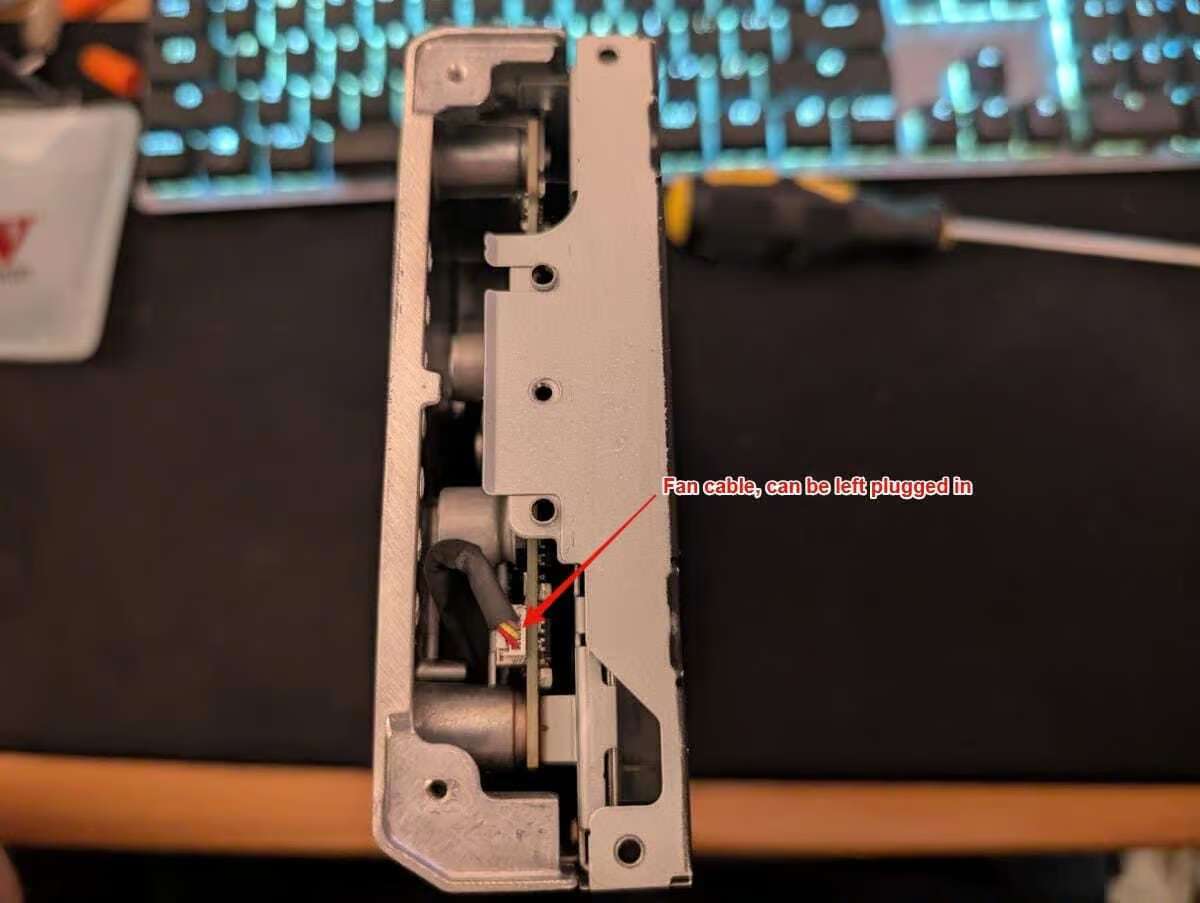
-
-
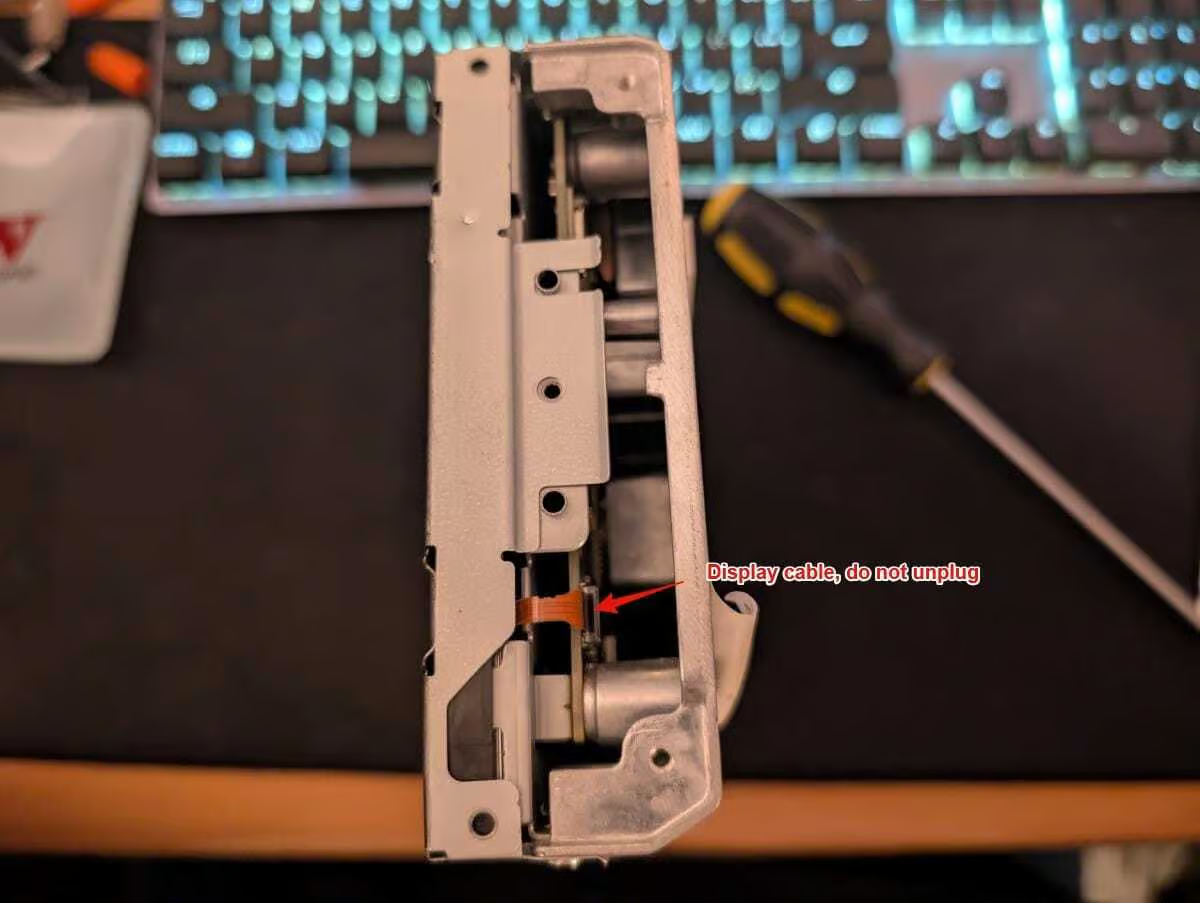
- Step 2a5: This display cable should be left plugged in, as it never moves with the top case.
-
-
-
- Step 2a6: Remove the two screws from the top.
-
-
-
- Step 2a7: Remove the two screws from the bottom.
-
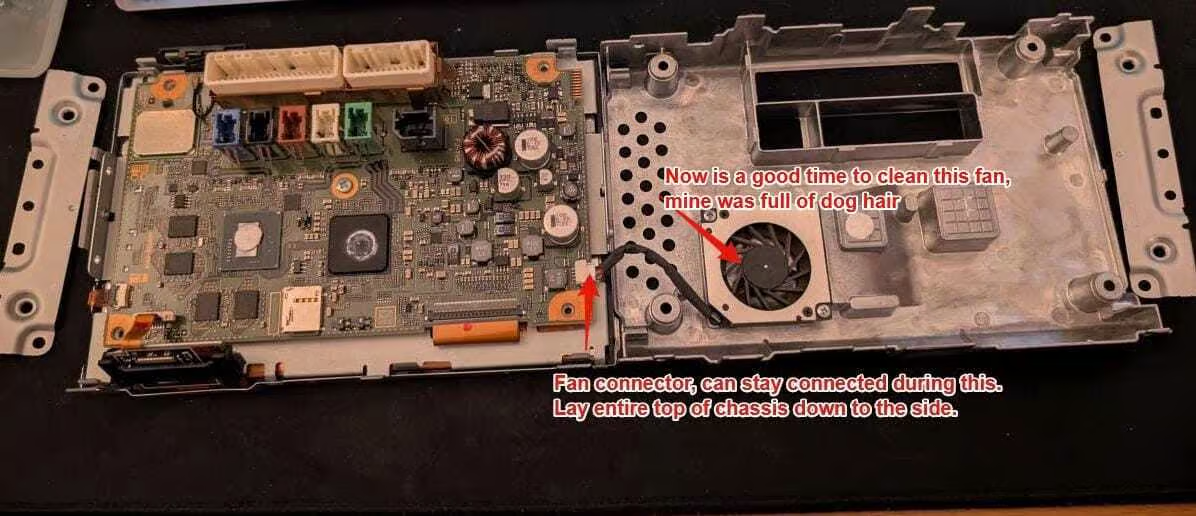
- Step 2b: Split the DCU apart and replace the SD Card
-
- Step 2b1: Stand the unit up on it’s end, and gently but firmly split the unit. Pull only straight out, and once it splits, stop pulling. You’re got extra cable slack on the fan but there’s no need to go any further than this. (You can lever one side slightly if you need to, but do not use tools)
-
-
-
- Step 2b2: A view from the side, you can see the dimples holding the halves together, they’re not large.
-
-
-
- Step 2b3: Lay the display down on something soft like a cloth or mouse pad, and the metal shell with the fan can be laid down to the side. If you’ve left the connector for the fan on, it should look like this.
-
-
-
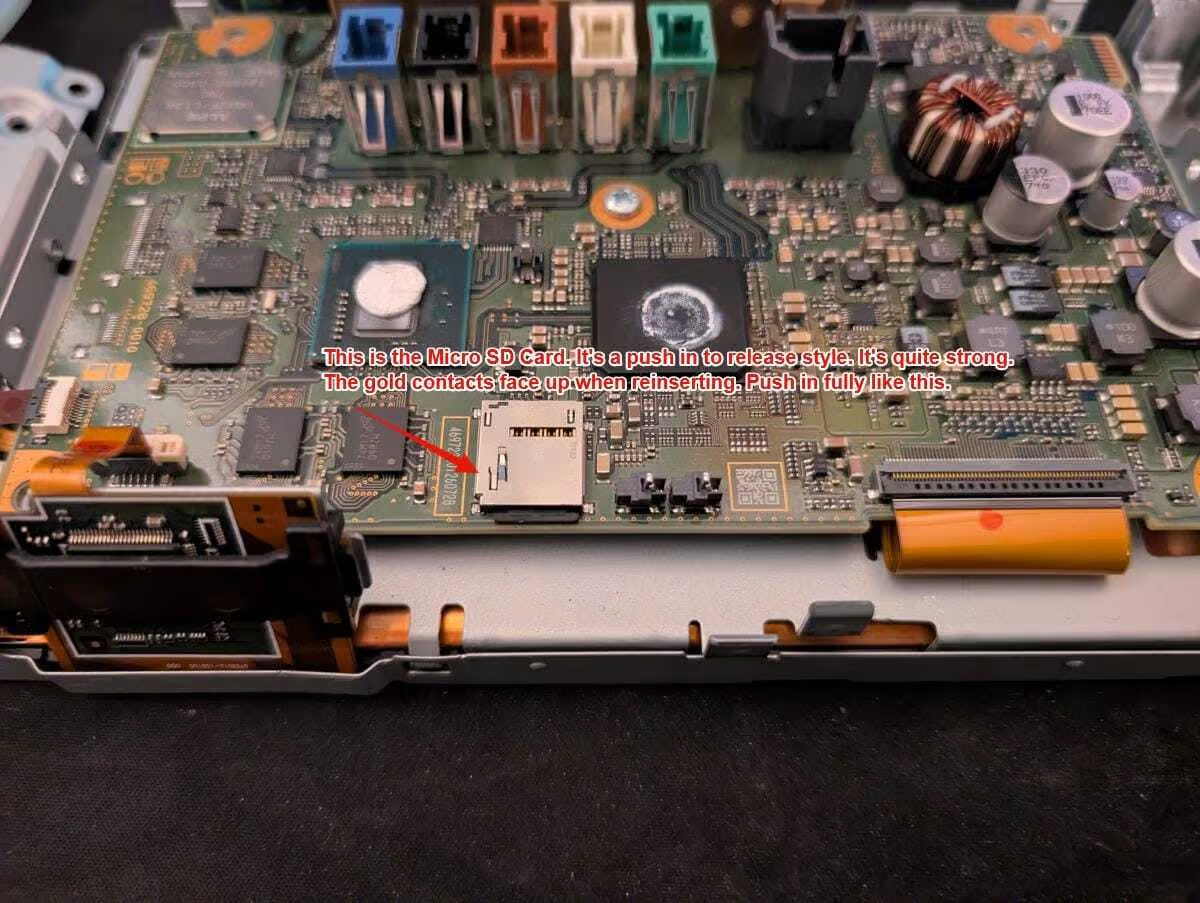
- Step 2b4: Here is the MicroSD Card you need to replace. Push the card in with your fingernail until it clicks, and then release. The card will pop out. Replace with the new card, gold contacts facing up.
-
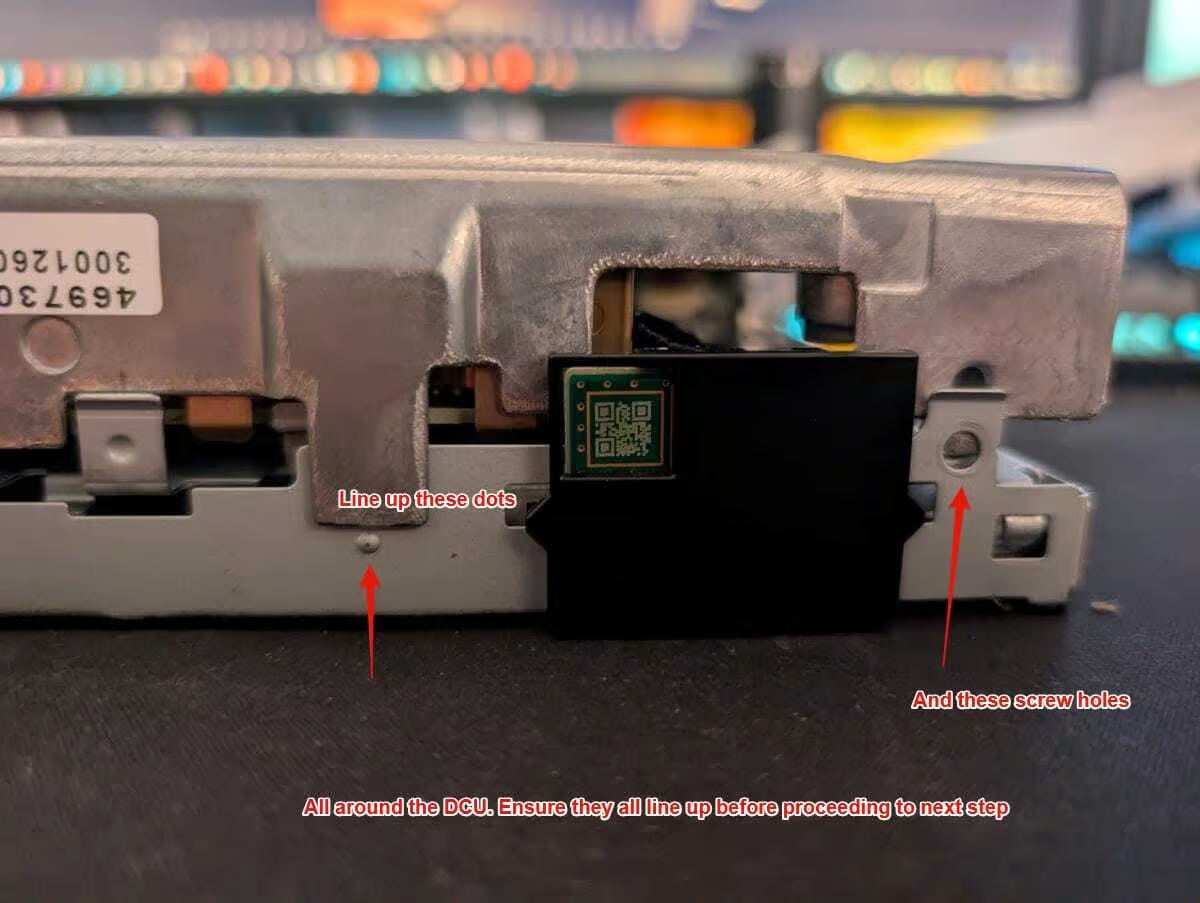
- Step 2c: Reassemble the DCU
-
- Step 2c1: Close the shell, and line up all the dots, screw holes and tabs around the device.
-
-
-
- Step 2c2: Ensure the fan cable is not being pinched.
-
-
-
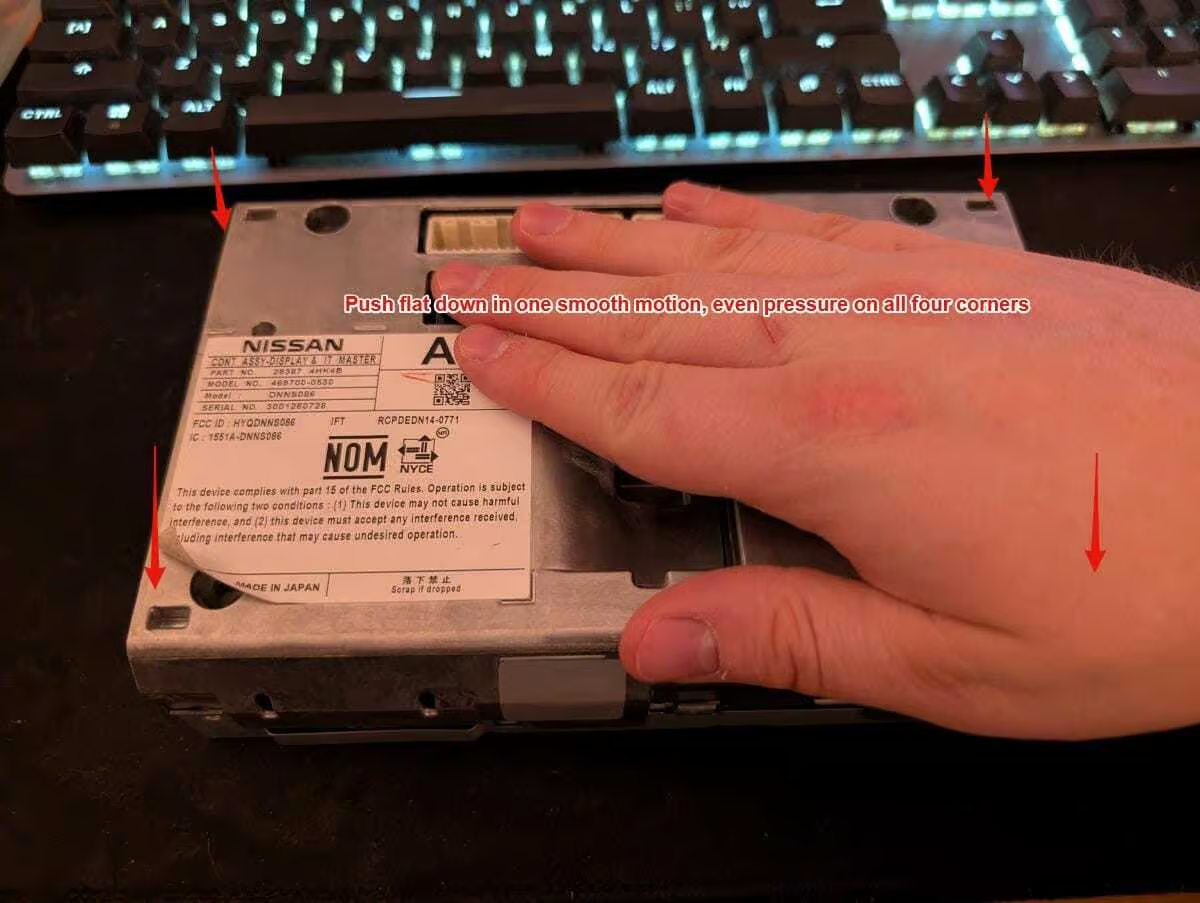
- Step 2c3: Apply even pressure on the back of the DCU, in one smooth motion. It requires some force but not enough to break anything. If it feels like you’re breaking something, stop and reassess.
-
-
-
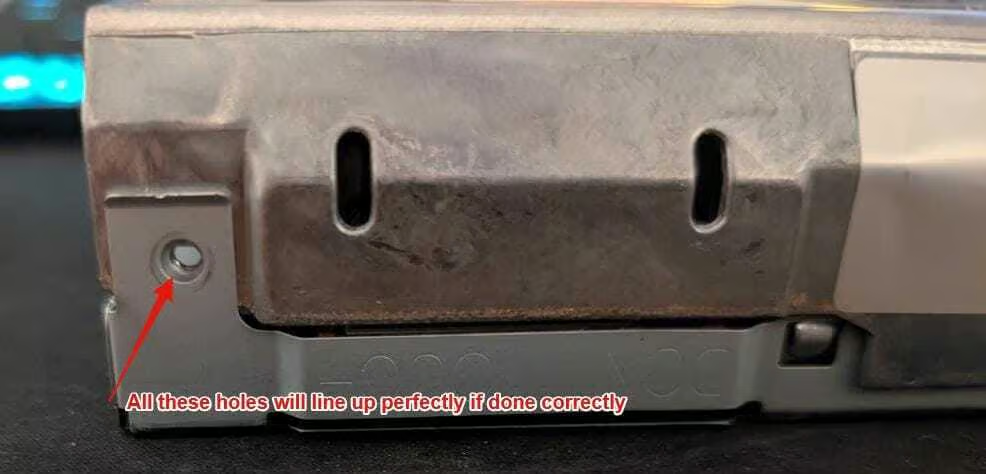
- Step 2c4: All these holes should line up perfectly for your screws to go back into.
-
-
-
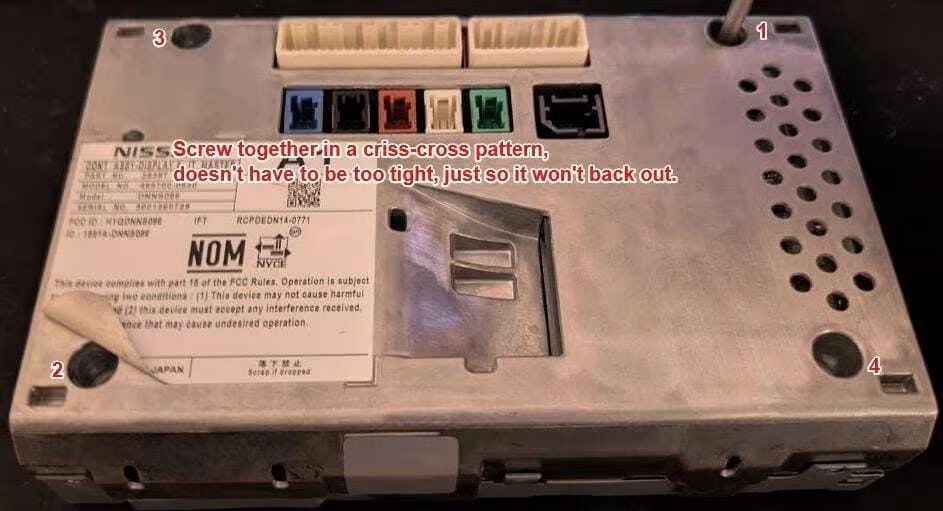
- Step 2c5: Screw the back four screws in, in a criss-cross pattern.
-
-
-
- Step 2c6: Do the top two screws.
-
-
-
- Step 2c7: An d the bottom two screws.
-

-
-
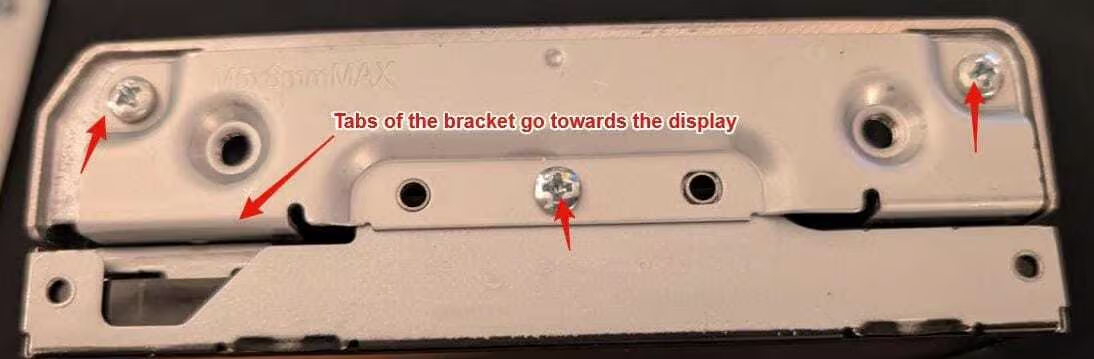
- Step 2c8: Now put one of the side brackets on, the tabs of the brackets go towards the display inwards as shown.
-
-
-
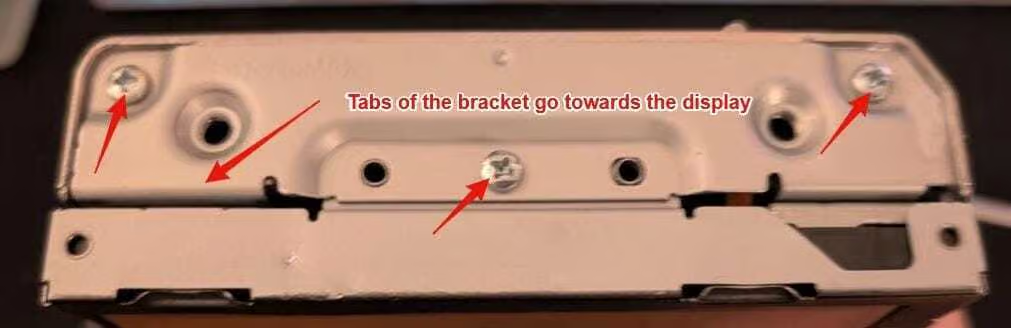
- Step 2c9: And the other side, same as before.
-
- Step 2d: Bonus– Skip all that if you’re feeling lucky.
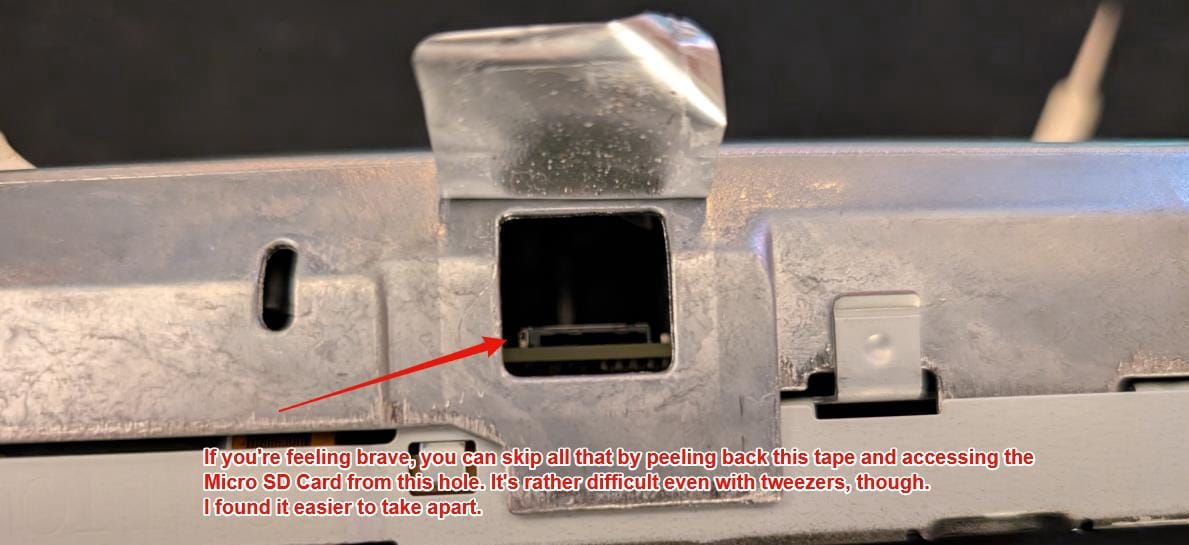
- Step 2d1: If you want to avoid disassembly, you can technically access the MicroSD card via this hole on the bottom, covered by a piece of aluminum tape.
I recommend the disassembly method as getting in here requires tweezers and you could damage something; and opening the device gives you a chance to clean the fan.
It is quite easy to open the device, and the risk of dropping the SD card and having to open it anyways (or damaging the Micro SD Card with tweezers) is high.
- Step 3: Test DCU in Vehicle
- Step 3a: Plug in all the cables for the DCU, and mount it with one screw so it doesn’t fall out.
- Step 3b: Plug in all the cables for the Infotainment control trim.
- Step 3c: Plug in all the cables for the Climate control panel.
- Step 3d: Start the car (Engine, not just battery, we want full alternator voltage), and verify the functionality of the DCU.
- Step 4: Install DCU in Vehicle (Reverse of Removal) (Note: Future versions of the guide will contain instructional images for installation)
- Step 4a: Ensure the top two hooks of the DCU are in their slots, remove the one screw from the test, install the support brace and reinstall the four screws.
- Step 4b: Clip the two clips of the Climate control panel back in, ensure the data connector is fully inserted with a click, and close the panel. Reinstall the two screws.
- Step 4c: Ensure the climate vents are fully inserted in their clips (they like to pop out sometimes, if they do fully pop out, they can be reassembled), and insert the panel straight into the slot. Ensure the clips on top fully seat before reinstalling the screws on the bottom. Some hard smacks with your palm may be required.
- Step 4d: Plug in all the connectors for the Infotainment control panel (and test it’s functionality— as well as the functionality of all the buttons on the climate stack and hazards etc) before inserting the clips at the bottom and angling it back into place (reverse of removal). Reinstall the screw.
- Step 4c: Replace the vanity cover directly under the display, the clips go straight back in.
- Step 5: ???
- Step 5a: Do a little dance because you just saved $4000 USD + labour and that was really easy. (Hint: Most of the work on your car is that easy or easier)
- Step 6: Profit
- Step 6a: Remove my old phone from the Bluetooth connection screen and add yours.
- Step 6b: Mail your local/state/provincial etc representative to let them know that you DEMAND the right to repair your things. Some guy on the internet just did something that a $1.6 Trillion dollar company didn’t do (not couldn’t, didn’t, that was a choice), and that’s tell you how to fix your car yourself and avoid more perfectly functional hardware ending up as E-Waste in the landfill. I hate that, and I think you should too; especially since they wanted to charge you so much to do it.
- Step 6c: If I got your device up and running for free or cheap, and you like what I’m doing by providing these instructions for anyone to use, buy me a pizza or two: https://www.paypal.com/paypalme/TDPEquinox
- Step 6d: If you require some additional support, reach out to me on the pathfinder forums, or join the discord. I’m happy to lend a hand with diagnostics.
- Step 7: Enjoy this picture of my Pathfinder 🙂

Guide (v0.2)